At long last I have scanned all 104 pages – plus covers – of my manual for the Singer 431G sewing machine and am thereby reminded why I’d been putting it off so long!
I hope it is useful to all who have requested it; enjoy!
(c) the blogger.
Vintage Sewing Machines, books, attachments and a few self-drafted projects thrown in too…
26 Sep 2019 10 Comments
in Manuals
At long last I have scanned all 104 pages – plus covers – of my manual for the Singer 431G sewing machine and am thereby reminded why I’d been putting it off so long!
I hope it is useful to all who have requested it; enjoy!
(c) the blogger.
22 Oct 2018 1 Comment
in Book Reviews
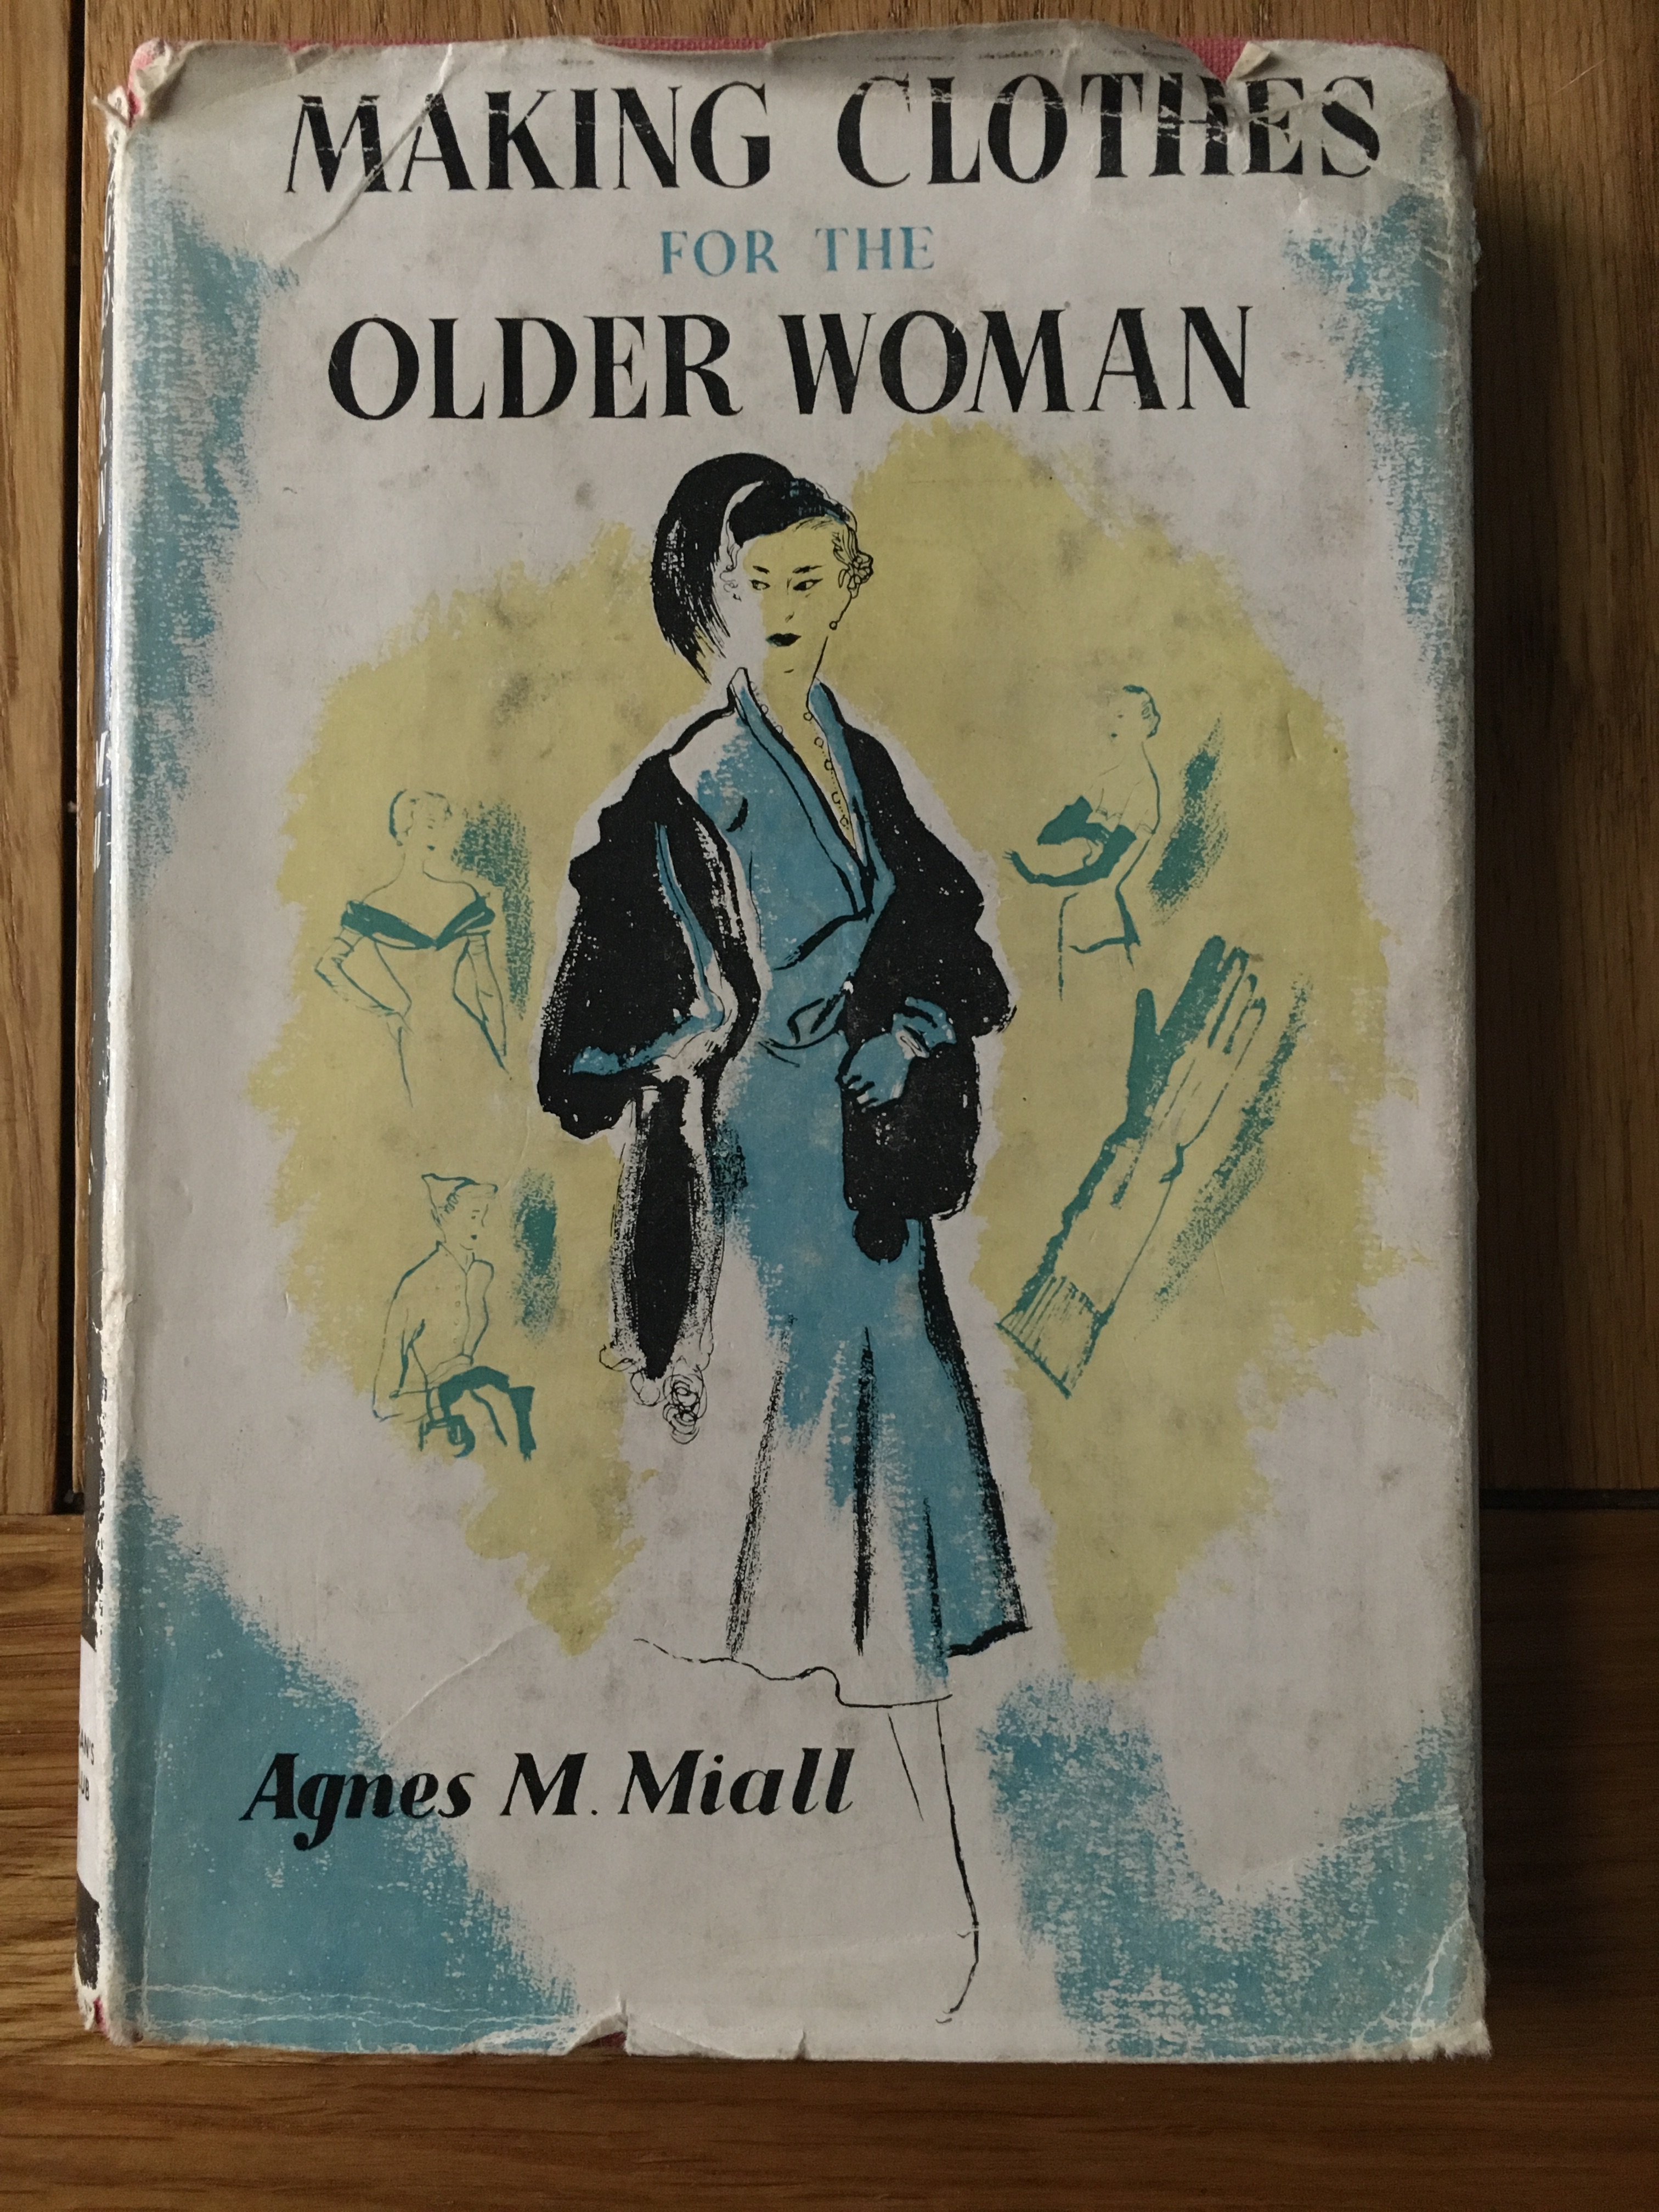
If you are familiar with sewing books of this vintage you could definitely be forgiven for wanting to skip the chapters that cover the construction and finishing techniques as you will doubtless be familiar with them already, in print if not also in practice but I would urge you to read it through regardless as like many other of the best-known authors in this field, Agnes Miall writes from long, personal experience and to skip sections is to potentially miss some useful, anecdotal nugget, doubtless won through personal error, which you may not find elsewhere.
Moving to the book’s ‘unique selling point’, it focusses on the figure faults of the more mature woman. I’m not certain that everyone (or indeed anyone) falls neatly into one of the main six figure types but that said, the advice given about style types is sensible and the guidance on fitting is good.
You won’t find any patterns here. It’s not that kind of book. It’s very much aimed at the home dressmaker who uses commercial patterns and it rightly pays a great deal of attention to the primary rule of commercial patterns which is to make the majority of alterations to the paper pattern itself, before EVER cutting it in fabric, so that alterations in the cloth will be minimized and no cloth will be wasted.
Be prepared to scream out loud when you hear what the threshold is for reaching “middle age”. Whisper it quietly and then discard this information forever. Thirty five.
Once you’ve picked yourself back up off the floor, comfort yourself with the thought that as this book was written at a time when fewer people carried extra weight before reaching that age, here in the 21stcentury it is certain that the modifications suggested here will be useful to as many below that age as above it, dealing largely as it does with accommodating extra flesh.
The six figure types are each given a name (Leonora, Penelope, Juno, Editha, Marianne and Augusta) and these names are frequently mentioned in the text, forming a neat reference to the types most likely to benefit from whichever modification is being described, e.g. “…Marianne and perhaps Editha, who are very generously built in front, may find too much room in the back…” and “”Skirts with a number of pieces or gores are more flattering to the older figure (especially to Augusta’s ample hips) than straight ones cut in only two pieces. So a golden rule for Mrs Over-Forty [yes, that threshold has shifted] to remember is that fitting will very likely need to be done on eachof the seams.”
Another useful reference point about this book is its use of numbered paragraphs for the three chapters which cover fitting. These are then listed in a ‘Fitting Ready Reckoner’ which is set out in a table of six columns, one for each type, under which is listed the numbers of the paragraphs most likely to be needed when fitting that particular type. She also suggests that the first time one uses the book, it is helpful to mark with a pencil tick each of the paragraphs found to be pertinent which is another useful hint I have not seen elsewhere.
The main chapter headings are:
I Getting Ready
II Older Figures and Styles that Suit Them
III Concerning Paper Patterns
IV Cutting Out and Marking
V Tacking Your Dress Together
VI Fitting – Shoulders and Neck
VII Fitting – Bust, Back, Hips and Waist
VIII Fitting – Armholes and Sleeves
IX Darts, Seams and Pressing
X All About Sleeves
XI The Neck of Your Dress
XII Binding and Rouleaux
XIII Plackets, Belts and Pockets
XIV The Hem and Finishing Touches
XV Blouses, Skirts and Underwear
XVI Altering Ready-Made Clothes to Fit
XVII Cutting Down and Remodelling Clothes
Index
Plates
Agnes Miall is very thorough and competent in her explanations. She explains things fully but remains focussed so it is easy to follow her guidance whilst losing track of the point she makes.
I’m not sure I’d recommend this book to anyone who has been making (and fitting) clothes since their early adulthood as even if the fitting issues begin to increase and appear in different places than formerly, most will nonetheless be familiar to those competent in recognising and addressing the source of such things. If someone is coming to dressmaking later though, or with a bit of excess weight already in place, then this will be helpful.
That said, it’s worth it for the read alone, and also for the polite euphemisms such as “sit-upon” for bottom.
Copyright of the blog owner 2018
02 Sep 2017 39 Comments
The Singer 431G has been on my wish list for quite a few years now. I patiently waited for one to come within reach and finally managed to secure one for a decent price and at a distance possible for me to collect it in person. I took a bit of a chance with it as I didn’t manage to find out what accessories and plates were included before hitting the “Buy” button but I was lucky. The only thing missing is the straight stitch plate but as I have many dedicated straight stitch machines, I don’t mind that. The general (zig zag) stitch plate will work just as well and I do of course have a LOT of options when it comes to sewing a straight stitch on fabrics that require the smaller needle hole. Of much more importance to me is that the chain stitch plate is present, which it is, together with the general plate and two cover plates and a full set of feet, cams and bobbins.

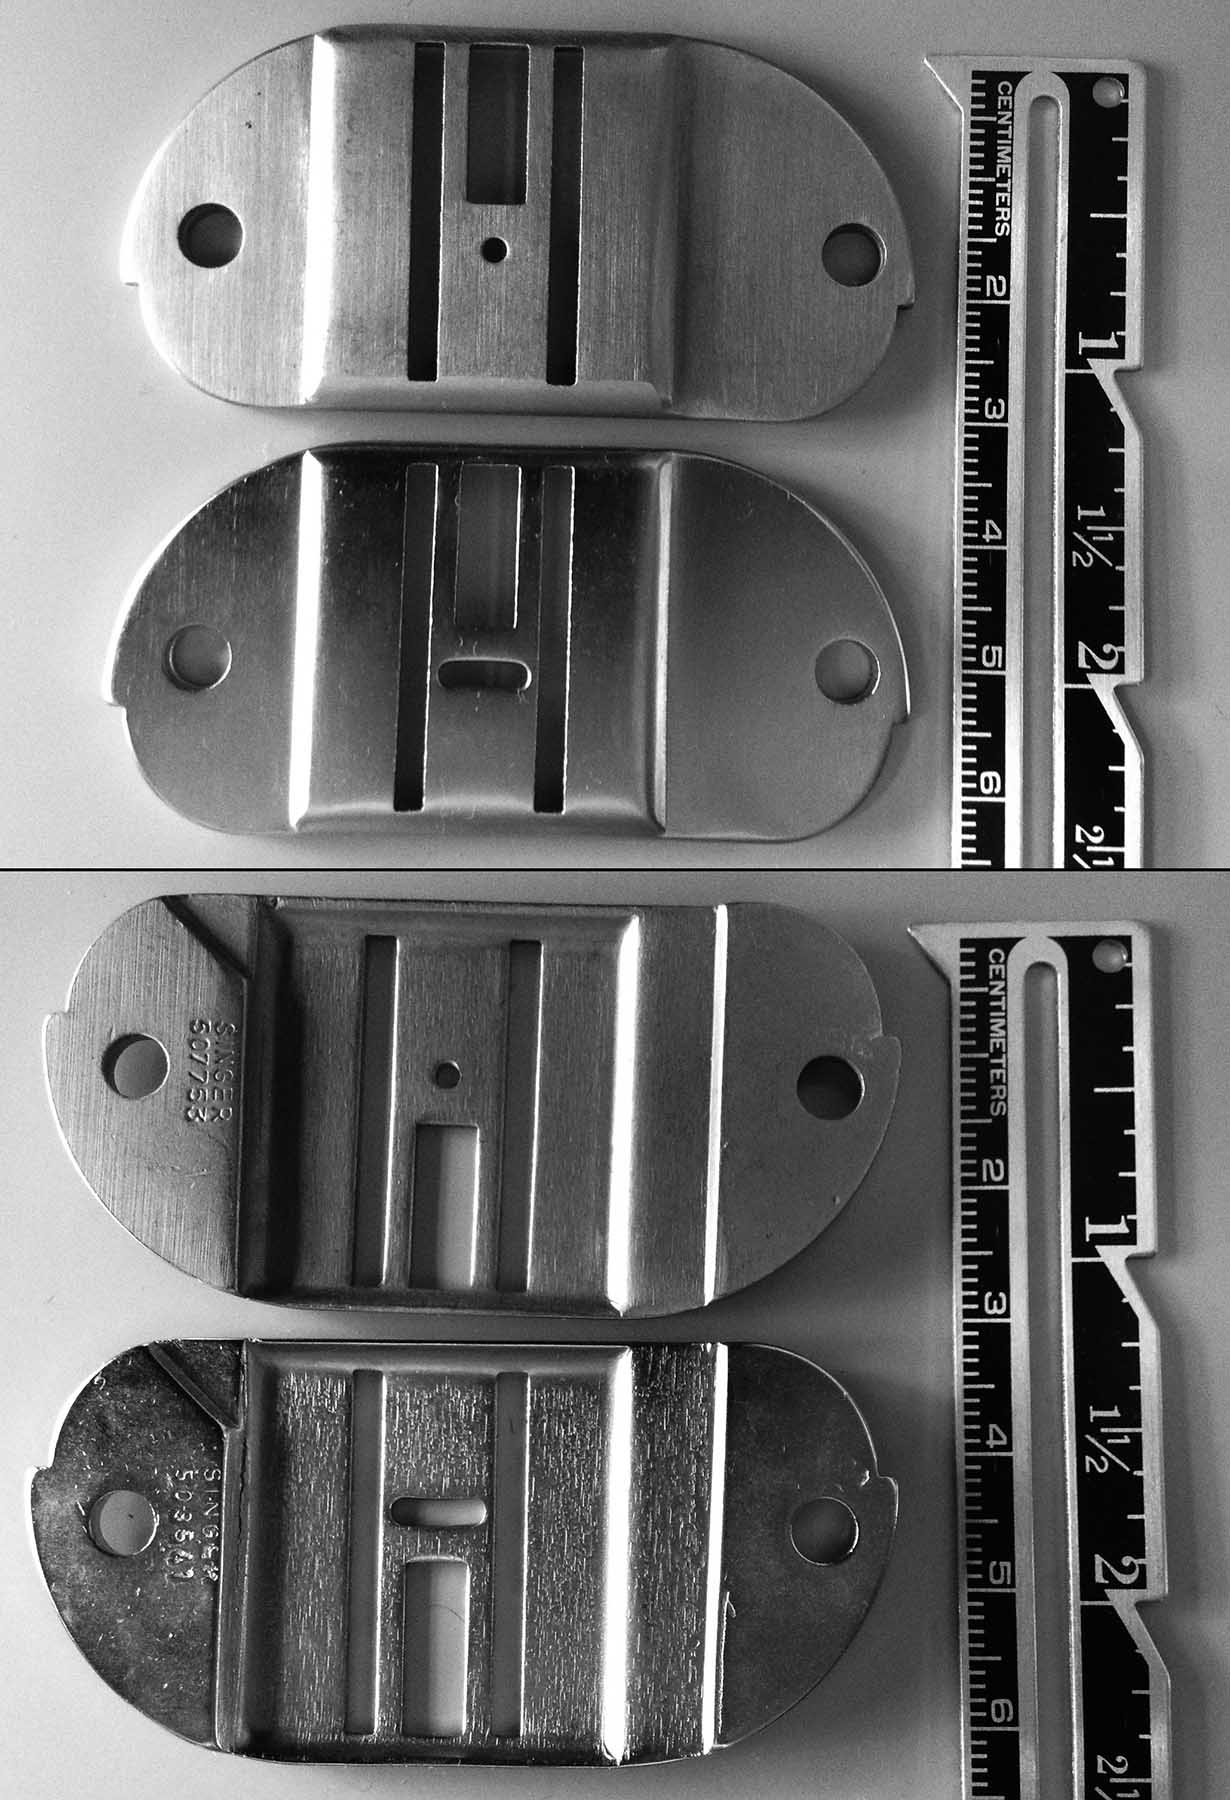
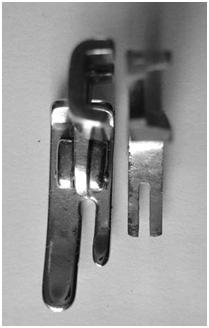
I always give new arrivals a thorough clean and service and removing the needle plate I discovered the ‘achilles heel’ of these machines: that is the fragility of the clamping pins over which the plates fit. These are a mushroom-domed pin, cut vertically down in quarters, which allows the pin to squeeze together a bit when the plate is passing over it. I managed to snap off one quarter when I was lifting the needle plate free.
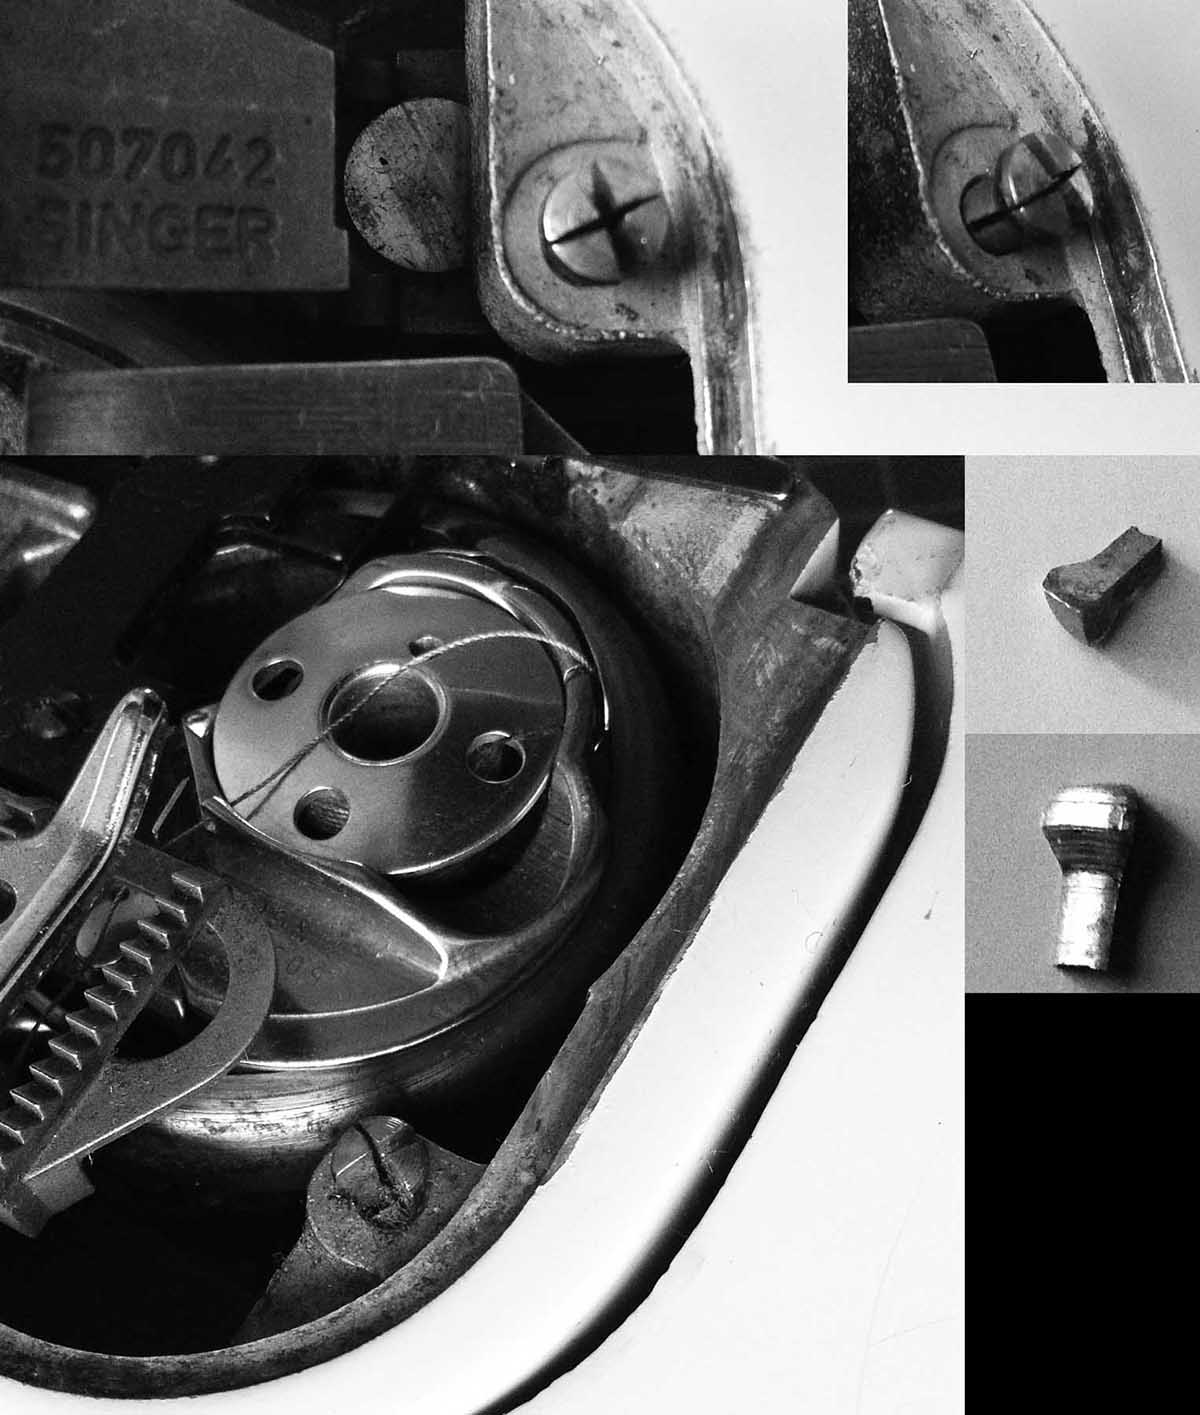
The complete, unbroken one is shown above left and right. The broken on is shown at the bottom, together with two views of the broken piece to the right of the photo.
I doubt it can easily be fixed; it is too small to drill and pin and glue would not be sufficiently resilient to the constant strain of having plates squeezed over and prised off it repeatedly. I shall just have to be careful not to dislodge any more. It seems to hold absolutely fine with three quarters of the pin and a quick Google search shows me that this is a common problem. If sufficient sections come free as to make it unusable I shall simply drill out the stumps and tap in a straight pin of correct dimensions to fit the holes in the needle plate or else tap in a threaded insert and use some ordinary needle plate screws.
Researching this machine before bidding, I found very little. I’m not particularly surprised by this as what I did find out was that they had a very limited production run in the early 1960s. I can’t find a serial number on her at all…I’ll continue to look but I’ve searched all the usual places.
Those of you who are familiar with my machine reviews will know how much importance I place on facts and figures so here follows some definitive data about the serial numbers of the accessories and plates which came with my machine. I can’t guarantee that all of them are original but the plates all fit and so do the feet.
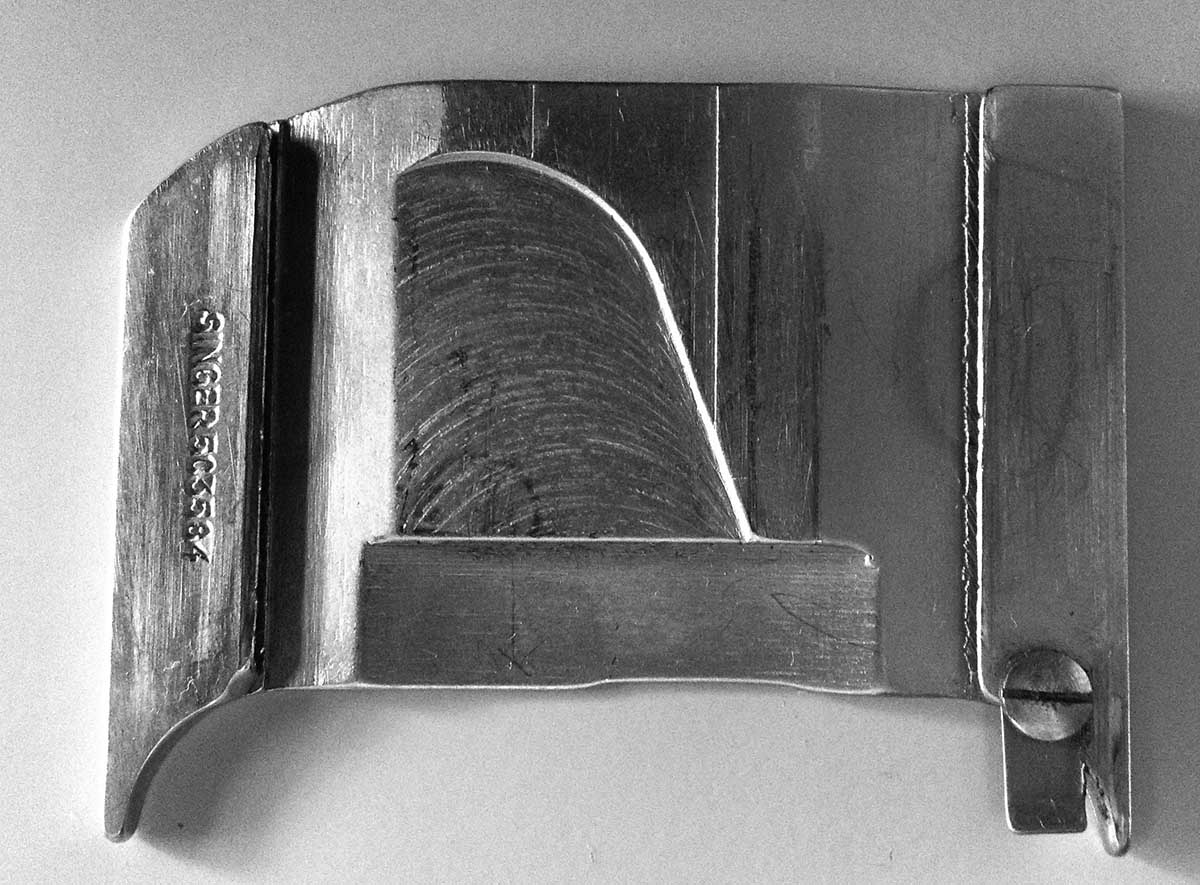
This is a composite photo of the chainstitch plate. Its serial number is 503601. I show it from three different angles – side, top and bottom, with the bottom photographed twice to show the range of motion in the swivelling piece that forms the chain stitch.

This photo shows the chainstitch. It is beautifully formed and not difficult to do.

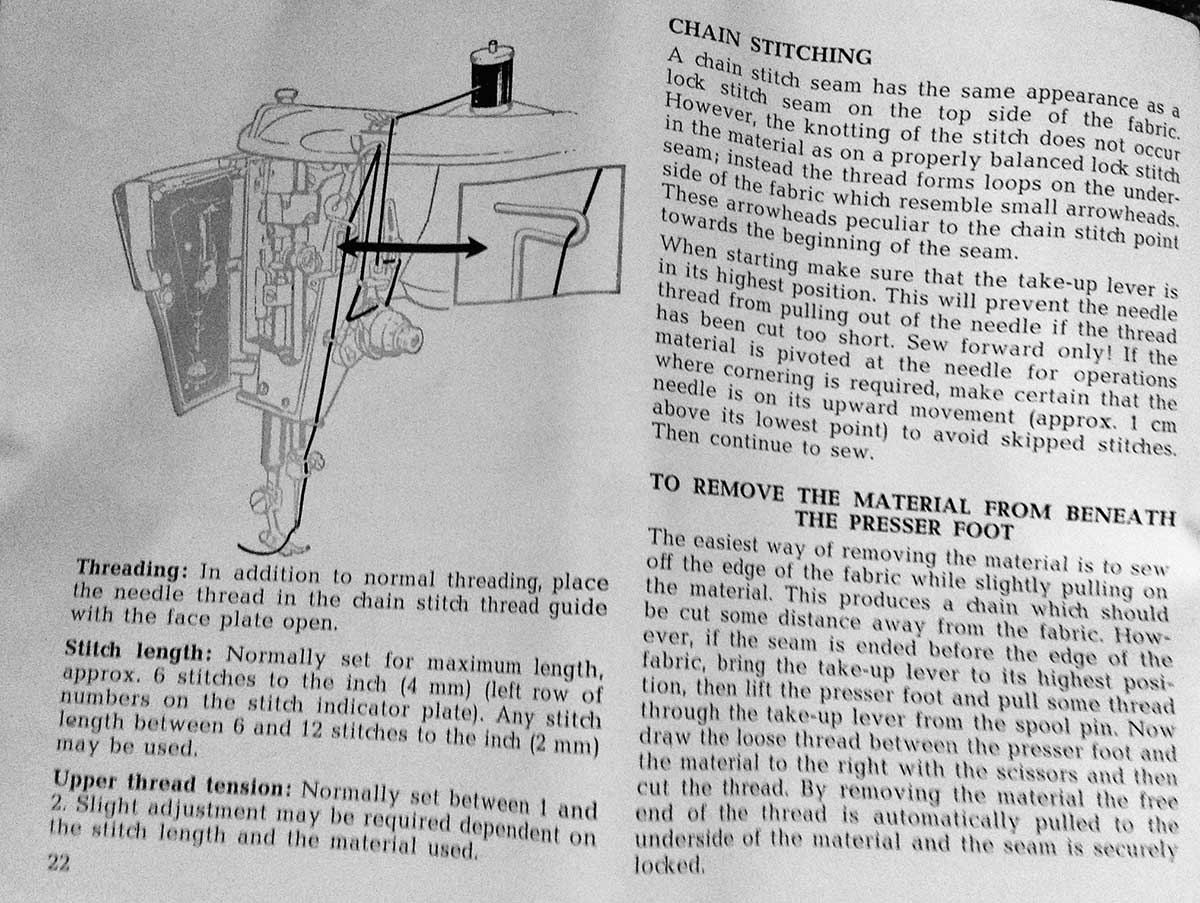
The bobbin is removed and the upper thread passed through the extra tension hook that is immediately left of the takeup lever.

I loosened the tension and used a stitch length of around 8 stitches per inch. Using a longer stitch length increased the likelihood of dropped stitches, as did a hesitation in pace whilst sewing.
The thread I used was just a cheap polyester but I was nevertheless impressed with the results and look forward to experimenting further with this as it was indeed the primary reason I wanted this machine.
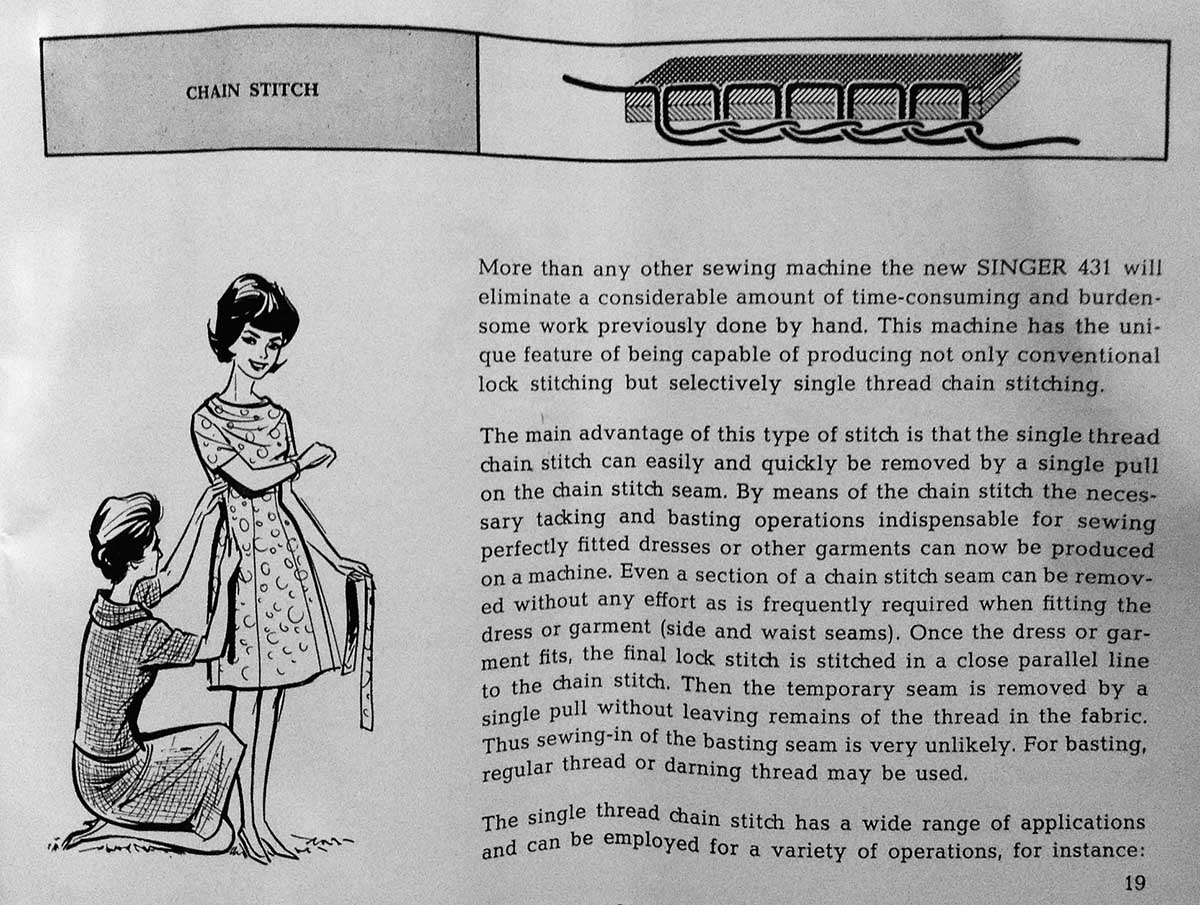
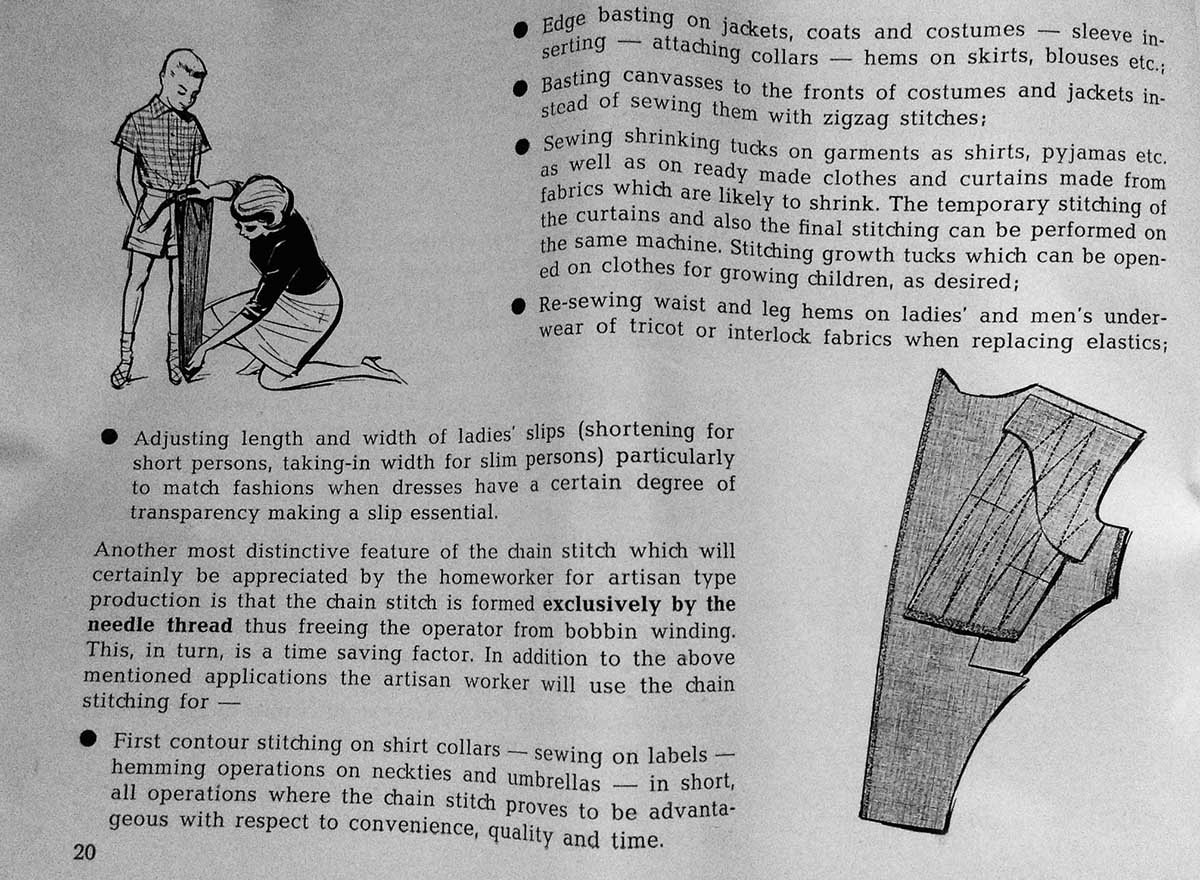
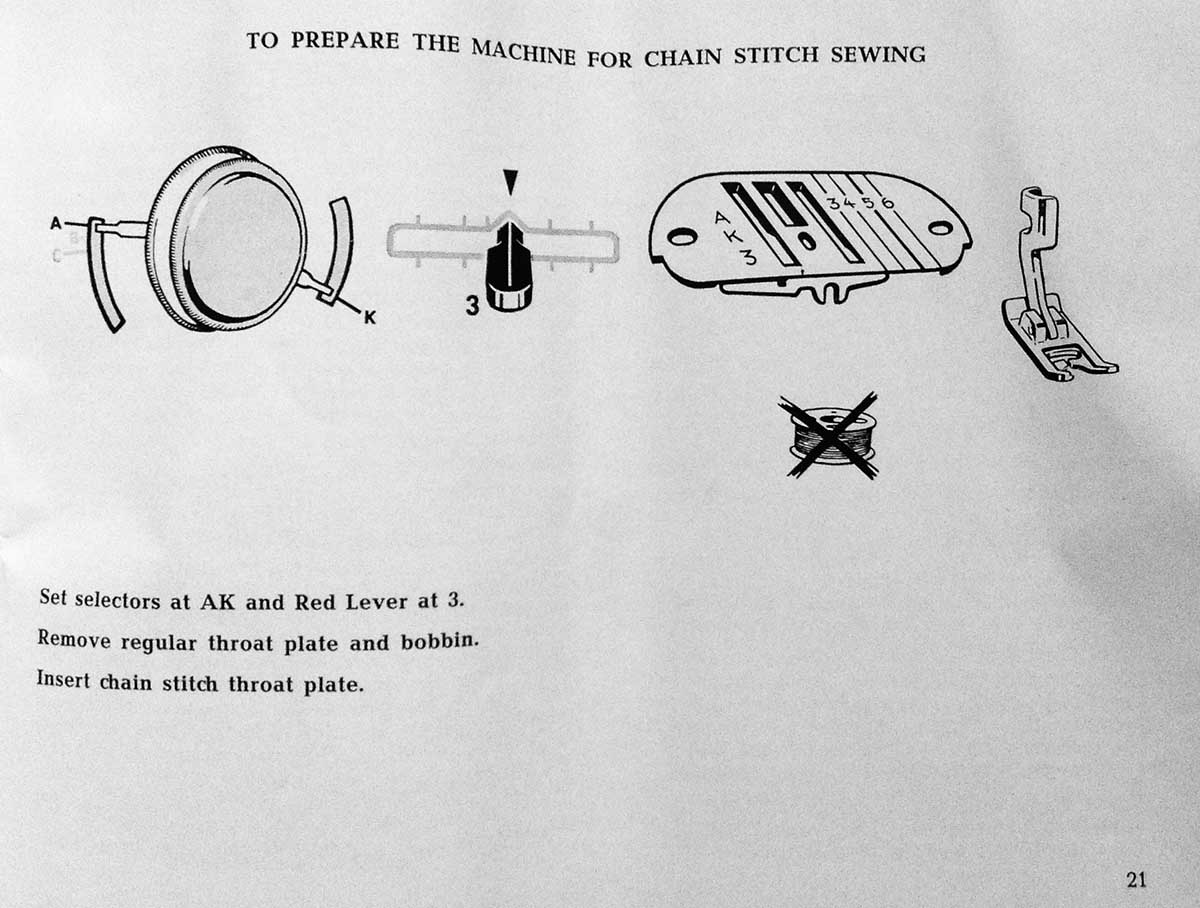
I will scan and publish a full version of the manual when time permits but in the meantime, here follow the pages relating to the chainstitching:

The top hat cams are the old style ones with two apertures in the brim. I am indebted to Barbara at Oldsewingear for her excellent blog post explaining the differences here: http://www.oldsewingear.com/blog/which-disc-is-which. I can confirm her advice that the 431 takes the ones she describes as Type 1.

These cams supplement the primary stitch patterns which are built into the existing, metal cam stack which sits below the area where the plastic cams may be fitted. The patterns are shown under the lid but further fine-tuning may be done using the stitch length too.
The manual advises to use the ‘Special Purpose Foot’ for these stitches as the raised area below the foot allows room for the depth of the satin stitches.
I do not presently have a straight stitch needle plate. I believe that its serial number may be 503582 but have no way of checking this. If any of you have one and can check it, please let me know.
I must draw attention to the fact that the lettering “AK3” appears on the top of the chainstitch plate as well as the straight stitch one so if you are seeking one or the other, do check that you are buying the correct one. The best and easiest way to tell them apart is that the chainstitch plate has a slightly oval needle hole and more notably a pivoting bar underneath that helps form the chainstitch.
Another common confusion that has come forwards in my research is the subject of replacement needle plates and whether the superficially similar T&S plates are compatible.
Instinct is telling me that I can see enough differences to make it unlikely that the T&S ones could be substituted but I can’t say for certain unless one came into my possession so that I could try it. Helen Howes (my favourite UK supplier) has several on her webpage and I can spot four main differences straight away, some obvious and others less so.
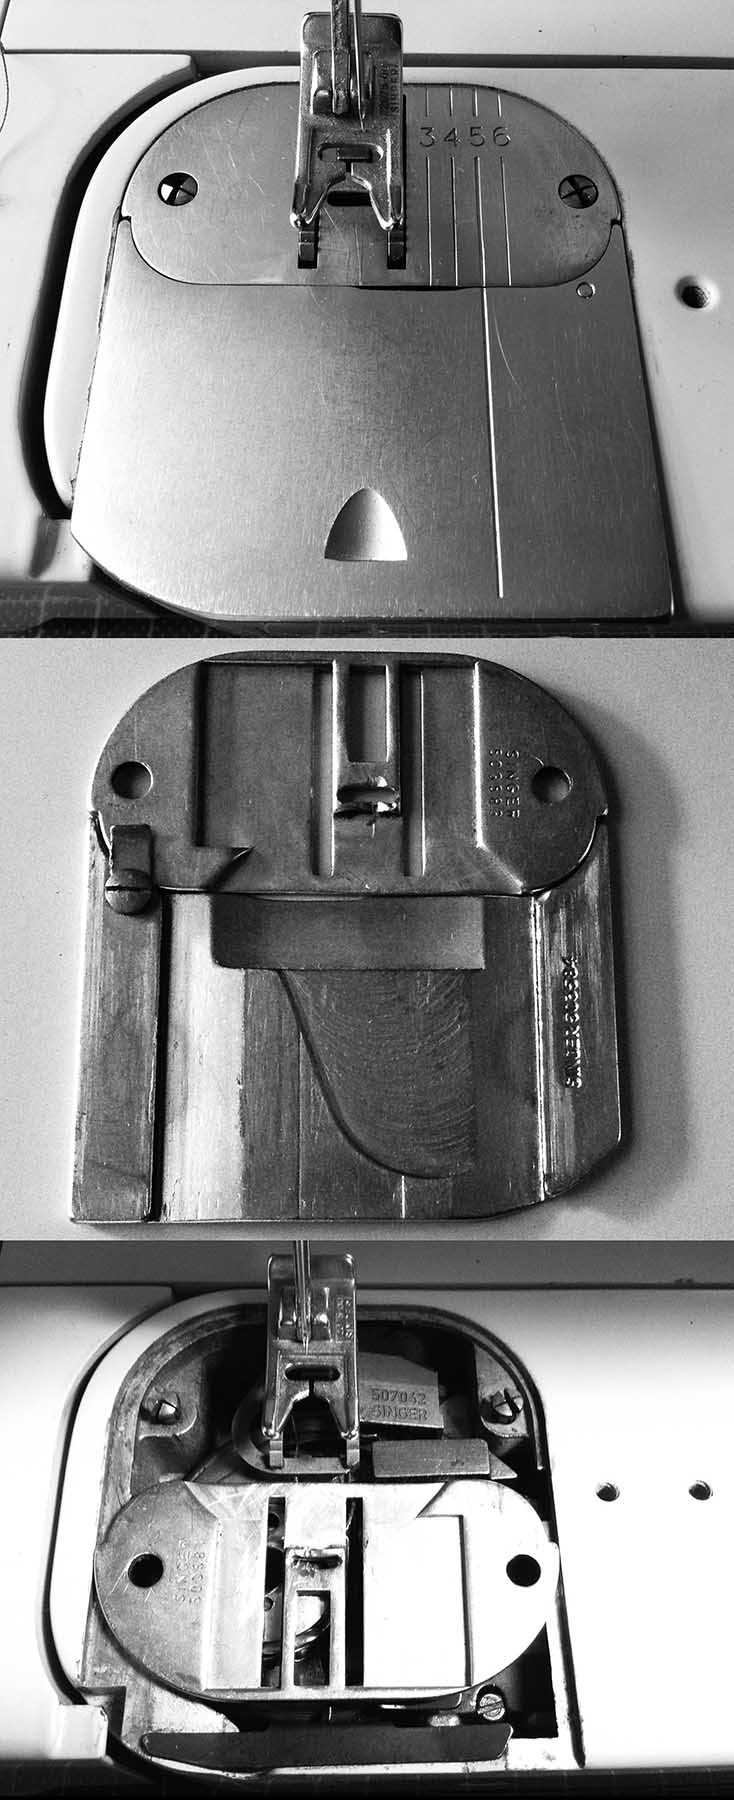
The 431 zigzag plate and the cover plates all have a rectangular area cut away on the underside, with a further two corners cut away further so that the base of the sides flared out at 45 degrees. Lining it up with the feed and the bobbin case I can’t see any reasons for this but I nevertheless can’t ignore it as possibly relevant for the plate to fit.
This photo shows the zigzag and straight stitch cover plates, both front and back.
This photo shows the area cut away from the underside of the bobbin plate.
Some of the plates for the T&S have measurements scored both sides of the needle hole. The 431 plates have measurements scored on the right hand side only, as shown here in this photograph of the general (zigzag) plate.
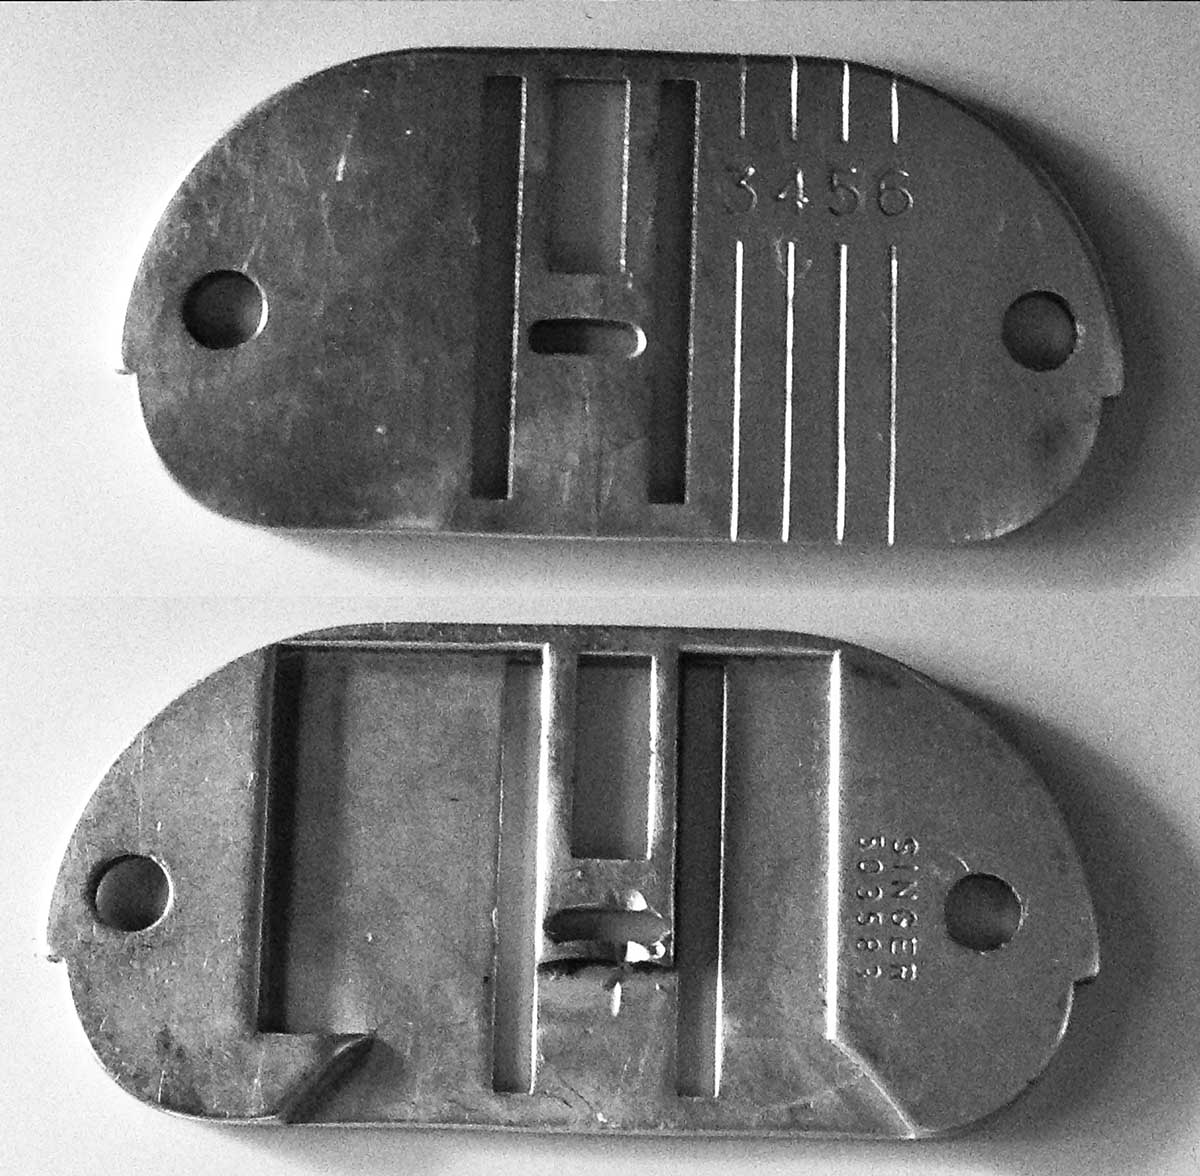
This photo shows the bobbin and needle plate together, top and bottom, showing how the two plates fit together. At the bottom of the photo, the underside of the needle plate is juxtaposed with the area which is covered by it.
Where the needle plate meets the bobbin plate, the curved sides of the 431 plates reduce width through a 90 degree turn. This edge is smooth. Some of the T&S plates are shaped similarly but have an extra piece of metal running below the edge of the bobbin plate, perhaps to improve the fit. I would be cautious of assuming that these extra pieces would marry up ok with a bobbin cover not designed to be used with it.
The holes for the clamping pins may be in a slightly different position; it is hard to tell. The back of the feed dog holes on the 431 plates looks as if it is slightly closer to the back edge of the plate than on the T&S plates. On the 431, the distance between the rows of feed teeth looks to be the same as between the feed and the back of the plate. Measuring confirms it – the distance is 2mm in both cases. These distances don’t look equal on the T&S plate.

Because it is impossible to accurately gauge size from photos, I have also measured the zigzag plate. It is 63 x 30mm. Mine has obviously suffered a bad needle strike in the past and I shall certainly replace it if I ever get the chance but as spares are rare, I’m not holding my breath for that…
The feet and accessories are all generic slant shank ones that I think will be able to be shared between any other slant shank machines.
The machine itself was in excellent cosmetic condition and did not need a great deal of cleaning. Despite this, I have taken all of her plates off and removed a great deal of fluff and a couple of needles from the base of the free arm. I was very happy to see how easily this may be cleaned out. The whole bottom of the free arm casing is a single piece, held in position by one bolt so it is very easy to access this area to clean and service it. The hook and bobbin case look at though they would benefit from a more thorough cleaning than I have been able to do so far but as I am unfamiliar with this style of bobbin and hook I will wait until I have educated myself a little further before attempting this.
The machine is now clean, oiled and ready to use. That said, I intend to run her in gently. It is certainly a good few years since she was last used and she has spent the last six months in a garage. Once I have properly run her through her paces I will report back with a post relating to performance, its neatness and quietness and how well she compares with my other machines.
I have not weighed her, but she is made from aluminium so whilst solid, is lighter than my cast iron machines and also lighter than my Bernina 830 Record, although similar in size. The extension bed is much easier to remove than the one on my Featherweight 222k. It is released by pressing a small button on the machine bed, close to the rear of the machine pillar and slides back on again very easily. The accessories are stored beneath an aluminium lid in the extension bed which opens up to reveal the compartment within, with space for the cams, oil, feet and attachments. The motor is housed vertically within the pillar and is easily accessed by removing the single bolt which secures the oil pan below. All in all it is very sturdily made and I am impressed.
Copyright of the blog owner 2017
21 Aug 2017 Leave a comment
in Book Reviews

Originally I gave this a 5-star rating but I downgraded it on account of the quality of the photos. In common with many books of this era, the photos are grainy and lack contrast, especially through their mid-tones. Where the photos are intended to illustrate a process this makes it very difficult to interpret the picture as much of the necessary detail is hard, if not impossible to make out.
Elsewhere, the book makes good use of line drawings which ably demonstrate techniques such as construction of cord froggings and I think the book would have been better had line drawings been more widely applied. The artistic licence that an artist can apply to emphasise certain points and downplay others is especially useful when demonstrating intricate detail. The photograph labelled 19.13, for example, illustrates a technique of inserting a decorative band made up of short lengths of bias strips, sewn to a strip of paper. These short strips are then each nipped and stitched across to secure their cinched centres and give a decorative, bow-like finish but neither is this last point described in the accompanying text nor is it mentioned in the label and it was only by giving the photograph some intense scrutiny under a good light that I was able to discern exactly what I was looking at.
Leaving the photos aside though, this book has certainly surprised me, and favourably so. I very nearly left it unpurchased; a quick flick left me unmoved and fairly sure it would offer nothing new to my groaning shelves full of similar sewing books but it was only £2.99 so I decided to buy it anyway and prepare to give it some more attention.
I am glad I did. Truly. There is a lot of emphasis on couture techniques and good and thorough coverage of such essential, if supplementary skills such as pressing.
The contents list follows:
1) sewing equipment
2) the sewing machine
3) basic hand sewing stitches
4) pattern and fabric
5) pattern alterations and fitting
6) layout, cutting and marking
7) assembling dress for fitting
8) seam construction
9) pressing
10) methods of handling fullness
11) bias and its use in cordings, bindings and folds
12) buttonholes, buttons and fasteners
13) plackets, fly fronts and concealed closings
14) pockets
15) collars, necklines and closings
16) sleeves
17) waistlines and belts
18) hems
19) decorative construction
Appendices
A) sewing supplies
B) preparing a blue chalk board
C) directions for making pressing equipment
D) home methods for shrinking fabrics
Index.
Do give it shelf room if you are lucky enough to find it.
Copyright of the blog owner 2017
21 Aug 2017 Leave a comment
in Book Reviews
An ingenious little volume whose method is one of folding paper of predetermined dimensions into a grid which is used to plot the design. The method can be applied to a garment of any size as the proportions are calculated, for the most part, from a single body measurement: usually the neck measurement or the height of the wearer.
The garments covered are:
1) child’s chemise (two patterns)
2) woman’s chemise
3) woman’s yoked chemise
4) combinations
5) baby’s drawers
6) child’s knickerbocker drawers
7) girl’s knickerbocker drawers
8) woman’s tucked drawers – circular band
9) cottage pinafore
10) yoked pinafore
11) baby’s morning gown
12) baby’s frocks (two patterns)
13) child’s pelisse
14) baby’s flannel – baby’s shirts
15) bodice
16) night-dress
17) lined shirt, a back yoke for a tucked night-dress
18) single half-square gusset, circular band.
Copyright of the blog owner 2017
21 Aug 2017 2 Comments
in Manuals
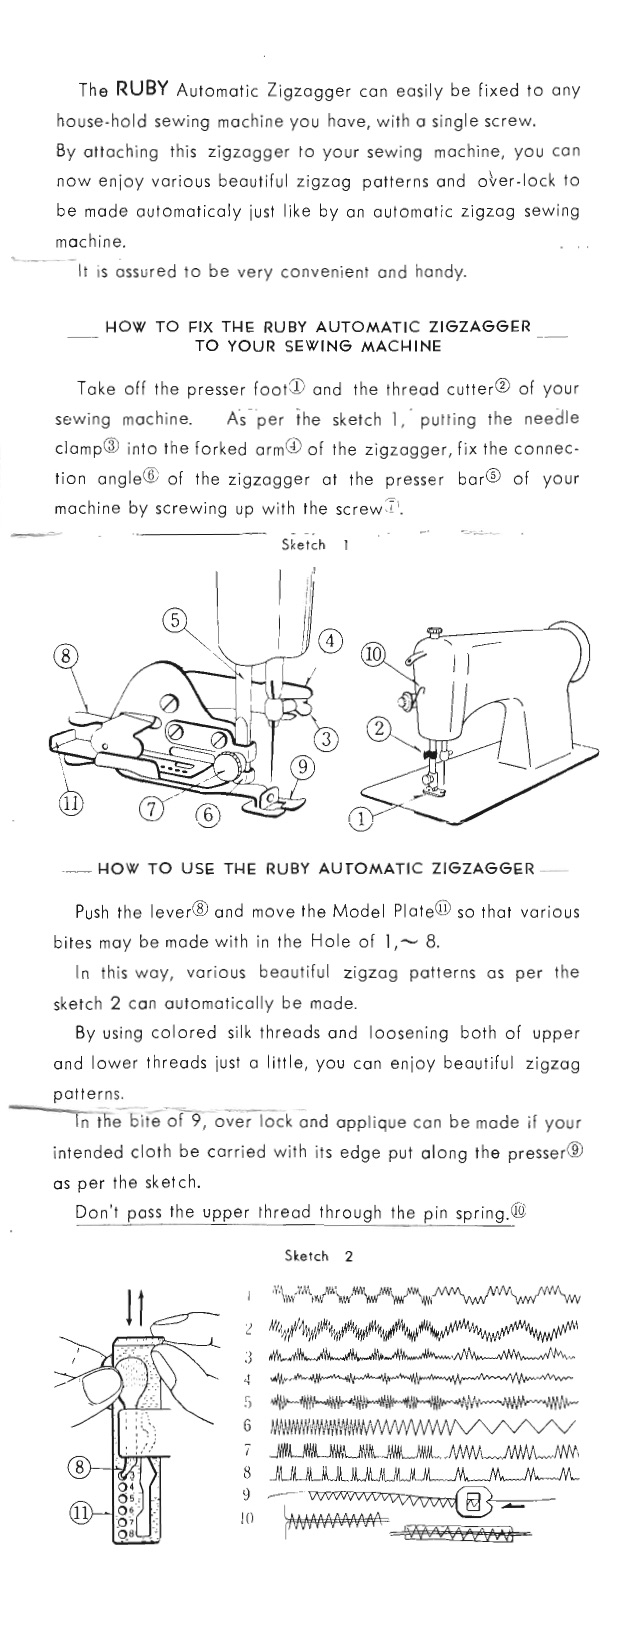
Following a request for the instructions for this, I’ve chosen to add them to the blog so that they are available to the wider community. I hope you all find them useful and enjoy using the attachment as much as I do.

Copyright of the blog owner 2017
12 Mar 2017 7 Comments
in Book Reviews
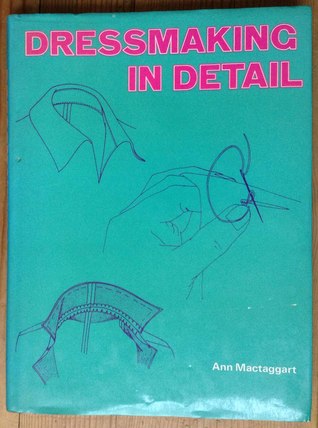
I own a great many books on dressmaking. Most of them assume construction knowledge or simply don’t cover it at all as they assume that the dressmaker will be using a commercial pattern, which will come with instructions which explain how to put the garment together and in what order. True, my older books do cover this but the emphasis is on hand sewing; if a machine is used at all, it is mainly for the long seams and the rest is very much hand-finished.
For those who seek to design their own garments and machine sew them, this leaves a frustrating gap in know-how and this is where this book really comes into its own.
As I mentioned, I do own a LOT of dressmaking books but this one really does have the best and clearest illustrations of complicated seam finishes that I have seen anywhere. Where some books use a series of stepped illustrations to demonstrate a technique, this one, by clear and well-thought-out diagrams, manages to make the entire process clear in a single picture. I can – at last – say that I understand a Mantua-Maker’s Seam…
So, if you need to know how to insert an under-arm, diamond-shaped gusset or the proper method of inserting godets, this is the book you need.
Fly fastenings, collars, plackets, cuffs and zips… it’s all here.
I can’t think of anyone who wouldn’t benefit from reading this. It has a really good ratio of text to diagrams, the text is well written and easy to follow – not pitched too high – and it has a good index. It’s a handy reference for design students, home dressmakers and professionals alike.
Copyright of the blog owner 2017
12 Mar 2017 Leave a comment
in Book Reviews
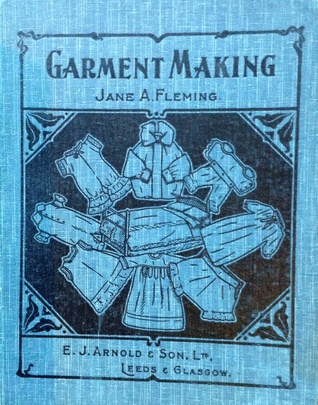
Definitely one for the girls as there are no boys’ garments included here. As a mother of a boy this was naturally a little disappointing but other volumes of similar era exist which do include boys so I was not entirely bereft.
The text is clearly written, the subject matter covered comprehensively and the line drawing diagrams are particularly well drawn, showing clearly the needle position, stitch sequence or whichever detail or method is being illustrated.
I am always impressed by the amount of practical and sensible tuition contained, so succinctly, in these older volumes. All the basic rules are here, with thorough explanation and examination of techniques, stitches and materials and – more pertinently, in my opinion – on how to choose which to use in a given circumstance.
Returning to the diagrams, those relating to the pattern cutting are especially clear. The method used in this book is especially suitable for the inexperienced or unconfident pattern cutter. The starting point is a piece of paper of set proportions and by folding this paper a number of times both vertically and horizontally, the resultant grid is used to plot the pattern according to the accompanying diagram. (Those interested in this method should also seek out the book “Pattern-Making by Paper Folding”, by Miss F Heath, published by Longmans, Green and Co in 1910.)
Unlike many contemporary needlework volumes, there is no mention of mending; it is purely making.
I do not think that the patterns lend themselves to modern interpretation quite so readily as the simpler garments covered by “Simple Garments for Children” by M B Synge but with suitable modification (slight modification to side seam silhouette, fullness arranged as pleats rather than gauged gathers, etc) there is plenty of scope for practical application and even if one ignores the patterns altogether the explanation and illustration of technique makes this book a very worth while purchase.
There is a section specifically covering dolls’ clothes and bedding which, whilst originally intended as reduced scale practice pieces, will appeal equally to those interested in producing dolls’ clothes from patterns which are correct for the era of the doll.
Copyright of the blog owner 2017
21 Mar 2014 1 Comment
in Book Reviews
Large format, hardback book measuring 11″ tall x 8″ wide x 1″ thick. Green boards (1945 reprint of 1942 original), 253 pages.
I have an increasingly extensive library of vintage sewing and needlework books and confess that this has to be just about the best I have seen.
Not only is it beautifully presented but unlike Mme Trois Fontaines’ Dress Design and Margaret Ralston’s Dress Cutting (who both cover a similar era and similar subject matter) Pepin goes one step further and gives a proper discussion to the matters of proportion and good design and encourages experiment and the development of a well-trained eye.
Pepin is also extremely comprehensive – more so than Fontaines and Ralston. She is similar in content to Natalie Bray except that she gives more consideration to the process of good design and the illustrations are, to my eye at least, more pleasing and easy to interpret. Unlike Bray, Pepin is also contained in a single volume.
The front bodice draft is a very simple, single-dart pattern which is easily adapted and lends itself very well to experimentation.
The chapter headings are:
1) Pattern Designing
2) Slopers
3) Hip Length Patterns
4) Sleeve Patterns
5) Adapting Patterns
6) Capes, Ties, Neckwear and Scarves
7) Collars
8) Skirts
9) Slacks, Shorts, Culottes and Bathing Suits
10) Lingerie
11) Coats
12) Children’s Clothing
I had to wait a long time to find a hard copy for a reasonable price but would certainly recommend this book to anyone wanting to study not just pattern cutting but clothes design as a whole.
Copyright of the blog owner 2014
21 Aug 2013 2 Comments
in Mending
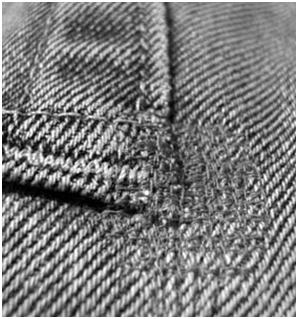
The first job for today was to finish what I first started last night; darning the splits in my husband’s jeans. Both the back pockets had pulled away the fabric onto which they were stitched and all four top corners needed to be reinforced and the missing threads darned over.
The particular challenges with this sort of mending relate to the different densities and thicknesses of the fabric layers. Sewing in close alongside the pocket edge is difficult as the foot is naturally deflected by the vertical edge of the pocket piece and when sewing back and forth across the top of the pocket corner the foot is required to rise up and over the ramp in both forwards and reverse. I could have minimised the deflection issue by using my new ‘Slim Jim’ foot but because of the need to ride up and over different thicknesses I chose the normal presser foot as it is hinged. I minimised the deflection by loosening off the presser foot pressure.
The job was performed on my usual machine, the electric, 1939 Singer 201k and a size 12 needle. The needle ought to have been a 14 or a 16 for this sort of fabric but as I presently have only 10s and 12s I simply went slowly over the thicker sections, occasionally just ‘handing’ it for a couple of stitches where it crossed the thread bars and had no trouble. The thread in both bobbin and upper was a cone of core-spun overlocker thread which I always use for these jobs as it is a good match for faded denim. Because of the need for cones to feed off vertically I run the thread from a large, industrial-type thread stand bought from Barnyarns.

Copyright of the blog owner 2013
20 Aug 2013 2 Comments
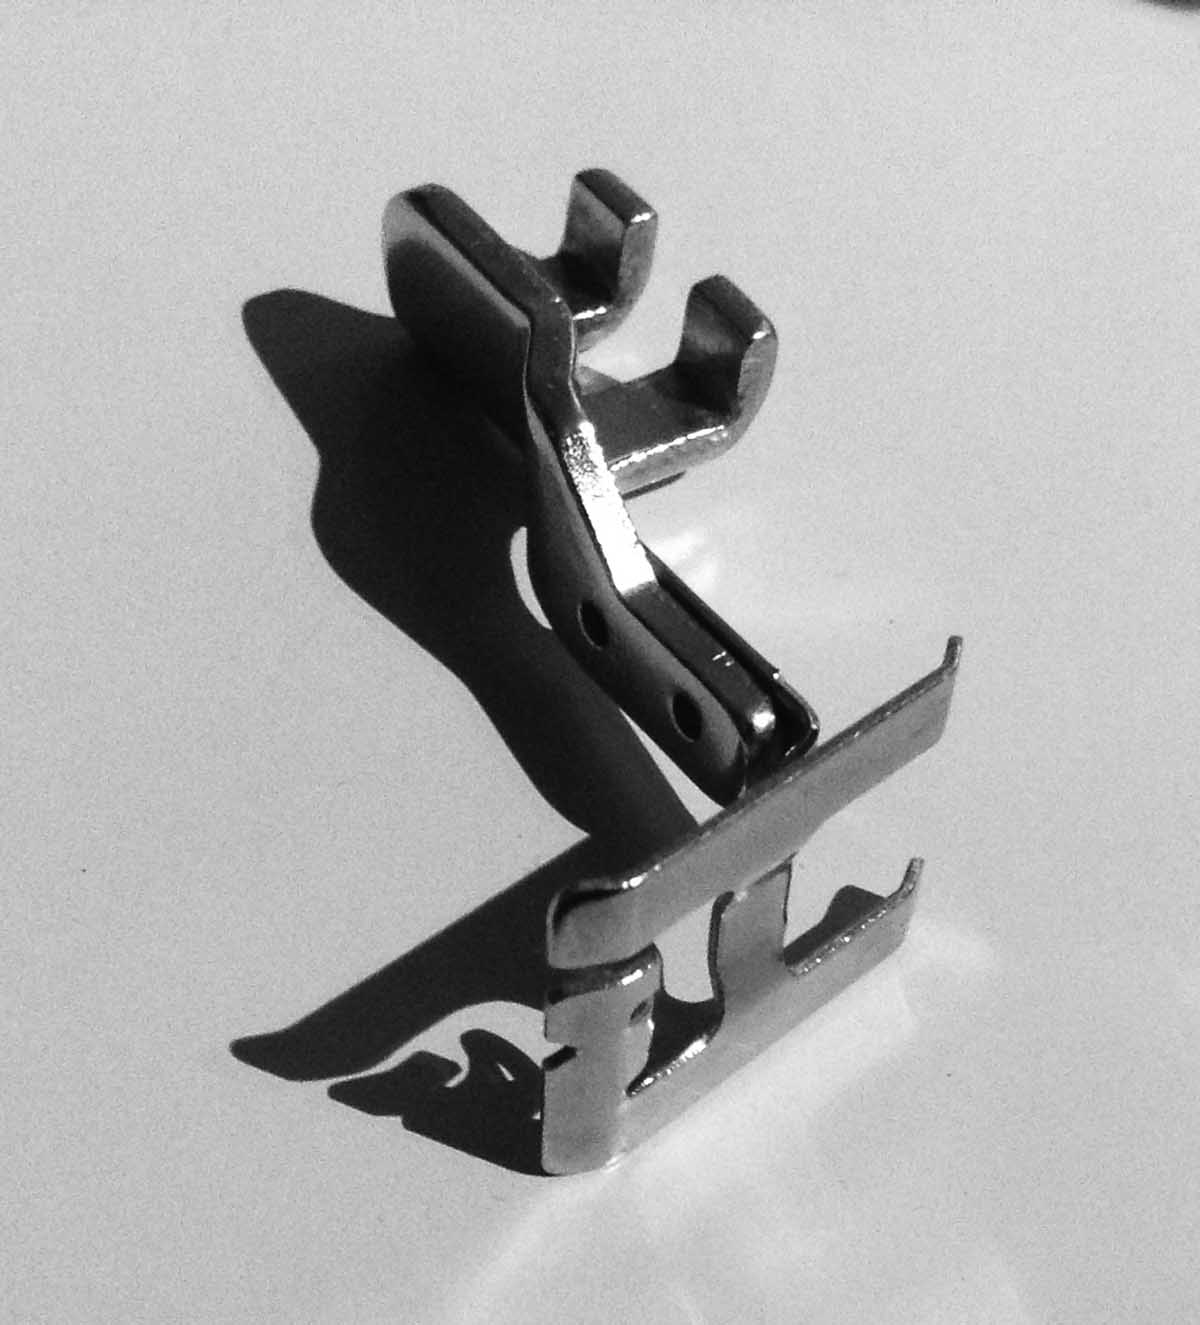
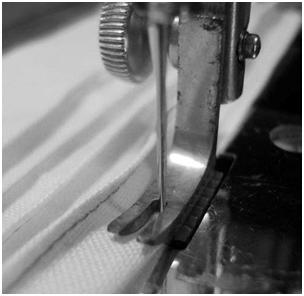
 A very exciting day for me today as Helen Howes has one again come up with the goods and provided me with something I have wanted for ages; a ‘Slim Jim’ presser foot. Although I knew, by definition, that it was a slender foot with equally-matched limbs it was still a pleasant surprise when I saw how dainty it actually is in the flesh and for this reason alone I have included a photograph which shows it next to the normal, hinged foot from my Singer 201k so that the two may be compared.
I have long wanted one as I often use the edge of the presser foot as a sewing guide and it is useful to have both prongs equal in width so that the foot will be a true guide in either direction.
The first thing I have tried it out on is baby run-and-fell seams and tiny, parallel pin tucks (see photograph). I predominantly sew baby clothes am working at a particularly small and dainty scale and having a foot which allows me to get right up close without the edge of the foot hitting and being distorted by the previous line of pintucking means I can make my pintucks smaller and closer than ever which I am particularly pleased about.
The only downside is one that can easily be remedied; because the foot is so tiny it makes much less contact with the feed dogs than feet which are wider and longer but this is easily rectified by simply tightening down the presser foot tension to compensate.
Copyright of the blog owner 2013
17 Aug 2013 2 Comments
The measurement required: – The size round the neck of the intended wearer. The collar is one-and-one-sixth of the neck. All the other measurements are derived from it. The body of the shirt is made in one long piece three-and-three-quarter times the collar length, folded nearly in half, the front being only one-quarter of a collar length shorter than the back. The width of it is one-and-a-half the collar length. Where the fold comes is the top of the shirt.
To Cut The Pattern.
As the back and the front of the body of the shirt are alike at the top, in making the pattern it is only necessary to cut the back-half. Take a piece of paper two collar lengths long, and one-and-a-half the collar length wide; fold it into four each way. Keep it folded in half lengthwise, and curve out the arm-hole from one-third of a division across the top, to the point of the first division downwards. Keep the piece you have curved out.

To Cut The Sleeves.
Take a piece of paper once-and-a-quarter the collar-length long, and two collar lengths wide. Fold it lengthwise into eight. Open it out, and then fold and cut a diagonal line through the two middle divisions. Take one of the pieces and fold it down the middle, as shown by the dots, by making the straight side lie on the sloped side. That will leave a single piece of the paper at either end which must be cut off. A small piece must be sloped off the bottom to prevent too sharp a point, and the top must be shaped. Use the piece you cut out of the armhole as a guide for that, as the top of the sleeve and the armhole must be alike.
To Cut The Neck.
The neck should not be cut until the shirt is partly made. A pattern the exact size of the piece required to be cut away can be made by cutting out a circle, the diameter of which is one-third of the collar before the turnings are allowed for, and then flattened a little (rather more than is shown in the diagram) at the top and bottom, and marking a line across it about one-eighth from the top. The following directions for making up the shirt are given, because they will simplify the work of teaching a large class. They have been found useful in the London Board Schools, as a great many shirts of this pattern are made every year for the Industrial Schools.
The Lining.
This should be put on first. Open the shirt flat, and then tack, and afterwards hem on the lining, giving exactly one-half of it to the front, and the other half to the back. Leave unhemmed three-quarters of an inch at the ends, until the seams are finished, in order that they may not be interfered with.
The Side Slits.
The side slits must be the same length as the armhole, measuring the front breadth of the shirt.
The Front.
The opening for the front must be cut about half-an-inch to the left side of the shirt, and must extend half way down the front.
The Front Piece.
This must be carried down from an inch to an inch and a half below the opening.
The Sleeves.
The sleeves must have the straight part to the front of the shirt.
The Sleeve Slits.
The sleeve slits must be half the length of the wrist-band.
The Wrist-Bands.
The wrist-bands must be divided into three, and all the gathers must go into the middle third.
To Cut the Neck.
Fold the front over as it should be if buttoned, and place the neck pattern on it so that the crossway line may meet the top of the shirt, and point A touch the middle of the front. Cut round it, leaving nothing for turnings.
The Gussets.
Gussets must be put in at the top of the sides and sleeve slits.
Copyright of the blog owner 2013
18 Mar 2013 2 Comments
in Projects
When I was first at college, studying for my fashion diploma we had to produce a folder of samples. This served both as practice and reference and I have often thought about it and how useful it was for me as a beginner. The subject has occurred quite a lot in conversation so I’ve been prompted to put together a post of suggested practice pieces which might prove useful to anyone wanting to do the same. The important thing is to label everything well and to list the stages involved – either by including examples of each point or by listing the steps taken to reach the finished sample shown.
Stitch Samples
You will need: plain cotton lawn, medium-weight cotton, cotton jersey, coarsely woven fabric. All fabric should be plain – patterns make it too hard to see the detail of what you have stitched. Stickers and pen to label the fabric with. Tension should be set at between 4 and 5 unless stated otherwise. Match the thread colour to the fabric as closely as possible.
Stitch Length Exercises
Each machine will vary in the range of stitch lengths (mine are old machines and are incremented in 6, 7, 8, 10, 12, 15, 20 and 30 stitches per inch) but for simplicity’s sake I will suggest sewing with 1, 2, 3 and 4mm stitch lengths although you may of course include samples for 1.5, 2.5 and 3.5mm if you wish to do so.
Seam Examples
Fabric – cut a 20cm square of fabric into four equal strips, cut each strip in half and press them. This will give us eight fabric strips 5 x 10cm. We will sew strips together in pairs, using different stitch lengths on each to show how it looks and behaves when pressed open.
Seaming and Hemming curves:
Seaming stretch fabrics
Hems
Buttonholes & Buttons
Darts, Gathers & Ruffles
Pleats and Tucks
Pockets
Zips and Fastenings, Openings & Miscellaneous
Copyright of the blog owner 2013
01 Mar 2013 Leave a comment
Looking through my old needlework books I found the attached and thought it an excellent resource well worth reproducing and sharing here.

The jpeg is necessarily in quite low resolution to meet the file size requirements for attachments so I’ll transcribe the text here:
“The sequences for making-up on the opposite page naturally have to be altered for jackets and complicated garments. Especially important is the frequent pressing, which has to be done after every seam is sewn. All embroidery should be worked before the garment is made up, unless the design crosses the seams, in which case it is better done afterwards.
The Sequence for Sewing a Dress
1. Put in darts at back, front and side. Draw out tacking threads, and press.
2. Machine side seams, draw out tacking threads, and press. Any fastenings can be left until last.
3. Machine shoulder seams, draw out tacking threads, and press.
4. Machine skirt seams, pull out tacking threads, and press.
5. Join skirt and bodice, remove tacking threads, and press.
6. Machine sleeve seams, remove tacking threads, and press.
7. Put in sleeves, press and finish off.
8. Finish off neck.
9. Finish the wristbands.
10. Turn up the hem, press all seams again, put on trimmings, and press finally.
The Sequence for Sewing a Coat
1. Machine darts at front, trim and press, shrinking material at the points.
2. Machine underarm and shoulder seams, and finish them if the coat is to be unlined. Press.
3. Cut canvas or linen interfacing, and tack to wrong side. Join to coat and outer edge of under collar. Press.
4. Join under collar and coat – trim seam and press open.
5. Make bound buttonholes.
6. Join coat facing to collar.
7. Join collar and facing.
8. Turn facing and collar inside, tack into position.
9. Turn up hem.
10. Make pockets.
11. Cut out and fix in lining.”
From Weldon’s Encyclopedia of Needlework (undated but looks 1940s. Red boards. Hardback. Boasts nearly 2000 illustrations. I also have an earlier version dating from the 1920s which is much smaller and with only 500 illustrations. That one has pale green boards. The two volumes are not at all alike and the contents equally valuable.)
Copyright of the blog owner 2013
14 Feb 2013 Leave a comment
in Book Reviews
Published by Odhams in 1946 this is a hardback book with a grasscloth cover, measuring ten by 7 inches and printed on quite thin but good quality, silky paper. The text is well written and is liberally scattered with pen and ink diagrams, very well drawn and clearly illustrating the techniques they demonstrate.
Some of the text is amusingly obsolete – my husband and I were equally amused by the “When You Mend for Men” section which commences with the observation that “every new husband is happy about the first button that comes off. His bride will sew it on for him and he will revel in this special attention” and which later, mentioning the sense in putting a price on one’s time and keeping a notebook of time spent and money saved sets as an example the “one woman with husband and three children to sew for learned to mend, took the necessary time to learn to do it well. At the end of a year she showed her husband she had really saved enough to warrant his buying a piano for her”.
Anyone familiar with the author won’t be surprised to hear that this really is an excellent and very comprehensive book and whilst the skills taught herein are hardly exclusive, the pleasing layout of this book together with the clarity of the diagrams makes it easily one of the better books I have encountered.
It truly does start with the basics. This is certainly the first time I have seen close-up diagrams showing how to thread a needle but each of us has to start somewhere and with people less likely than ever before to have learned these skills from a relative or at school it is not inappropriate to have them mentioned here.
Indeed many of the finishings and techniques covered as standard subject matter here now find themselves promoted to the lofty status of “couture” techniques and are overlooked by many ordinary sewing books whose aim is to use the sewing machine almost exclusively. The example of factory-produced goods too frequently leads us to believe that items are “homespun” and inferior unless made entirely by machine and it is time we debunked this.
Even though this is a book specifically about mending there must necessarily be some overlap with books on dressmaking and general needlework so seams, hems, embroidery stitches, darts, gathers, tucks and ruffles, pleats, godets, neckline and sleeve finishes, plackets, fasteners and buttonholes are all covered here but often with a slightly different bias – bound buttonholes are, for example, promoted as being an excellent way to refurbish a buttonhole frayed out of shape too badly to be simply reworked in buttonhole stitch.
There is a handy section dealing with how to recognise the fibre content of cloth and also a good introduction to the sewing machine and its attachments.
In keeping with a sense of proper economy and foresight there is discussion about reinforcing areas prone to wear and tear and also the particular method used in mending each of a variety of different tears – invisible darn, slashes, reinforced darn, one-way darn, corner tear, runs in knitwear, cross-wise splits in knitwear, stocking grafting and irregular machine darn.
Patches are shown in variety; including some which are cunningly designed to look like a design detail whilst in fact hiding a stain or a tear.
Underpinnings receive a lot of coverage; the reinforcement and renewal of straps and fastenings, how to disguise minor repairs, mend frayed edges, deal with broken fagotting, seams and worn elastic, reinforce where bones and wiring pushes though.
Some things, like repairs to cuffs, collars and pockets I have seen before but others, such as gloves, ties and belts are less common as is the very comprehensive coverage given to the repair of blankets, pillowcases and sheets, including the hemstitched variety which often tears along the hemstitching.
Laundering is also mentioned: stain removal, washing, ironing, cleaning and pressing, as well as an area akin to dry cleaning referred to here as “Freshening” but do indeed treat this with caution as the chemicals are indeed eye-watering and the reader must be responsible in his or her own research into the chemicals involved before attempting to follow any of the advice in this section.
The final part of the book deals with refashioning clothing – of refreshing worn areas, updating them and in picking them apart and reusing the cloth. It advises the seamstress to look carefully at each garment and assess its merits before deciding upon its fate: first considering whether some refurbishment, recutting or readjustment could do anything for it. Next consider whether, when done the garment would do anything for you!
If that seems hopeless, either give it away or else rip it apart at the seams and reuse the material for something different. I have to say I snorted somewhat at the part where the author advises against the home sewer attempting to draft her own patterns, opining that it “requires equipment and experience beyond the home sewer’s ken.” I do happen to have had the benefit of professional training in pattern cutting but certainly don’t agree that it is beyond a home sewer to learn the same skill.
Ideas follow as to the sorts of project which could be attempted for different garments – evening coats into skirts, jackets, even boudoir cushions! Men’s shirts are particularly prized as being a suitable basis for children’s shirts, blouses, aprons and pinafores. The author sets a pretty tight schedule, mind: to produce a pair of trousers or a dress from reclaimed fabrics will take six hours by her estimate: one for ripping and pressing, one for cutting, one or possibly two for basting, half an hour for fitting, half and hour for adjustments after fitting, one for stitching, half an hour for buttons and buttonholes and half an hour for a complete pressing. The author does concede that this represents a highly concentrated schedule, as she puts it “making every stroke count”.
Coats merit a section all their own – trimming with new fabric on pockets and revers, recutting, remodelling and relining.
Dresses also receive a chapter all their own: suggestions being made to sew in entirely new sections of fabric where areas are looking worn and to use even the smallest piece of fabric to add a cheerful touch to cuffs, pockets and other small details. Eyelet embroidery, velveteen and taffeta are all shown used in a variety of ways to liven up old items as are lace, tassels and ribbons.
When cutting down garments to be remade for children the author suggests using the following checklist:
1) Is the fabric worthy of my time?
2) Is it easy to wash and keep in repair?
3) Is it worth the expense of needed new material?
4) Is it in suitable colour and weave for a child?
5) Is it right for the child who is to wear it?
One caveat – this section advises using tie fasteners of narrow tape or ribbon or wider ties of material for baby’s first garments and tot’s dresses. Please be aware of strangulation risks when having any tie on clothing intended for babies and small children.
Copyright of the blog owner 2013
11 Feb 2013 Leave a comment
in Book Reviews
A well written book illustrated clearly with black and white photographs showing a very comprehensive range of stitches, techniques and articles.
This is not a book which includes patterns which may be scaled up and used but it does include line drawings which provide sufficient visual information about fullness, style lines etc for a competent pattern maker to draft a similar garment – this being especially true of the childrenswear, which examples are particularly engaging, especially the middy blouse and rompers.
One of the peculiar strengths of these older volumes is the particular attention give to construction. Possibly because of the weightiness of full-length skirts cut from woollen cloth the waists were not simply set into a modern style of waistband but were instead often hung from a strong, internal waistband of shaped petersham or similar rigidly woven tape which allowed the weight of the skirt to be carried not by the fabric of the costume but by the abdomen of the wearer.
Similar attention is given to the fitting of a corset cover – the care with which the garment is quartered by twin rows of gathering threads which are then gently pulled up and shepherded into the correct position is a study well worth revising today for any garment in which gathers are to form the main shaping over the bust.
Suffice it to say that all of the usual hems, stitches and seam finishes are described and illustrated and good suggestions made for correcting and disguising ill-fitting portions of garments such as a sleeve too long above the elbow or tight across the forearm.
In conclusion this is another very comprehensive volume and one I would not wish to part with.
Copyright of the blog owner 2013
11 Feb 2013 Leave a comment
in Book Reviews
A highly informative volume introducing a full introduction to the sewing machine and its attachments, including a demonstration of using a veining foot to make picots which I have never seen before and am very glad to know. The book lists suggested items of equipment for sewing, pressing and the mending basket. As well as the usual, ubiquitous instructions on where and how to measure, instructions are given for padding out a dummy and fastening a padded arm thereto, all valuable lessons when trying to achieve a good fit either in shop-bought, or home drafted patterns.
Given that this book is not written as a drafting book the instructions for creating and adapting basic blocks are really very good; simple to follow but easily comprehensive enough to form a firm basis for most dressmaking and furthermore, patterns are shown throughout the book, drafted against a grid for easy transferral.
A good appraisal is given to fabrics, their widths, quantities and qualities as well as their suitability to various styles.
Reading the chapter on pressing I was again struck at how sensible and comprehensive was the advice given. Clear illustrations showed real-life examples of what was being discussed, including the use of a pressing cloth, using a padded rolling pin to press open seams and the use of the tailor’s ham in pressing sleeveheads. You will certainly learn all the correct methods here and your sewing will be the better for it.
The chapter on fitting is equally clear. I can’t claim that it covers any more or less than other books on the subject but somehow the diagrams get right to the very heart of the matter and make it simple to compare the problem in hand with the issues illustrated and find out how to solve it.
The chapter on sewing details once again cuts through the unnecessary and gets right to the heart of the matter – namely how to deal with all those awkward, non-standard fastenings like leather buttons and the bone ones which need to be removed before washing. I have also never seen such a neatly illustrated description of inserting zips – truly this book is an absolute gem.
The Lingerie chapter supplies patterns for some truly elegant and timeless pieces – a bias cut nightdress, a long sleeved nightdress, a princess slip, camiknickers, brassiere and knickers but be warned that the bra in question is a dainty little number best suited for nothing beyond a B-cup and of a simple, rounded shape. You won’t learn how to draft a bullet bra here (although in truth that would not be hard to do, simply by straightening the vertical seam lines a little and reinforcing with the requisite concentric stitch lines).
This book truly does attend to precisely the right things. Rarely have I ever seen bound buttonholes, tucks, pleats, piping, rouleau loops, cuff openings and bound hems so nicely and plainly described.
The same applies to pockets. Bound pockets, welt pockets, slot pockets, patch pockets, flap pockets. All well described and beautifully illustrated.
How to make a belt? It’s here, with many pretty ideas on how to finish and fasten.
The chapter on collars shows very clearly how the different types are drafted from the bodice blocks laid together at the shoulder seam. Each has a particular profile, depending on how high or flat it is to lie and the different shapes are very well shown here.
Sleeves are quite narrow and sculpted, as to be expected from this particular era but other types are discussed also. Useful tips such as the application of interlinings, stiffeners and special tight linings into the sleevehead of a puffed sleeve to prevent it migrating down the arm are again all subjects new to me and very welcome. Another new tip for me was that of how to cut and attach a shaped interlining into a sleeve; cut half the breadth of the sleeve, rounded at the top and sewn into the lining it provides extra warmth.
Pattern diagrams are given for the following garments, with extremely detailed instructions for cutting, fitting and making up: one-piece dress, princess style; cardigan suit (a neat suit with shaped jacket and straight skirt with kick pleat); blouse with rever collar and bishop sleeves and the items of underwear mentioned earlier.
The childrenswear chapter is truly a delight as it covers a far better range than the usual rompers, dress and knickers. There are proper instructions for the drafting and making of a woollen blazer, suggested to be best suited to a boy of ten to twelve years but easily adapted to other sizes besides. Knee-length trousers to match are also covered here and the photo is simply delightful – the shorts are shown knee-length and fastened with a snake belt. This is such a timeless accessory I have photos of my father (born in 1919) wearing one when he was about ten and my own little boy, aged four wears one even now. For girls, a neat, pleated skirt with inverted box pleats is shown for a schoolgirl. It is cut a couple of inches above the knee similar to gym shorts and is worn with a blouse made to the same pattern as the boy’s shirt but fastening the other way of course. Also for girls, a pair of ‘School Knickers’ which resemble athletic shorts, being of a simple shape gathered onto a band of elastic at the waist. It is suggested that these can be made in a thinner fabric for wearing under party frocks in which case the leg edges could be finished with a fabric frill or with lace. There follows a plain, cotton print frock with a high neck, simple collar, elbow length sleeves and waist sash, cut above the knee and very ‘youthful’!
There is just the one dress for a baby – a classic, knee length design with short puffed sleeves and a skirt gathered onto a yoke under the arms.
The final articles of childrenswear are again refreshingly practical – a darling set of unisex pyjamas. The jacket is made to the same pattern as the blazer, but fastened up to the neck and the trousers made from the shorts draft, lengthened accordingly. A modified pattern is described wherein the bodice and trousers may be combined and feet added to make a sleepsuit for a younger child.
The final chapter deals with mending, patching, darning and the setting in of the small triangular gussets into the bottom of side seams.
This is, in my opinion one of the most comprehensive texts I have read and should you buy only one book on home dressmaking, this would be a very good one to choose.
Copyright of the blog owner 2013
11 Feb 2013 Leave a comment
in Projects
The author explains that this, the second edition differs from the earlier only in that a few minor alterations have been made and the index made more comprehensive. I mention this as often books are substantively enlarged and revised between editions, photographs and techniques being updated in line with changes in fashion and technology but as childrens’ wear changes little this is not the case here.
I must say right at the start that anyone wishing to see full drafts for contemporary fashions will be disappointed as this book supposes that the mother will buy a pattern, not make it so the subject matter is limited to the cutting out, making up and finishing only.
This should not be held against it though as the book has much to recommend it, containing many good tips not often considered today such as allowing for growth in the garment so that its usefulness is extended.
The book itself is printed on good quality, silky paper and has aged very well with no sign of deterioration or discolouration at the edges and corners. The illustrations number 100 and are all greyscale photographs. While they are quite charming (lots of ‘Marcel waves’ in the figure shots, suggesting their origin a full decade earlier) they are quite dark and do not give such a clear demonstration as a line drawing would do.
The book is much more wordy than many but Agnes Miall writes in a confident and easy style and it is by no means hard to follow.
Agnes assumes no prior knowledge of sewing and helpfully suggests a detailed list of sewing items required and gives tips also on good working practices and the need for a well-lit spot and the necessity of taking regular breaks from sitting, especially when pregnant.
This book truly does start with the basics, including a basic education in the three different types of stitches – namely joining, hemming and edging – which will be encountered and reassures that the twelve stitch types contained therein will, between them, serve every purpose.
Having covered those stitches the book moves on to the first garments; the baby’s layette. Again expecting no prior knowledge, it gives a list of the average layette required:
4 woollen vests (bought or home knitted
4 nightgowns
4 flannel petticoats
4 dresses (daygowns)
1 large carrying shawl (bought or crocheted)
2 to 3 dozen Turkish towelling napkins (bought ready made)
3 pairs of bootees (knitted)
1 sleeping bag (for the pram)
2 bonnets (or crochet caps)
2 matinee coats
1 or more silk or muslin robes, with nainsook petticoats to wear beneath.
Chapter IV deals with cutting out and marking, emphasising the correct methods of pinning, use of the straight grain, tacking and arranging the pieces on the fabric, cutting out and marking the seam allowances through between the two pieces. It may all seem a little long-winded compared with modern methods but I can confirm from personal experience that time taken in careful preparation is never wasted as no number of flawless seams can salvage a garment which twists due to being cut slightly off grain.
The next chapter teaches what seams should be used to join the various portions of the garment and instructs on the matter of plackets, facings and bindings and how to construct and apply them although some of the suggested applications, such as a drawstring pulling in the full circumference of a wide neckline, would be frowned on now as unsafe so do please exercise some caution if using this book as a resource for making similar garments.
The garments covered in that chapter include flannel petticoats, a sleeping bag, day dresses, petticoats, matinee coats and bonnets. Suitable fabrics are suggested for each as well as the general instructions for making them up.
Chapter VI covers trimmings, including bias binding (home made), tucks, lace trimmings and insertions and finally hand embroidery. As previously mentioned the greyscale photographs represent the finished item rather better than the technique being employed but nevertheless the text provides perfectly good instruction.
Clothes for the Toddler covers some good ideas for making bibs out of table linen and face cloths; feeders (larger, plainer bibs), sleeping suits and rompers, knickers for either sex and finally leggings. The subject of correct pressing is also discussed here.
Chapter VIII deals with the subjects of growth and of fitting. In brief, extra turnings are suggested so that the garment may be let out as the child grows.
Very good advice is given on altering patterns, specifically on the subject of where and how to add the extra. The book warns that unless the alteration is a small one, simply adding to the seams will frequently just throw the whole pattern out of proportion. It advises instead to think of the body as a series of definite segments so that it is simpler to see where the extra needs to be added and apply it accordingly.
Hints are given as to placing hidden tucks which may be let down later and also of extra depth hidden up inside a yoke which may simply be unpicked and reset lower down when the need arises.
Finally in this chapter, a whimsical topic called the “Language of Pins”, used when fitting, which promotes the idea of angling pins according to a set formula – pins placed vertically along a hem means that the hem is too short between the pins; placed horizontally means too long and should be turned up deeper to the level shown by the pin; two pins pointing diagonally outwards means to let out whilst the opposite means to take in. Pins set in a cross show the exact position of a button or other fastener. That is the only one I was previously familiar with.
Dressmaking for Little Girls introduces some more advanced methods of facing and finishing hems, including the correct method of hemming a square neckline, the making up and setting in of collars, bands and cuffs and pleats. Some general guidance is given on the subject of Gym Tunics.
Trimmings such as frills and gathers are covered next, including some instruction in gauging, which is the gathering of the fabric in parallel folds such as is done when preparing fabric for smocking. Some practical ideas are given for decorative trims made from simple braid – ruching, shelling and box-pleated ruching – and the use of fur and fur fabrics is also given special mention and while the use of real fur has quite properly fallen out of favour in modern times the instructions given for the treatment and handling of fur fabric are still valid today.
Hand embroidery fills the whole of the next chapter but because this is such a ubiquitous subject I shall not waste words on it here. Suffice to say that the usual stitches are covered – lazy daisy, smocking etc.
Chapter XII covers tailoring for little boys. Boys’ clothing is generally covered less comprehensively than clothing for little girls so any mention at all is worthy of especial notice.
Knickers are the name used for what we would more usually call shorts these days and these are the first item mentioned. I concur with the author that these are very simple and quick to make and I love the ideas she gives for fastening them onto the ‘bodice’ (or shirt, in modern terms). All very sensible for keeping a child neat and trim at the waist yet allowing for easy and quick access when changing a nappy or potty training. For the slightly older boy, instructions are given for the making up and setting in of pockets and fly-fastenings. Pyjamas and shirts are also covered in this chapter although remember that no patterns are given; it is simply the order of making up and the appropriate seams and finishes which are covered here. Hand-sewn and bound buttonholes are introduced here and the introduction of gussets into the end of the cuff opening placket and the bottom of the side seam where the shirt tails commence.
Chapter XIII, trimmings for boys’ clothes, admits in the very first sentence that it is a very short chapter, as boys whose clothes are over-trimmed will soon be teased by their peers so the author quite rightly urges restraint. She suggests that up to the age of three the clothing may be as ornate as the mother chooses and even up to the age of four or five rompers may possess small amounts of smocking or laid pleats are acceptable but in today’s society I would advise that these age limits are shunted downwards quite considerably! Some of these details have survived better than others though: whilst I cannot think of having my son have smocking at any age, pintucks and laid tucks I would be perfectly happy to introduce in a linen or cotton shirt at any age up to about seven or eight. The author suggests that while hand embroidery is ok up to the age of four or five, much less should be used than on a garment for a girl of the same age and neat topstitching, tailored details and belts, collars and cuffs trimmed in a plain, contrasting colour is a better choice for little boys. Unexpectedly, embroidered buttons are introduced at the end of the chapter.
Dressing the older girl introduces the subjects of darts, flimsier fabrics, french seams and methods of supporting the fabric when sewing flimsy fabrics such as chiffon.
Chapter VI covers another of my favourite topics, that of mending and cutting down of clothes.
Preventative mending is covered very well, with suggestions for almost imperceptible reinforcements to stockings, socks and jersey elbows and the seats of pants. Also suggested is the use of linen tape behind any area receiving strain from buttons and the suggestion to reinforce by extra stitching any button or fastener in a bought garment, making certain to include shanks and suitable reinforcement. This makes it much less likely that the garment will suffer damage from a button pulling free or the bother of having to find a match for a lost button.
Patching and darning are covered well, including how to pattern match the patch to the surrounding area.
Cutting down of garments is covered quite briefly here and it is pertinent to note that it is covered much more comprehensively in “Home Dressmaking” by the same author.
Fancy Dress commands a whole chapter and challenges the mother to look afresh at all manner of household items to see whether they could be utilized as costume. The author recommends a “Costume Trunk” into which can be thrown any old garments which would lend themselves well to being adapted to theatrical purpose as well as scarves, curtains, beads, woollen skeins and ribbons. Photos are given for a highwayman, a nun and an Arabian as well as instructions for making a wig out of wool and various ideas for curtains, pillowcases and old sheets.
Finally there are chapters dealing with baby equipment and nursery furnishing. Trimming a baby’s cot and providing the bedding is straightforward. More interesting to the modern reader is the idea of making the baby’s own mattress at home from a flour bag filled with chaff, this being – it is insisted – easy to wash and renew as well as being cheap to make and comfortable besides. Another cautionary word though: instructions are given for making an adorable wadded quilt, similar in looks to the satin eiderdowns so popular during the 1930s and 1940s. Modern childcare advice is to avoid the use of quilts on the bed of infants under the age of one; ours being an age of central heating the child would risk overheating and small babies can neither regulate their own body temperature nor kick off the excess layers. Instructions for making a larger one for an older child are also given and this would certainly be fine to make today as the size given (4ft long by 2ft 6 inches wide) clearly equates to a small single bed.
The final project suggested is a loose cover for a small armchair, one of which is often found in the nursery for the child’s use and I conclude that anyone who completed all the projects contained in this little book would clearly be very competent by the end of it!
Copyright of the blog owner 2013
09 Feb 2013 Leave a comment
in Book Reviews
A lovely little volume, hardbacked, measuring about 7″ x 5″ and with good quality, silky paper. It is a comprehensive volume, quite wordy compared to others of its type but the descriptions are clear and good and the diagrams, where they do appear are well drawn and easily understood.
I often measure the usefulness of a book by how well it covers the subject of gussets. I laugh whenever I write that but it’s true. I often make little garments with square-set sleeves which require a gusset set into the seam yet many books – thankfully not this one – deal only with the setting in of the triangular type commonly found as a reinforcement at the bottom end of a side seam on garments having a curved hem, such as a shirt with shirt tails.
It covers the absolute basics such as the correct way to use thimbles and needles, basic seams and hem stitches, casting on two and three knitting pins, darning, patching, the use of tapes and other reinforcements, buttonholes, turning a heel on a sock or stocking, working with pleats, tucks and gathers as well as decorative stitches.
The cutting out section happily contains workable patterns (illustrated upon grids and with dimensions clearly labelled) and useful hints about cutting out such as to caution against cutting a curved seam too deep as once cut out the curve cannot be made tighter whereas to cut away excess is comparatively simple.
Line drawings are also included of some of the finished articles, nicely drawn and with good attention to the detail and neatness which best tempts the reader to attempt the item. Shirts (both day shirts and nightshirts) for men and boys are covered here together with chemises, petticoats, night dresses, aprons, pinafores, combinations and drawers (knickerbockers) are all covered as are the techniques required for finishing them, for example the working and neatening of plackets, false hems (facings), sleeves, collars and bands. A wide selection too of infants’ garments together with example costings and suggestions as to suitable materials make this a useful resource for anyone interested in infantwear as with some obvious exceptions such as stomach bands much of these little garments are timeless.
It is also worth noting how unusual it is to have any boyswear covered in dressmaking books. As previously mentioned, boys shirts are covered here. I have often been disappointed to find that books purporting to cover the subject of childrenswear indeed concentrate purely on infantwear and beyond that, dresses for little girls; boys being seemingly forgotten. I’m not making the mistake of thinking that little boys didn’t wear dresses as toddlers either; one such book was published in the 1950s.
The third part of the book deals with the knitting or articles such as stockings and socks, knitted vests, petticoats and jackets, hoods, scarves and muffatees (a long, knitted cuff worn over the wrist and hand with a hole for the thumb), shawls and muffs, quilts, blankets and fringes. Netting, crochet, straw weaving and plaiting are also given a brief mention towards the end of the book.
In conclusion another very comprehensive but eminently usable book, well worth space on the bookshelf and not one I will be in a hurry to part with.
Copyright of the blog owner 2013
09 Feb 2013 Leave a comment
in Book Reviews
I am lucky enough to own the above books bound as a single volume but will review them separately.
Another highly rated little gem from my collection, this volume once again answers my desire to collect books which not only teach construction technique but which also give workable patterns, or instructions on how to create them so that perfectly authentic examples may be created without having to trust to the authenticity of patterns created for commercial sale by others.
The scope is obviously not particularly wide – you will not find herein the means to create a period ballgown or walking outfit but for the basic garments easily made at home such as childrens’ pinafores, chemises, overalls, aprons, knickerbockers, nightshirts and nightdresses for all ages, combinations, day-shirts and infants clothing you will find little better than this book.
The methods given are often simple – frequently worked to a proportional system of folding a sheet of paper – but this makes them very approachable. The garments are also made with the absolute minimum of waste – a Cottage Pinafore gives a very pleasing arrangement at the shoulder simply by clever cutting and with zero waste along that seam.
Written as an aid to teaching, this volume starts at the absolute basics. The correct use of a thimble, how to hold the needle, how to form a stitch – all are covered here. Knitting, darning and patching are also covered very comprehensively and ever with practicality in mind. As well as the ubiquitous instructions for hems, seams, buttonholes and decorative stitches here you will also learn how to turn the toe of a knitted sock, how to deal with a hem crossing a seam and how to sew the strengthening gusset at the foot of the side seam.
The discovery (or rediscovery) of methods still valid today but seldom taught are what make these old volumes such a delight. Anyone who has ever struggled to make gathers sit neatly would welcome the instructions for ‘stroking’ which induce them to lie in such uniform fashion.
The diagrams for cutting out are shown drawn against a grid, with dimensions clearly displayed for each piece, making it simple to recreate it for oneself. The grids are turquoise, the lines themselves either black or else red and they are very easy to interpret.
If I had to choose to keep only a fraction of my books, this one would surely survive the cull as it contains much that is covered elsewhere and more besides.
A companion volume to “Manual of Needlework and Cutting Out” by the same author and somewhat harder to come by, I am lucky enough to have secured my copy bound up with the former title as a single volume.
Whereas the earlier title also gave a substantial attention to cutting out and making up, it gave equal attention to the basic skills, seams, hems and techniques required in their making up. Such preliminaries are entirely skipped over in this second volume. I am happy about that as every other book I possess seems to demonstrate slip-stitching a hem and I would much rather dedicate shelf-space to new subjects.
A certain degree of overlap is admitted, especially in the clothing types for which the patterns and instructions are given but the patterns are not the same as those covered by the previous book and in addition to the chemises, petticoats, aprons and nightshirts, more advanced items are introduced such as some very fancy sleeves and sleeveheads and also techniques such as bone casings and gussets discussed in greater detail.
As the title suggests, this volume also gives detailed instructions as to the making up of the garment, the order and the types of seam suitable for each part. This makes it a valuable addition to the bookshelf of anyone interested in authentic techniques as well as the patterns of the turn of the last century.
Obviously a sewing machine could be used to save labour on the longer sections of the projects described in this book but it will be found that there are many areas, such as the insertion of square gussets, where hand-sewing is much simpler.
Copyright of the blog owner 2013
09 Feb 2013 2 Comments
in Book Reviews
This is a small, hard back book bound in red linen. Compared with the book “Dress Making” by Mme Trois Fontaines, published at a similar date the quality and size of the volume are inferior but despite this and the similarity in subject matter Ralston’s book still possesses plenty to recommend it.
The diagrams are not as large and clear as in the Fontaines book but the styles shown within are much more casual and practical. Where Fontaines supplies a great range of evening dresses, Ralston provides a sweeter and somehow more achievable selection such as a lovely, V-necked blouse, two different styles for a tennis dress and a number of dresses I would best describe as neat and stylish day-dresses for the modern, office-working girl.
Ralston does have one quirk which, as a trained pattern designer I have never encountered elsewhere – that of including a strange little tuck pleated into the shoulder edge of the bodice block exactly where one would expect a shoulder dart to appear. The block itself is drafted entirely without darts and this little tuck is intended presumably to supply the necessary ease for the bust.
Two foundation garments are provided as a basis for the patterns: a bodice and a sleeve. The skirt is drafted simply as a rectangle so not a block in the modern sense. The bodice block is incredibly simple, being dartless as previously mentioned and as with the other diagrams is simply a line drawing with red ink used for emphasising the main construction lines.
The drawings are less easy to follow than Fontaines, as the description of the type and colour of the lines used is described for the one and only time in Chapter V, before which point one simply had to muddle through with ones own interpretation. That said, the key is not a complicated one – red, solid lines to show the original block; red, dotted lines to show construction lines and black, solid lines to show the new pattern as it should be cut. This information appears before the pattern cutting proper commences so is not too far removed from where it is best needed although I do believe it would have been better to mention it before commencing the blocks as these make use of all three types of line but without the benefit of explanation.
Ralston is a more wordy volume than Fontaines but this is not to its detriment. Many a gem of advice is contained therein both on the subject of taking measurements correctly and in the proper manner in which to construct the garments, many of which tips are simply not widely covered today.
The style of reading is easy to follow and in reading it I was impressed that such a wealth of valuable information could be imparted so simply and so sensibly. There is nothing herein what Fontaines does not cover yet more comprehensively (and indeed liberally) but unlike Fontaines, the Ralston volume can be slipped easily into a pocket, a bookshelf or a handbag and covers wonderfully well a wide range of accessible and authentic patterns for anyone interested in this era.
Copyright of the blog owner 2013
09 Feb 2013 Leave a comment
in Book Reviews
Apart from the great beauty of the illustrations, wonderfully evocative of early 1930s glamour this book has two main strengths which particularly recommend it.
First is its size. The paper is silky and thick and at a hefty 14″ by 11″ it is quite a beast but this works to its advantage as the greater size of the diagrams makes them much clearer to follow and the notes with which they are labelled much easier to read.
Written instructions are concise, the diagrams being sufficiently clear and well labelled to act as the main source of instruction in recreating them.
The second area in which this book particularly succeeds is that of subject matter. Fundamental preliminaries such as accurate measuring and the adjustments to be made for various figure shapes/deviations are covered fully but succinctly, a mark of the both the confidence and the competence of the author, leaving the rest of the book for the patterns themselves.
It is rare in my experience to find a book so fully dedicated to the actual creation of patterns. Plenty of books relating to dressmaking flit quickly over the subject of pattern drafting. They may instruct how to make a basic block, a foundation garment from which to work but the majority then assume that you have purchased a pattern and need only to be taught how to set in the collar, work the seams, hems and buttonholes.
This book is quite the opposite. You won’t find how to make a bound buttonhole here. What you will find though is instructions for the basic foundation blocks, all worked to your own measurements, and a very generous number of style variations based on them, together with full instructions on achieving the same.
As I previously mentioned, the diagrams are large, well-drawn and clear. Refreshingly free of clutter, they are easy to follow and understand and are liberally used.
Anyone wishing to make up these styles exactly as they appear in the book would be advised to remember that the fashionable figure was long and slender, and the foundation bodice block uses a single long bust dart set into the shoulder seam – not at all appropriate for anyone with a full bust. However neither were the styles so if your figure is less than willowy you may have to forsake historical accuracy and draft a bodice better suited to your shape but the style ideas are here and may certainly be applied to a more modern foundation draft.
In conclusion this is a valuable resource for anybody interested in reproducing authentic 1930s clothing from equally authentic patterns. It would also make a wonderful addition to the coffee tables of anyone who loves beautiful books.
Copyright of the blog owner 2013
18 Jan 2013 Leave a comment
in Book Reviews
It made me smile to see how, over a century later, the same problems remain as tricky as ever! What follows is a transcription from the 1894 version of “Dainty Work for Pleasure and Profit” by Addie E Heron (including original typos and spellings) although the daily rate recommended her may need changing! That said though, consider that this amount was no mean consideration back in 1894 and is surely a reminder never to sell one’s time too cheaply:
and especially is this the case where parties are acquaintances, and may be friends. The social relation should not be considered in this connection, and the only successful method is to adopt a rule of procedure to be applied to all cases, and apply it impartially. Never accept an indefinite order, as
“my dear Mrs A. I believe I will have you get me up something for my dressing case, something pretty!” “What would you like?” “Oh, I’m not particular, just anything that would suit you!”
Never be betrayed into filling such an order. Insist upon the name of the article being specified, the nature of the work, the scheme of color, the amount of work, cost and nature of the materials, and last the price of the whole when completed. Make a memoranda of the items in the form of an order, read it to the lady and pass it to her for her signature. This will preclude the possibility of any mistakes being made, and leave no loophole for misunderstandings to occur when too late to rectify them. Be sure to fill all orders according to agreement, make out a bill for the work and present when the work is delivered, and insist gently upon payment at that time; if this is not possible have a definite time set when you are to call for the amount, and be punctually on hand. Women, as a rule are apt to be careless in regard to the payment of such bills, and allow them to run into indefinite time, but they will none the less be your customers because you insist upon your rights in a dignified manner.
When the parties are not known to you insist upon an advance payment of at least one half the price when the order is taken, and the balance upon delivery.
Do not work too cheap, neither be exhorbitant in your charges. Make the estimate of cost upon the time occupied in filling the order; at the rate of $1.50 per day is a fair consideration. When possible furnish the embroidery silks, linen or other threads used in your work; by this means you will always be certain of having correct shading and then, too, the profit on the same will be an item worth considering at the end of a year, as you will be able to make arrangements to secure these materials in small quantities of the wholesale houses.
The chapters on “Shading,” “Designing,” “Stitches,” “Materials,” “Art Embroidery,” including “Roman Embroidery,” “Kensington and Satin Embroidery,” “Application of Stitches,” and “Drawn Work,” contain all of the instructions necessary to thoroughly equip one for “Order Work”, without the aid of a teacher, if even the learner has had no previous instructions in embroidery, providing she has any natural aptitude for the work.
Copyright of the blog owner 2013
18 Jan 2013 Leave a comment
in Book Reviews
The fashion of the present day runs towards beads in every colour and design, and although the making of beads is not exactly a needlework economy, it is a dress economy, and that is very nearly related to needlework.
I have been very successful in making all sorts of articles for ornamentation – from beads, sealing-wax, broken china, a little gold paint and some glue, not to mention a little grease and a knitting-needle.
I began my home-made bead-making from necessity, because I was unable to find any beads to match a particular frock I very much wanted a string for. Also, in hunting everywhere for them, I found that the really artistic and barbaric ones ran into a great deal of money, especially if they were large.
Now, I wanted an odd shade of blue, which was really no shade at all, because the material was old and had faded to the beautiful tint which it now possesses. I could not procure any tint that were even remotely like it, and so my idea of making some for myself was born.
To begin with, I bought for six-pence a large box of assorted beads, such as are sold for children to string at kindergarten.
At a stationer’s I bought up a whole lot of broken sealing wax for a very little money, purchasing at the same time, two good sticks, one of gold and one of silver. These I carried home and sorted as best I could into shades of different colouring.
You will be surprised to find what a lot of different tones there are to be had in sealing-wax, though, when buying, be careful not to be taken in by the outside of the stick! I bought what I thought was a beautiful shade of lavender, but fortunately was told by the assistant that it was really a dark blue, which had been in the window and faded! Blues will often fade mauve, and reds will become pink. But you will easily avoid mistakes by looking at the box which gives a description of its contents.
Broken China the next Requisite
Having secured what I wanted at the stationer’s, I next looked through the china pantry and kitchen cupboards to see what I could find in the way of broken china and glass.
I turned out quite a nice little heap from here, and then went to the tool-house, where I had a little store, which I had dug up out of the garden.
I never can understand where all the broken china comes from which is always to be found in every garden when the earth is turned up. I have a small basket full of all sorts of odd pieces in bright blues, reds and yellows, which appear to be chips from plates or saucers. I should think it would take a generation of families, and their tea, dinner and breakfast services, to account for the quantity and colouring I have by me.
All this china I washed carefully in soapy water, rinsing in very hot clear water, and drying whilst still hot. By this means the china and lass keeps its shine, and if set in the sun for a little while it will greatly improve the lustre.
Next I sorted the colours, and then, with the aid of a wooden hammer and a piece of felt, I cracked the china into tiny pieces. Be careful in doing this to put the coloured side of the china downwards, and lay on a piece of felt, with another piece on top. Hit gently, but firmly, and where the piece is cracked insert a nail or strong pin in the crack and hit with the hammer. The cracks will split and will leave a nice edge, which is very useful for sticking in the sealing-wax. Break the pieces as small as possible, but leaving the colour to show on one side. If you smash at the pieces they will powder and be no use at all.
Whatever odd beads you have, or old pieces of coloured paste and imitation stones – which are often to be had in old buckles – spangles and bugles, all are grist to the mill. I have also used broken pieces of pebbles and stones which I found amongst the gravel, and which were broken by the roller, and which, when chipped very fine, displayed really brilliant colouring. Pieces of flint with a sparkle of mica look beautiful.
Having completed this collection, I turned my attention to the bead-making, and I began in this manner:-
I started with a set of six large beads in blues for my chain. I chose the largest beads in my assorted box, irrespective of colour and shape. Taking one of these I slipped it over the end of a steel knitting-needle, using one large enough to hold the bead tightly. This needle I first greased with a rag on which a little lard had been rubbed. This prevents the sealing-wax adhering to anything but the bead.
Next I lit a taper, and, using blue wax, I covered the bead roughly with it, turning the knitting needle in my hand, so that the hot liquid ran round it. This I plunged into cold water.
Before proceeding, I would like to say that great care must be taken not to smoke the wax when a taper or candle is used; if you will heat the wax in the centre of the flame, you will find that the colour does not become blackened.
As soon as the blue wax has cooled, without hardening, I splashed on some of the gold, and, turning the bead rapidly in the flame itself, the gold mingled with the blue, so forming a sort of marbled effect. This I also plunged into the cold water.
Then I chose a brilliant yellow wax, and, heating it in the candle flame, I squeezed the tip into a sharp point.
This, in turn, I heated, and dabbed it at regular intervals round the bead to form spots. While the spots were still soft, I pushed into the centre of each one a tiny piece of broken china, in a pure turquoise shade, pinching the wax to cover the rough edge.
Do not use the fingers to the sealing-wax more than can be possibly helped, as touching it takes away the glaze.
I made three beads similar to this design, and three in a paler shade of blue, with the same yellow spots, but using pieces of dark red china instead of the turquoise. These I strung with a three-inch length of small yellow beads (which I bought at the same shop as the box of beads came from, and which were also sold for children’s kindergarten work) between each large one, and the chain, when finished, looked truly beautiful. It certainly enhanced the beauty and value of the frock for which it was made.
To match the chain I made four buttons, used to fasten the shoulder-pieces of the bodice, in the same colours and the same design.
To make these, any old buttons that have shanks to them will do, but have shanks they must, as there is no other means of fastening them. I had four old brass buttons, with flat, shiny tops. With an old knife I scraped the face of each so as to make it rough, as the wax adheres better to a rough surface.
I used a piece of cardboard – piece of an old box – and cut four small slits in it large enough to slip the button-shanks through. On the other side I slipped a burnt match into the shank of each, and by this means the buttons were quite firm and did not wobble about.
Then I covered two with dark wax, and two with light wax similar to the beads, scraping away any wax which had overflowed on to the cardboard. Before it was cold I pressed a tiny ring of the small yellow beads round the immediate edge, finishing off with a spot of the yellow wax in the centre of each, and a scrap of broken china in the centre of that, again.
I found the buttons a little rough on the edge, but, with the aid of a nail file, I rubbed them fairly smooth, and they did not notice when sewn on the frock.
I have made buttons and buckles galore from old oddments, using up different coloured beads in an inlaid fashion.
A most effective way is to cover the surface of a button with a thin layer of glue, and to lay the beads on in a design like a mosaic. This is a really beautiful way of decorating buttons, and a very pretty opaque look can be given by sprinkling the beads, while the gum is still wet, with a little of the flitter used in pen painting.
Copyright of the blog owner 2013
14 Jan 2013 Leave a comment
in Book Reviews
A Book of Mending and Making with Oddments and Scraps. Thus is the book subtitled and what a little gem it is. Now there are indeed many books, and reprints thereof dealing with post-WW2 thrift but those dating from post-WW1 are much less common so it was a great delight for me to recently lay hands on this fascinating little volume, undated but having a typically Arts and Crafts cover.
I did want to share for you one particular project, which struck me as uncommonly useful and economic, not least because it utilises tiny scraps and threads and all of the snippets which are typically discarded during any needlework project.
Bedclothes become an expensive item when there are several beds for young people to be made up, as well as those for their elders. Yet warmth is essential, if their health is to be maintained.
In the winter, there usually comes a night of sudden cold, so raw and so intense, that it seems next to impossible to put too much on the beds. Every spare blanket is turned out, and every eider-down, and still there is not enough! Next morning someone is sure to say they never got warm all night!
Of course, eider-downs are ideal. They are warm without being heavy. But real eider-downs are expensive. Here is a substitute that was popular in our grandmothers’ day. It is simply a quilt formed of small bags, sewn together like patchwork, each bag containing a certain amount of snippets and clippings. Very simple, isn’t it? And yet these quilts, that cost practically nothing, are invaluable in the cold weather. Put one of these over the outside of the bed, and the sleeper keeps as snug and warm as though under a couple of down quilts.
One great advantage of this quilt is the ease with which it can be made. A child can always run up a little bag; a child can also cut up snippets, if it is old enough to be allowed to use a scissors. Mother can run round a few bags with her sewing machine, just before putting it away after doing needlework. In this way the bags accumulate in a surprising manner, and joining them together, a few at a time, either by hand or machine, is not laborious or brain-wearing work.
For some years now, I have made it a rule always to have one of these quilts on hand. If I do not need it myself, when it is finished, I always know someone who can put it to good use. Any woman who has an elastic family and a non-elastic purse, is glad of one for a gift.
I save every scrap of material that would otherwise be wasted. If it is not new, I have it washed and thoroughly dried. All this waste goes into a bag that I keep hanging up in a cupboard in my bedroom. I never allow a large amount to accumulate, lest moth should get at it. I have seldom more than a couple of handfuls at one time waiting to be dealt with.
On my chest of drawers I keep a box. In this there is always a pair of sharp scissors. When I have a few moments idle – between the lights when it is too dark to see much else, or when my eyes are to do work requiring close attention – I cut up a few of the scraps from the bag into snippets about an inch square sometimes smaller, never larger. I put these in the box.
Then again, whenever I have any bits from dressmaking, or mending, or darning, it has become second nature to me to cut them up there and then into snippets, and put them in the box. In fact, I always have the snippet box on the table beside my workbox when I am sewing, and the bits go in as a matter of course as I go along. It keeps me so tidy. Everything comes in useful, even the fragments of darning wool, ravellings and basting threads!
I save any scraps of material large enough to make the bags; a useful size is five or six inches by three inches. I run up three sides of these when I have a spare moment; put in a small handful of snippets, and close up the end. These I put in a drawer until I have time to join them together.
I always machine mine together, as it is the quickest way.
Do not fill the bags anything like full, or the quilt will be impossibly heavy. If you fill the bag about a third full, or at most a very loose half-full, that will be quite enough. Each little bag just wants a slight thickness inside, to give the extra warmth, much the same as we sometimes line quits with a layer of cotton wool between two cotton covers.
The reason we put the clippings in little bags, instead of into one bag, is to keep the stuff evenly distributed over the surface of the bed. Otherwise, every time the sleeper turned over, or disarranged the coverings, there would be the chance of all the clippings slipping over, and collect themselves on the one side or the other of the bed, or possibly all falling to the foot of the bed.
A quilt made of the bags, not too full, can be shaken and kept thoroughly aired.
Almost any sort of material can be used for the bags, provided it is not too delicate in colour, as one does not want to have a quilt of this sort frequently going to the cleaners. Strong stuffs are best, such as cretonne, serge, stout print, sateen – anything in fact that will stand some wear.
Mix cotton clippings with wool clippings in each bag. Obviously the quilt will not need any lining, as the back will be fairly neat. If you like, you can finish the edge with a cord; but I myself always aim to get the outside bags all one colour scheme; this in itself makes a certain finish – a kind of border – and I just leave it at that. After all, these quilts are not for ornament so much as stern utility; nevertheless, they can be made to look really pretty, if a little care and taste is expended on the placing of the various colours and designs.
Copyright of the blog owner 2013
09 Oct 2012 4 Comments
Last year I obtained a darning spring which is fixed in place of the needleclamp. It does not carry any part number but came to me amongst a collection of other Singer attachments in a box marked as being for a Singer 66. I had hoped to be able to use it on my main machine, a 201k but couldn’t get it over the needlebar. Neither would it fit my 222k nor my 15k. I didn’t have much luck online discovering whether the model 66 (and presumably 99) had a different needlebar to the 201k, the 15k and the Featherweights so now that I have discovered the answer for myself I am anxious to share it. The spring will fit a 28k and a 99k.
The important difference in the needlebars lies not in their diameter but in the design of the needleclamp and how it affixes to the lower end of the needlebar.
The 201k, 222k and 15k all have a needleclamp into which rests the final thread guide and the end of the needlebar is designed to accommodate this. See fig 1.
The 99k uses a much simpler design in which a longer portion of the lower end is milled away to a smaller diameter and it is this which will accept the needleclamp style of darning spring (fig 4). Fig 5 shows all three together.
I shall properly review its capabilities in a future, planned blog post covering darning/free motion embroidery methods, including a number of different feet and attachments including the Stoppax darning spring which I have recently obtained.

Fig 1 – Needlebar style of the 201k and 15k (needle side). |
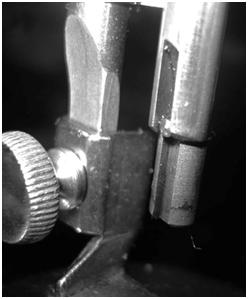
Fig 2 – Needlebar of a 99k (needle side). |
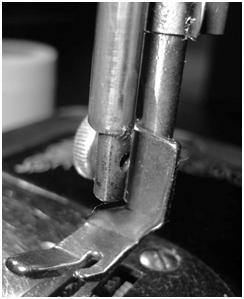
Fig 3 – Needlebar of 99k (screw side). |
||
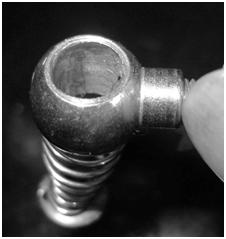
Fig 4 – Darning Spring (showing circular cross section) |
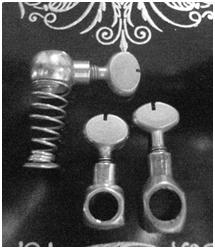
Fig 5 – L-R: Darning Spring, 99k needleclamp, 201k needleclamp. |
|||
Copyright of the blog owner 2012
09 Oct 2012 4 Comments
in Book Reviews
As I seem to be collecting more and more books these days I have plenty of material to review so this is the first in what I hope will be a series of book reviews, all relating to sewing, needlecraft or pattern cutting and as you would expect, there is a definite slant towards the vintage. There is understandably a great deal of overlap in subject matter in the many books published by different companies, especially evident in the various large grasscloth covered tomes published over the middle decades of the twentieth century so I will seek also to stress each ones particular merits over its peers and hopefully guide the reader towards the one which represents the best investment for them.
Of the two books mentioned in the title, given the similarity in their own titles the reader could be forgiven for assuming that the former is a reworking of the latter. This is partly true but the later title is by no means a simple republication of the same work, even with additional chapters for lace work. It is a total reworking, with different photographs, different text and different examples altogether.
The earlier work has 93 pages whilst the later book has 225 and the indices are given here for comparison.
| The index of the 1911 edition: | ||
| General Instructions Shaded Embroidery (Flowers) Art Embroidery Raised Embroidery Scallops, Beadstitch, Cording Venetian Embroidery Seed Stitch English or Eyelet Embroidery Shaded Embroidery on Velvet or Plush Gold Thread Embroidery |
First Openwork Stitches Filet, Netting or Open Mesh Embroidery Hedebo Embroidery Richelieu Lace Point Venise Renaissance Lace English Point Duchess Lace Brussels Lace Novelty Lace |
Point Lace Cluny Lace Hemstitching Mexican Drawn-Work Mexican Drawn-Work (Second Part) Teneriffe Wheels Velvet Appliqué Net Appliqué |
| The index of the 1941 edition: | ||
| Foreword General Rules Preparation of the Machine Correct Posture of the Operator Operation of the Machine Embroidery by Electricity How to Trace Designs Preparation of the Work Rules for the Size of Stitches Rule No. 1, Stitching of Drawn Work Rule No. 2, Cording Tensions Embroidery Work with Heavy Thread Table of Stitches Per Half Inch Indicating the Threads and Needles Most Suitable |
First Course of Study Lesson 1: First Stitches Lesson 2: Cording Lesson 3: English or Eyelet Embroidery Lesson 4: First Openwork Stitches Lesson 5: Richelieu Work (Cut Work) Lessons 6-7: Hemstitching Lesson 8: Scalloping and Raised Embroidery – Satin Stitch Lesson 9: Letters and Monograms Lessons 10-11: Fancy Stitches on White Goods Lesson 12: Appliqué on Net Lesson 13: English Lace – Braid Appliqué Lesson 14: Brussels Lace Lesson 15: Filet Lace Lesson 16: Milan Lace Lesson 17: Bone Lace First Appliqué Lesson 18: Embroidery on Net Lessons 19-20: Needlepoint Lace & Venetian Richelieu Lace Lesson 21: Smyrna Embroidery Lessons 22-23: Venetian Lace – First Stitches Lessons 24-25: Shaded Embroidery |
Second Course of Study Lesson 26: Teneriffe Wheels Lesson 27-28: Mexican Drawn Work Lesson 29: Hedebo Embroidery Lesson 30: Velvet Appliqué Lesson 31: Battenberg Embroidery Lesson 32: Appliqué of Cretonne Lesson 33: Blond Lace Lesson 34: Valenciennes Lace Lesson 35: Cluny Lace Lesson 36: Fancy Lace Lessons 37-38: English Point Lace Lessons 39-40: Artistic Embroidery on White Goods Lessons 41-42: Renaissance Lace Lessons 43-44: Fancy Embroidery Points on White Goods Lesson 45: Bone Lace – Insertions Lesson 46: Fancy Lace Edging Lesson 47: Bead Work Lesson 48: Rococo Embroidery Lesson 49: Venetian Embroidery Lesson 50: Imitation Velvet Embroidery |
| Third Course of Study Lesson 51: Crochet Lace Lessons 52-53: Duchess Lace Lesson 54: Bruges Lace Lessons 55-56: Spanish Point Lace Lessons 57-58: Genoese Net Lesson 59: Malta Lace Lesson 60: Bone Lace Edging Lesson 61: Guipiur Lace Lesson 62: Venetian Lace Lessons 63-64: Venetian Lace Faces and Figures Lesson 65: Cross Stitch Lesson 66: Raised Embroidery on Mesh Lesson 67-68: Embroidery with Gold or Silver Thread and Persian Embroidery Lesson 69: Chinese Embroidery Lesson 70: Wool Embroidery on Net Lesson 71: Artistic Shaded Embroidery Lesson 72: Granite Stitch – Round Stitch Lesson 73: Penelope Embroidery Lesson 74: Shaded Embroidery on Velvet or Plush Lesson 75: Italian Filet |
Fourth Course of Study Lesson 76: Frivolite Lace Lesson 77: English Lace, Making the Braid Lesson 78: Zambori Lace Lesson 79: Irish Lace Lesson 80: Lace with Gold Thread Lesson 81: Insertion of Szepes Bone Lace Lesson 82: Kis Koros Bone Lace Insertion Lesson 83: Rooniok Lace Edging Lesson 84: Cobweb Lace Lesson 85: Macramé Prince Weave Lesson 86: Fancy Lace and Embroidery Points Lesson 87: Fancy Embroidery for Dresses Lesson 88: Embroidery with Mercerized Embroidery Cotton Lesson 89: Embroidery with Metallic Cord Lesson 90: Imitation Tapestry Lesson 91: Embroidery on Leather Lesson 92: Bengal Lace Lesson 93: Crochet Points Lesson 94: Medallions Lesson 95: Mirecourt Bone Lace Edging Lesson 96: Fancy Work on Raffia Straw Lesson 97: Imitation Embossed Velvet Lesson 98: Sculpture Reproduction Lesson 99: Embroidery on Wood Lesson 100: Smyrna Rug |
Fifth Course of Study Lesson 101: Combination Lesson 102: Bed Spread Lesson 103: Bed Sheet Lesson 104: Table Cover Lesson 105: Boudoir Doll Lamp Lesson 106: White Lace Cushion Lesson 107: Altar Cloth Lesson 108: Table Runner Lesson 109: Kimono Lesson 110: Towel Lesson 111: Tea Cozy Lesson 112: Tray Cloth Lesson 113: Fancy Box Lesson 114: Window Panel Lesson 115: Runner for Dresser Lesson 116: Lamp Shade Lesson 117: Handkerchief Case Lesson 118: Picture Lesson 119: Curtains Lesson 120: Parasol Lesson 121: Sofa Cushions – Embroidered in Colors Lesson 122: Slippers and Bag Lesson 123: Baby Dress and Cap Lesson 124: Imitation Pen and Ink Drawing Lesson 125: Amphora Recapitulation of Points Names and Expressions of Common Usage |
The later edition may clearly be seen to have many more topics, cover a greater variety of laces and give a greater number of projects than the earlier book and is in all respects a more detailed volume. In my opinion it is also heavier going. The earlier edition is written in a much more accessible fashion and really does give a full and adequate grounding in all the necessary skills for this type of work. It is freely available to view or download here: http://archive.org/details/singerinstructio00sing .
I have not found an online version of the later title and assume that it is therefore still under copyright. This does however make it difficult for the reader to evaluate and compare the two books and decide whether he needs the later version and this is largely why I am writing this review of it.
The 1941 volume in particular does not give much by way of instruction; as well as referring back to previous lessons much is left to the common sense (and prior experience) of the reader when interpreting the directions. Each lesson is concise but includes good, large photographs, usually in colour and an indication of the weight and type of thread, the size of the needle, the respective tensions top and bottom and a suggestion of fabric and use.
Amongst some of the more novel approaches include using a crochet hook, overlaid with coloured wool down which is sewn a line of stitching to produce a line of loops, which may be either cut or left loopy. A similar technique uses a pair of large needles and a finer thread to provide an attractive, barred infill. Much use is made of cording and padding and the overriding impression is that labour saving as the machine doubtless is, none of these effects are achieved quickly – apart from the need for much practice in controlling the co-ordination of eye, hand, hoop and machine speed there is also the sheer patience required to produce this work in any great quantity, especially the hemstitching, ladder work and laces. Art embroidery it certainly is; it could definitely never be considered commercial!
So, would I recommend the later edition over the earlier one? Yes, I honestly think I would. It provides a fascinating insight into a surprising range of effects which can be achieved and even if I cannot see many people wishing to try each and every topic there is enough here to give most seamstresses some new ideas and some new stitches to try.
I will try to include here some of the more useful points to be gleaned, including a brief explanation of the terms and subjects which I (and I suppose others) have found it difficult to find information on online. I have only given a brief review of the laces and how they appear to be made as they are difficult to describe in any meaningful detail without including the photographs which copyright currently prevents me from including in any appreciable quantity.
| Table of Stitches Per Half Inch Showing Suitable Threads and Needles | ||||
| Embroidery Thread No. |
Needle No. |
Stitches Per Half Inch |
||
| Bobbin |
Needle |
Old No. |
New No. |
|
| 16 20 20 30 30 40 40 60 60 80 80 100 |
20 20 30 30 40 40 60 60 80 80 100 100 |
½ ½ ½ ½ B B 0 0 00 00 000 000 |
14 14 14 14 11 11 9 9 8 8 7 7 |
6 7 9 11 13 14 16 18 19 20 21 23 |
| Sewing Thread No. |
Needle No. |
Stitches Per Half Inch |
||
|
Old No. |
New No. |
|||
| 120 |
120 |
0 |
9 |
9 |
| 150 |
150 |
00 |
8 |
10 |
| 200 |
200 |
00 |
8 |
11 |
| Sewing Silk No. |
Needle No. |
Stitches Per Half Inch |
||
|
Old No. |
New No. |
|||
| 00 000 0000 |
00 000 0000 |
0 0 00 |
9 9 8 |
10 11 13 |
A Brief Description of Each Chapter:
Lesson 1: First Stitches
The fabric is hooped for these exercises and the stitch length set to zero so the stitches must be judged and placed merely by use of the eye and the hands moving the hoop. Emphasis is made of the necessity of gaining a good control of the machine in speed, starting and stopping and an exercise set in which the sewer should practice zigzagging, attempting each time to stop in line with the previous zig. The fabric is not pivoted around the needle; rather the user moves the hoop backwards or forwards depending on which direction the stitches are to go. A second exercise involves sewing between parallel lines, in what may be described as a square-ended zig zag and this further hones the user’s skill in stopping neatly on a predefined point.
Lesson 2: Cording
Cording is an important skill to master as so many of the following lessons depend upon it. In short, cording involves stitching a small, close satin stitch over a filler thread so that the result is a raised, 3D satin stitch. The same skills are used for raised embroidery and monogramming as well as some of the fancy stitches used on white goods. The fabric is again hooped and the hoop moved slowly and carefully left and right so that the stitches are formed equally and neatly to cover the filler. The filler is often a couple of strands of darning cotton and is secured by a couple of small stitches before being folded back on itself and stitched over by the beginning of the satin stitching. The filler thread is held in the left hand between the index finger and thumb and is held out just in front of the needle while the other fingers help to hold and move the hoop.
Lesson 3: English or Eyelet Embroidery
Most people will be familiar with this as Broiderie Anglaise. The design is marked out on the fabric and a thin outline of small stitches made around each shape. This is then reinforced by further stitching before the centres are carefully cut out and the edges corded. If the holes are small, a stiletto may be used instead of cutting.
Lesson 4: First Openwork Stitches
Openwork is akin to forming delicate, thread spiders’ webs with rows of parallel stitching spanning thin air from one side of the aperture to the other and then infilled either with further lines running at angles across these, running around over the joins in a circular motion or a combination of both.
Lesson 5: Richelieu Work (Cut Work)
This type of work is a cross between openwork and Broiderie Anglaise as it involves the cutting and cording of shapes but includes the formation of thread bridges across the apertures.
Lessons 6-7: Hemstitching
Threads are drawn lengthwise and are then sewn over and drawn together in bunches by the machine stitch. Further stitches are taken sideways into and back from the adjacent fabric to form a secure edge to the hemstitching and the work proceeds in this fashion to the end of the hemstitching. The lesson also covers fancier and more complex patterns of hemstitching. As the stitch length and thread bundles must each be judged by eye it strikes me that this is a laborious task and is best undertaken by those whose excellent eyesight is matched by their dexterity and skill with a machine.
Lesson 8: Scalloping and Raised Embroidery – Satin Stitch
These all use the same skills as were learned in the cording chapter, namely the overstitching of a filler thread only in the case of scallops and raised embroidery the stitches are shaped and in some cases include further cording to define their edges.
Lesson 9: Letters and Monograms
Yet further development of satin stitch, using all manner of curves, angles, swelling and tapering of shapes together with small, corded holes akin to those described in Broiderie Anglaise.
Lessons 10-11: Fancy Stitches on White Goods
Describing a number of small, regular stitches used as decorative infill. The stitches are not named individually but are referred to collectively as “fancy stitches”. They are all worked in symmetrical bands, bars or blocks so that they work to create a regular pattern across a defined area (for example, a petal).
Lesson 12: Appliqué on Net
Fine fabric such as organdie used in combination with a fine net, with raised embroidery and cording used to secure the edges of the chosen motifs and provide definition thereto.
Lesson 13: English Lace – Braid Appliqué
Similar to Richelieu but using also a narrow braided lace to define the edges and some of the inner shapes. Thread ladders bridge the gaps between the braid and the fabric and the overall effect is similar to the stone tracery and glazing of a stained glass window in a cathedral.
Lesson 14: Brussels Lace
A combination of lace motifs applied to a background net and fine cording applied thereto.
Lesson 15: Filet Lace
Often used as lace curtains this is a lace formed on a net with a large, square aperture across which are worked parallel lines of thread work to form a pattern, a bit like pencilling in squares on graph paper when developing a design for knitting or cross stitch.
Lesson 16: Milan Lace
A complex lace which uses a tracery of braid created by cross-filling between lines of parallel stitching and then provides bridging of small pairs of parallel thread bars each with small pairs of corded picots running perpendicular to the main bars.
Lesson 17: Bone Lace First Appliqué
Similar to Milan lace but more delicate and with shaped, rather than parallel lines of stitching forming the braided tracery.
Lesson 18: Embroidery on Net
Another lesson in which the stitches are not named individually but wherein they are merely applied to form pleasing patterns on the net background.
Lessons 19-20: Needlepoint Lace & Venetian Richelieu Lace
Needlepoint lace involves cutwork, bridging bars and then drawing small bundles of threads together and stitching over them to form a decorative, open meshwork from the background fabric. Venetian Richelieu lace involves the creation of the same open meshwork but without being in connection with cutwork. The two types are often used together though.
Lesson 21: Smyrna Embroidery
This gives a pleasing, flocked finish and is best worked on a fairly heavy background fabric. The design is transferred to the fabric by sketching it out on thin paper, laying this over the fabric, sewing through both along the lines of the design and then tearing away the paper to leave the stitched guide lines. The design is worked in knitting wool held slightly aloft over a crochet hook whilst the resultant loops are machined down. Once completed, the loops are cut through and trimmed down to form a neat, thick pile like a carpet.
Lessons 22-23: Venetian Lace – First Stitches
A very pretty lace consisting of small, decorative stitches, all repetitive but of slightly different form, used as filler upon the background fabric. The various motifs are divided by cutwork and corded bridging.
Lessons 24-25: Shaded Embroidery
This lesson best imitates the long and short stitches used in hand embroidery to provide the sheen and subtle shading typically used when creating embroidered flowers and leaves. The stitch used is called silk stitch and is made with two stitches forwards and one back.
Lesson 26: Teneriffe Wheels
This is a complex design the basis of which resembles spokes in a wheel. The spokes are then spanned by further machine stitching, forming a delicate pattern.
Lesson 27-28: Mexican Drawn Work
Similar to Teneriffe Wheels but worked in squared blocks as a repetitive design.
Lesson 29: Hedebo Embroidery
A delightful embroidery, sturdy in construction yet delicate. It is a small-scale cutwork worked in small shapes – leaves, petals, circles, diamonds and lozenges as the fancy takes. The shapes are then infilled with a combination of bars, ladder work and picots.
Lesson 30: Velvet Appliqué
The design is sketched in on thin paper which is then laid over the appliqué layer (velvet) and the background fabric. Sew through all layers following the lines of the design and then tear away the paper leaving the velvet sewn on to the backing fabric. The excess velvet is then carefully cut away and the raw edges corded.
Lesson 31: Battenberg Embroidery
A pretty embroidery using cutwork and cording together with satin stitch and bridge work to span the spaces.
Lesson 32: Appliqué of Cretonne
This involves the application and embellishment of coloured shapes such as flower clusters, cut from a patterned fabric and sewn on to netting. The edges are sewn using the shaded embroidery technique and other points such as stamens, leaf ribs and inner petal edges may be picked out similarly.
Lesson 33: Blond Lace
Somewhat against what the name suggests, the example given is of a black lace worked on a black net and is formed by stitching the outlines in machine stitching, cording them and infilling in different densities so as to give a sense of variable transparency.
Lesson 34: Valenciennes Lace
A very dainty lace worked on a fine, round mesh net and formed from fine, transparent infills and delicate cording, with minimal cutwork, the overall effect being of great delicacy.
Lesson 35: Cluny Lace
Another lace worked on small, round meshed net. The shapes and cording are much larger and heavier than Valenciennes as are the areas of cutwork.
Lesson 36: Fancy Lace
An exceedingly dainty lace again worked on small, round meshed net. Organdie is used as an infill together with tiny stitch patterns and a network of interlaced picots.
Lessons 37-38: English Point Lace
Extremely similar to the Fancy Lace described above.
Lessons 39-40: Artistic Embroidery on White Goods
Quite a heavy finish of satin stitching in combination with intricate latticework similar to the fancier types of hemstitching and Mexican drawn work.
Lessons 41-42: Renaissance Lace
Shapes bordered by braid are then filled with complex latticework. Cutwork and laddering joins the shapes together.
Lessons 43-44: Fancy Embroidery Points on White Goods
A very time-consuming confection of small and elaborate infills and counted threads.
Lesson 45: Bone Lace – Insertions
Very simple and pleasing but delicate. Very open cutwork joined by long and slender bars and occasional picots adding interest.
Lesson 46: Fancy Lace Edging
Another time consuming work which looks very fragile and difficult to keep nice. A large square trellis is formed within the fabric and the edges corded. The squares are then worked individually, acting as frames within which is suspended further tiny spiders webs of intricate thread work. Some of the squares are in themselves cut away to form larger squares which are then spanned by daisy-type wheels of cording. Pretty but I would think tricky and time consuming.
Lesson 47: Bead Work
The beads are threaded onto a long thread of silk the same colour as the beads being sewn. This string of beads is then laid along the line of the design, a stitch being taken across the thread between each bead.
Lesson 48: Rococo Embroidery
This is embroidery using ribbon turned and stitched down to form flowers, leaves and festoons.
Lesson 49: Venetian Embroidery
Very pretty embroidery worked in neat bars of clearly defined colour blocks, shaded from light at the outer edges to dark at the centre. The centres of the flowers are formed by loops made in the same way as for Smyrna embroidery but left untrimmed.
Lesson 50: Imitation Velvet Embroidery
Worked in a similar way to Smyrna embroidery but with twin needles used in place of the crochet hook and without raising them. The needles are used like filler cords. Sew across the first of the needles as for cording. Then place the second needle alongside it and “cord” this one too. This will give you two parallel rows of satin stitch. Now draw out the first needle, lay it alongside the second one and cord over it. Repeat all the way to end of the motif to be filled. When the rows are all complete, carefully cut open the satin stitched rows. The result is like shaded corduroy.
Lesson 51: Crochet Lace
Uses a picot braid and openwork bridges and wheels.
Lessons 52-53: Duchess Lace
Very pretty and delicate, worked with a variety of dainty infills and picots on a small, round meshed net.
Lesson 54: Bruges Lace
One of my favourites. Worked on a small, round mesh. Delicate lace motifs are applied to the net background and are enhanced by cutwork, dainty ladders and picots.
Lessons 55-56: Spanish Point Lace
Quite a haphazard looking lace, worked with large areas of cutwork and very thin, insubstantial-looking ladders.
Lessons 57-58: Genoese Net
Similar to Fancy Lace Edging, worked on a large mesh made from threads worked across a large aperture within the body of the fabric.
Lesson 59: Malta Lace
A very pretty and well-balanced lace, worked with stitchwork similar to Bone Lace and much use of cording.
Lesson 60: Bone Lace Edging
Similar to Malta lace but with picots.
Lesson 61: Guipiur Lace
Another of my favourites, this is a complex lace worked entirely across meshes and ladders formed by machine stitches. Much use of satin stitches and picots and extremely pretty.
Lesson 62: Venetian Lace
Similar to Guipur but with some of the background fabric retained, albeit worked, within the pattern
Lessons 63-64: Venetian Lace Faces and Figures
The same principles apply as above but the application is to create not a pattern but an object such as the face or the heron used as examples here.
Lesson 65: Cross Stitch
A small-meshed canvas is laid over the main fabric to act as a guide and the cross stitches are worked across both.
Lesson 66: Raised Embroidery on Mesh
Worked within an aperture of the main fabric, the mesh is created by parallel rows of stitched threads sewn perpendicular to one another to form a mesh of the required size. The pattern in then worked in satin stitch across this mesh. When working the pattern, the mesh is sandwiched between a layer of Organdie on top (on which the pattern is traced) and behind by a sheet of transparent paper which is afterwards torn away. The excess organdie is carefully cut away after the filling has been prepared so that the edges may be neatly contained by the satin stitches.
Lesson 67-68: Embroidery with Gold or Silver Thread and Persian Embroidery
The metallic thread is used on the bobbin and the work done face downwards. For Persian embroidery, the work is set the right way up again. Several different threads of different colours are wound together onto the bobbin and the bobbin tension substantially loosened to accommodate them. The top thread may match any of the colours used in the bobbin and the tension set sufficiently tight to pull through the lower threads into an attractive loop. The example in the book shows the goldwork used as a broad border around a colourful infill of Persian embroidery and the effect is most pleasing, giving the same effect as aurora borealis beads.
Lesson 69: Chinese Embroidery
Similar to Venetian embroidery except that the bars of colours are shaped to follow the contours of the petals.
Lesson 70: Wool Embroidery on Net
Worked on a mesh with wool wound in the bobbin and a matching silk on the top. Worked (and the meshes made) according to the instructions given in the book for Italian Filet.
Lesson 71: Artistic Shaded Embroidery
This is a free-hand style where a machine stitch is used to sketch an outline rather than shade the whole. The same stitch is used as for Shaded Embroidery.
Lesson 72: Granite Stitch – Round Stitch
This is a true freestyle stitch where the stitch is fashioned in tiny undulations or loops to form a tiny and very subtle form of shading and infill. The effect is similar to miniscule French knots and the degree of subtlety makes this most suitable for still life studies as well as those where a subtle graduation of colours and shapes is required.
Lesson 73: Penelope Embroidery
Uses a decorative braid called Penelope Braid to make an attractive, looped finish to a group of aster-like flowers. The braid resembles fagotting or a soft, picot braid.
Lesson 74: Shaded Embroidery on Velvet or Plush
The work is sandwiched between twin layers of organdie, the top layer bearing the design and the bottom purely for reinforcement. Once the layers are sewn through and the outlines reinforced by a second row of stitches the excess organdie is cut away from the top layer. The method of working is the same as for Shaded Embroidery given in an earlier lesson.
Lesson 75: Italian Filet
Worked on a mesh, this embroidery uses coloured infill within the mesh squares to form an attractive pattern.
Lesson 76: Frivolite Lace
Delicate cartwheels of picots joined across a central aperture within the background fabric.
Lesson 77: English Lace, Making the Braid
An alternative method wherein the braid is not laid on but is made as part of the design.
Lesson 78: Zambori Lace
A very pretty and substantial looking lace using a similar method of braid making to that given in lesson 77 above.
Lesson 79: Irish Lace
Another of my favourites. Substantial and three-dimensional lace made by building layers of petals and motifs upon a background of picots.
Lesson 80: Lace with Gold Thread
An intricate lace made with closely spaced parallel bars and gold thread used as accents and infill.
Lesson 81: Insertion of Szepes Bone Lace
A pretty and substantial insertion with cording and drawn thread work.
Lesson 82: Kis Koros Bone Lace Insertion
Pretty and substantial, using a lot of worked infill and twin rows of parallel bridging with picots.
Lesson 83: Rooniok Lace Edging
Openwork edged with an elaborately wrought braiding of closely spaced parallel thread work worked over with stitching and corded rows to form a semblance of braid.
Lesson 84: Cobweb Lace
A beautiful and dainty lace which is exactly as the name suggests.
Lesson 85: Macramé Prince Weave
Anyone who lived through the 1970s will be perfectly familiar with Macramé but this one differs. It is wrought across a corded aperture along the length of which have been created groups of parallel ‘warp’ threads of macramé thread. The ‘weft’ is created by a macramé thread which is stitched across to create the pattern.
Lesson 86: Fancy Lace and Embroidery Points
Nothing new in the stitch patterns featured but needing a higher degree of skill. The tiny, repetitive filler stitches are made with raised embroidery and cording on a very fine scale.
Lesson 87: Fancy Embroidery for Dresses
Two methods are described: the stitching of leather appliqué and the use of a machine stitch similar to blanket stitch, worked in wool and providing a decorative outline.
Lesson 88: Embroidery with Mercerized Embroidery Cotton
Worked wrong way up and with mercerized cotton embroidery thread in the bobbin. Worked on canvas with organdie to stabilize.
Lesson 89: Embroidery with Metallic Cord
Quite a fiddly lesson which teaches by what method may be achieved a finish resembling that often seen on military insignia. The method involves winding strands of plain and metallic cords, by hand, around the upper thread, beyond where it leaves the needles eye, laying it across the area to be worked and then securing the end of the cords in place by a couple of small machine stitches. The next row is done with further strands of the cords wound around the upper thread and the process repeated.
Lesson 90: Imitation Tapestry
Using canvas as a base, the machine is used to make a series of stitches worked diagonally across the threads.
Lesson 91: Embroidery on Leather
No mention is made of the use of a special needle but organdie is used behind the work to stabilise it and the work hooped. The same stitches (two forward, one back) are used as for Shaded Embroidery. A second method is shown which involves laying on, and overstitching pieces of wool which may afterwards be carded to give a three-dimensional and fluffy finish.
Lesson 92: Bengal Lace
This is a very pretty and colourful lace. Shaded bars of colour follow the contours of the motif; there are heavily corded borders and colourful ladder work for the bars.
Lesson 93: Crochet Points
Diagonal thread bars use a crochet hook to make a little looped picot at each change of direction.
Lesson 94: Medallions
These may best be described as embroidered “miniatures” as being contained within a small, black, oval frame is the only feature they have in common. Granite stitch and silk stitch are the best suited for this, scaled accordingly.
Lesson 95: Mirecourt Bone Lace Edging
A combination of several different skills and effects – bone lace, decorative thread work and cording.
Lesson 96: Fancy Work on Raffia Straw
The raffia is laid across and stitched down at the ends of each section, according to the shape of the pattern.
Lesson 97: Imitation Embossed Velvet
An interesting and labour-intensive method of creating a raised pile in the embroidery. As well as the main fabric, two layers of organdie are required, one of which bears the design to be wrought and also as many layers of scrim and interlining as are needed to build up a layer the same thickness as the required depth of the velvet pile. Perhaps needless to say, the more layers the deeper the resulting pile; the example uses twenty. Place the plain layer of organdie behind the main fabric to act as a stabilizer. Then add as many layers of scrim and interlining as are required and finally place on top the organdie on which the pattern is traced. The book makes no mention of basting the layers together before proceeding; I leave this decision to the reader. Silk is used as the top thread. With the top tension naturally loosened significantly the pattern is followed and entirely infilled with lines of machine stitches placed as closely as possible to one another so that they form a dense pile. Once the stitching is completed a solution of “mucilage” is applied to the back of the organdie which has been placed behind the main fabric and left to dry. I would suggest PVA glue might be an acceptable modern equivalent. The reason for this is presumably to anchor the back of the threads as securely as possible so they are less likely to draw free when cut. Once the mucilage is dry, turn the work over and with a very sharp knife (scalpel or razor blade, perhaps) begin to carefully scrape the lines of stitching over the top layer of organdie. This should sever the stitches and allow the organdie and layers of padding to be removed one by one until the main fabric is revealed, complete with its luxurious pattern of silk pile.
Lesson 98: Sculpture Reproduction
This is really just a project example of stitches already learned. This is a small, long-necked amphora made in shaded and padded embroidery in such a way as to look three dimensional. It is then carefully cut out and applied to a backing cloth whereon it is supplemented by a corded handle stitched directly onto the backing cloth.
Lesson 99: Embroidery on Wood
A fanciful notion, this is simple shaded embroidery worked on thin wood veneer which has been reinforced by two layers of organdie applied behind it, each in opposite directions for maximum support. No special needle is needed; merely a very fine one. Size 9 is suggested in this example. The wood is suggested to be no more than 1/25″ thick.
Lesson 100: Smyrna Rug
The same method is used as for Smyrna embroidery but upon canvas.
The remaining lessons are merely photographs of items made using the skills learned in the previous lessons. No instruction is given as to their making; merely a mention of the stitches or techniques used so I have decided that nothing useful can be added by covering those.
Copyright of the blog owner 2012
22 Jun 2011 10 Comments
Zigzaggers are potentially one of the most useful attachments to own if you have a vintage, straight-stitch machine and they can also be arguably one of the most frustrating and difficult to use so I thought that I would amass and compare a few different ones and give an honest opinion on their use.
On test were:
1. Generic, basic metal zigzagger with joining plate.
2. Greist Decorative Zigzagger
3. Singer Automatic Zigzagger, Simanco number 161157
4. Ruby Automatic Zigzagger
Not tested were YS Star Automatic Zigzagger, Singer zigzagger number 160620, Singer zigzagger number 121706 nor Singer (Swiss) zigzagger number 160990 as I do not presently own them. The Swiss Zigzagger is also incredibly difficult to find with a full complement of metal cams – which I believe number 10 in all – and the prices for even an incomplete set are presently beyond my budget. When and if I obtain any of these I will review them separately. I am keen to obtain a Singer 160620 as it has a cord guide, present on none of the models I tested today. I would also like to obtain one of the basic Singer zigzaggers 121706 on which the generic test one was based as again it has a cord guide and I am keen to compare the quality against the generic one which seemed a bit ‘clunky’ and imprecise.
Preparation: All zigzaggers were tested on the same fabric; a double thickness of medium-weight cotton twill. I did not use a darning plate nor drop the feed dogs. Where instructed, I adjusted the tension and threading path and in some instances loosened the presser foot pressure.
Generic, basic metal zigzagger with joining plate.

Generic Zigzagger & Joining Plate
Description: There is very little to describe, really. It’s a small, bent metal thing with a detachable joining plate and width adjustment made by means of a screw at the back of the attachment. It has good clearance of the fabric, perhaps too good as at times I felt that the fabric was not being fed as accurately and effortlessly as some of the other attachments although of all the zigzaggers this was the only one able to achieve a really narrow (1.5mm) satin stitch and the feed problems were minimised when the zig zag movement was kept small. Overall I felt that I had to work quite hard to keep the fabric feeding in a straight line, especially when the zig zag was a wide one. Tension-wise, there was tunnelling when the zig zag was wide but with the tension eased off to 0, the sewing speed reduced and the presser foot tension reduced the tunnelling was greatly improved.
Size: Smallest of the zigzaggers tested.
Scope: Just a simple zig zag with no additional stitch patterns but within its scope it is minutely adjustable between wide/narrow and long/short and gave the narrowest satin stitch of any of the attachments tested.
Price: Usually amongst the cheapest.
Pros: Widely available so no need to be patient or pay a lot of money.
Cons: When the zig zag was set to wide it was a little difficult to control the feed of the fabric and keep the row straight. This attachment would probably benefit from the fabric being stabilized prior to stitching. There is no cord guide in the front of the foot.
Conclusion: A good, basic zigzagger but definitely a budget model. Will do the job and do it well enough but I’d describe it as a utility model – fine for neatening seams but for topstitching you might be better to pay more and get one of the alternatives. That said, as this was at its best sewing a tight, narrow satin stitch it would be fine for producing a pronounced row of top stitching or else tiny appliquéd edging.
Greist Decorative Zigzagger.

Greist Decorative Zigzagger
Description: My favourite utility model, this is really sweet. It looks very similar to a blind hemmer. It uses small, steel pattern disks similar to the Swiss Zigzagger. There are four stitch widths marked along the side of the attachment and a sliding gauge which is moved along to correspond with these markings. The unit is easy to attach and the cams can be changed without removing the attachment from the machine. The zigzagger can also be disengaged without removing it – simply flick a tiny lever to disengage the cams and flick it forward again to reengage it.
The zigzagger includes 6 pattern disks and additionally, when used without a cam, produces a normal zig zag. Despite the title, the patterns all give utility stitches rather than decorative ones although the quality is good enough to be used for topstitching if desired:
In terms of setting up, I found this to be one of the more unfussy attachments: it required no special threading nor loosening off of the tension or foot pressure. It handled the fabric firmly but gently and – above all – consistently, producing a top-quality finish with no tunnelling.
Size: Dinky.
Scope: The best utility one I tested. It gives a good selection of stitches and whilst essentially utility they are of sufficiently good quality to be used decoratively too.
Price: Varies. Mid-range.
Pros: Petite, easy to use, easy to change the cams, gives a nice finish across all widths and stitch lengths, good tension and good fabric control. Unlike some of the other models the presser foot had a central gap through which to pass the thread.
Cons: Not widely available so depends upon a chance find. Despite its title, no really decorative stitches. Cannot be adjusted to give as narrow a zig zag as the basic Singer-type one. Cams small so easily mislaid. There is no cord guide in the front of the foot and no gap in the front of the foot, meaning that the top thread must first be fished through under the foot if it is not to become caught up in the stitching.
Conclusion: This one is a keeper and I suspect will be the one I usually reach for if needing to do zig zag.
Singer Automatic Zigzagger Simanco part number 161157.

Singer Automatic Zigzagger
Description: This was the largest model tested and subject to different cams gave the widest range of decorative stitches of any tested. I tested it with the following cam sets:
Set 1 (Red, as supplied with attachment):
Cam 1 (Simanco 161000) Zig zag
Cam 2 (Simanco 161001) Scallop of 5 small stitches & 1 larger zig zag
Cam 3 (Simanco 161002) Domino stitch
Cam 4 (Simanco 161003) Arrowheads
Set 2 (Ivory, Simanco part number 161008):
Cam 5 (Simanco 161004) Scallops (all small stitches)
Cam 6 (Simanco 161005) Walls of Troy
Cam 7 (Simanco 161006) Multiple Stitch Zig Zag
Cam 8 (Simanco 161007) Icicle
Set 3 (Blue, Simanco part number 161076):
Cam 9 (Simanco 161067) Key
Cam 10 (Simanco 161068) Ball
Cam 11 (Simanco 161069) Block
Cam 12 (Simanco 161070) Shingle
I found that the attachment worked very well although I did have to lessen the tension to prevent tunnelling on the wider zig zag settings. The cams are easily changed without removing the attachment from the machine – the lid is flipped up and the cam simply lifted out. The attachment can be completely disabled in situ by the flick of a lever, the mechanism being on a much larger scale than the Greist model and of a different design.
Size: Big. This is the largest attachment of those tested and the cams (which are cast aluminium) are also big although this does make them less likely to become lost than the tiny steel disks of a Swiss Zigzagger or Greist Decorative Zigzagger.
Scope: Subject to additional cams, the widest of all tested.
Price: Mid-range but cam sets can be expensive as they are not so commonly seen as the basic attachments with red cam set 1.
Pros: Versatility. Of all the attachments tested this gave the widest scope of patterns both decorative and utility and was also widely adjustable both in the bight width and in the stitch length. Markings on the front of the presser foot make it easier to keep the fabric feeding true.
Cons: For me, the size was a bit of a turn-off and I would have liked a central gap in the presser foot to make threading easier. There is no cord guide in the front of the foot and no central gap in the presser foot.
Conclusion: Despite its size I did feel that of all the zigzaggers tested this one gave the widest scope of decorative and utility patterns but the difficulty of finding cams mean it is not a choice for the impatient! It is, however worth the wait.
I did not test Set 4, (Yellow) as I do not presently have it but for the sake of completeness it comprises the following patterns: Curved Mending (Simanco 161071) which is a multi-stitched wavy line, Open Scallop (Simanco 161072) which is a satin-stitched scallop, Three Step (Simanco 161073) which is a satin-stitched diagonal bar and Solid Scallop (Simanco 161074) which is a satin-stitched semi-circle.
Ruby Automatic Zigzagger.

Ruby Zigzagger
Description: This was a real surprise, being built on a totally different principle to the Greist and the Singer models but working surprisingly well. Rather than have removable cams it works by selecting a starting position on a fixed, lateral cam plate which then acts upon the rest of the mechanism to stitch out the prescribed pattern. The starting point is set by moving a pointer into one of 8 numbered holes on the cam plate. I found that the fabric fed very well and that there was no tunnelling. It was easy to change between patterns mid-way through a row although the pattern width could not be altered. The instructions advise that the tension is slightly lowered and the tension spring ignored when threading and doing so I found that the stitch quality was impressive; very consistent and it was relatively easy to feed the fabric and keep the line straight.

The numbered holes used to select the stitch pattern on the Ruby Zigzagger.
Size: Medium-sized, similar to a basic, non-template buttonholer.
Scope: Surprisingly wide. Offered a good selection of patterns both decorative and utility. 8 decorative patterns, plus basic zig zag.
Price: Mid-range.
Pros: No cams to lose. Compact and easy to use.
Cons: Uncommon, so availability depends upon a chance find. Also, no means to change the width of the patterns although the stitch length could of course be altered. Cannot be disabled in situ. There is no cord guide in the front of the foot and no central gap in the presser foot.
Conclusion: Despite its limitations I love it.
Copyright of the blog owner 2011
12 May 2011 12 Comments
in Projects
Materials:
Approx 1m 8oz wadding
1m 4oz wadding (optional)
4 large dishcloths or roll of stockinette
1 bag of toy stuffing
Curved needle
3 reels of upholstery thread
Approx 1.5m heavy calico or ticking
Approx 10m narrow, black cotton tape
My dressform has always been a source of deep dissatisfaction to me because it just isn’t possible to get it to represent my shape. I have a narrow back and chest, next to no bum and a full bust. Oh, and the nasty, loopy, plushy nylon fabric gives me hangnails.
Another big annoyance was that all the places I wanted to place a pin were represented by gaps. Centre front, back and side seams all gaps, not tapes. There was no point in buying a Stockman or K&L as I would be paying for something which represented the average form, which I was not.
So I decided to modify my existing dummy. The first step was to cover the existing dummy in stockinette so I had something easy into which to anchor some stitches.

Dummy covered in stockinette
Next I placed one of my bras onto the dummy, secured it firmly and stuffed it out with toy stuffing. A full cup bra is best for this. I then covered the bra area with another layer of stockinette and padded out any gaps. I used some tape to hold down the stockinette close to the body.
The next step is to encase the whole dummy with layers of 8oz wadding, cut in a sort of princess line to mould around the bust. I drew up the pieces tightly and stitched them together to form a tight casing. Using a curved needle I sewed small stitches across the whole surface of the wadding, drawing it in flatter, compressing the fibres and giving a springier, firmer base into which I could pin.

Sewing down the first layer of wadding.
Extra contours were built up with patches sewn on, added to and drawn down with stitching until the correct shape and dimension was reached. It is essential to keep measuring so that you’re sure that the inches are going on the right places. An extra inch may not need to be put on all around. I made a mistake with mine in that it just looked, at one stage, much, much too barrel shaped. I am quite slender from the side and this wasn’t. Realising I had overestimated my ‘mummy tummy’ I took some off there and added the extra to the sides of my waist instead.
I created the mummy tummy by sewing on a circular patch, leaving the top edge open and stuffing with toy stuffing before sewing the pouch shut at the top. This was then stitched down and formed just the right bump.
Once I had the wadding all in place I added a second layer in 4oz wadding, lightly secured in place at the seams. Unlike the first layer it does not need to be compressed by stitching across it. This is because the first layer was intended to give a springy but substantial layer into which I could drive pins but this second layer was to smooth out any unevenness and create a looser, more spongy layer that could easily be compressed by my ‘tight lacing’ the outer shell.
This second layer should leave the dummy an inch or two bigger than the finished size. This is necessary because the cover will be drawn in and stitched very tightly, pulling the form in a little further so if it is not to end up too small, it must reach this stage slightly too large.
This in place, progress ground to a halt while I made some decisions about how best to approach the outer shell. Traditionally the method for this style of dummy is to wrap loads and loads of wadding (kapok,or cotton wool) around the dummy, make the shell as a tight toile fitted to the body and then padded out with more kapok to make it solid.
I have instructions for this method in an old needlework book but the finished item features a flattened mono-bosom rather than the cross-your-heart, lifted and separated silhouette I needed for mine. I make a lot of v-neck and cross-over garments so it is vital for me to be able to see where my sternum lies if I am not to end up with garments gaping at the neck.
I had to find an alternative method and this caused me a lot of headaches. Firstly, I wanted to cover the bust as two independent hemispheres with the sternum drawn down tight. I decided to base the cover on a princess line as I could then shape the panels to cope with the bust issue. I started by drafting a basic bodice block according to my measurements. My bust is large so requires much wider darts going into the waist seam than those which go from waist to hip so I always draft my bodice block to the waist only and do from waist to hip separately, as a skirt block.
Using my own measurements gave me a very odd armhole which I had to override and redraw according to common sense and after the first toile I also moved the bust point and shoulder dart.

Sometimes you just have to use some common sense.
Next, I created a second block based on this but with the armhole dart closed and pivoted into join the waist dart. I chose to swing it here rather than split it between shoulder and waist as because of my bust size my waist is comparatively close to my bust line so an exaggerated dart would be very helpful for gaining the close fitting silhouette I desired.
I then created a princess block from this draft and married the skirt block into it so I ended with eight hip-length panels plus a little extra to turn under and take a drawstring for closing it under the bottom edge of the dummy. Then I cut out the pieces and stitched them together, leaving one of the side seams open which would be hand stitched once the cover was in place on the dummy. I would then hand-stitch the other seams again with a curved upholstery needle and strong, upholstery thread, pulling the cover tighter by so doing.
I wasn’t happy with the central, waist section – I had adjusted the shoulder and neck quite a bit so whilst the length was fine at the front it now needed a little extra length at the back. So rather than go out and buy more calico and start again I cut the cover in half at the waist, moved the bottom half down a little and then added a new section around the middle and stitched and shaped it into place. I had to do quite a lot of yanking and dragging and strong stitching and my panel seams were far from the perfectly even ones you see on the professional dummies but I kept the stitches small and closely spaced and eventually my little Frankenstein’s Monster came together.
I have added narrow black cotton tape to the construction lines so that I can pin and drape with confidence. My dummy resembles me in proportions, in dimensions and most important of all, in balance front-to-back. At last I can model garments on the stand which I can personally wear.

The finished dummy.

Front close up.

Back of the dummy.

Side view of dummy.
Copyright of the blog owner 2011
14 Feb 2011 Leave a comment
in Projects
I’m afraid that this project was done in a bit of a hurry. That doesn’t mean that the quality was stinted upon but it does mean that I was not able to stop and photograph each stage.
Some of the extra time spent on this was on account of having to travel to get fabric and further time was spent drafting basic blocks for a three year old and from them drafting patterns…all the while dealing with the very eager intervention of a 33-month-old child!

The finished outfit
The outfit was designed for a little girl’s third birthday. She was born eight weeks premature and is quite short and petite so whilst I knew that a standard size 3 clothing would almost certainly swamp her I wanted to design something which would fit her both now and through the forthcoming summer and be versatile enough for all of the seasons in between.
So, with this in mind I decided to make a tunic-style pinafore, slightly flared at the sides. It is sleeveless, is short enough to serve her well as a short pinafore over tights and a long sleeved t-shirt yet when she grows taller can also be worn as a sleeveless tunic over the matching cropped trousers I have made in the same fabric. To add one last piece of versatility to the outfit I made a simple skirt in a contrasting fabric and picked out the colours from the main fabric in rows of embroidered, ric-rac satin stitch sewn in parallel bands around the hem.
The three pieces can be worn together (the ric rac embroidery is fully visible below the level of the pinafore hem) or in any combination. It is all very reminiscent of some favourite “mix-and-match” separates which my mother bought for me when I was about four. The colours were shocking pink and white, both as plain fabrics and as a sort of chequered tartan pattern incorporating both. I had a tunic top in the pattern, a pair of white trousers and a pink skirt. Before you question my mother’s sense in putting her tomboy daughter in white trousers I must stress that this was 1970 and the fabric was crimplene!
I ummed and ahhhhed for a long time over fabric. The little girl is half Indian, half white british so has café au lait complexion, huge dark eyes and hair which though very dark brown shows, in sunlight, the most gorgeous auburn highlights. Her mother quite rightly shudders at the preponderance of shocking pink, mid pink, lilac, sugar pink or all shades pallid in girlswear and opts where possible for strong, jewel shades, especially reds and oranges.
The fabric which caught my eye had bright dragonflies in jewel shades and this really seemed to reflect R’s personality but then came the choice of backing shade as it came in several, most of them strong such as orange, yellow, turquoise and ultramarine but the dragonflies seemed dull against these strong shades and I opted instead for the cream background which really showed them off best. I then selected a plain cotton in a contrasting shade with which to line the garments and add accents. I chose a strong, egg-yolk yellow of a shade and intensity only usually seen in free range eggs or Birds Custard Powder when mixed with that first tablespoon of cold milk.
Because the pattern is busy and the little girl small, I elected for as simple a design as possible. Sleeveless, slightly flared and with a “Norman Arch” shaped neck front and back. The back and front were completely plain.
The tunic was fully lined in the plain cotton.
The trousers were cut with the lining extra long, with a whole extra section grown on which would fold up onto the right side and then be hemmed and topstitched in place to form a deep, contrasting cuff. As usual the Singer 201k did me proud with its tiny, evenly tensioned stitches, its superior feed and clear view of the stitch line. I have yet to tire of marvelling at its ability to sew slowly and consistently even though it is teetering on the edge of uneven layers. I also used it to understitch and top stitch the sleeve and neck edges of the tunic – this topstitching was less than 2mm from the edge and was faultless.
The ric-rac embroidered skirt was made from some cream twill. I used my Bernina 830 Record Electronic to do the embroidery and as usual it was perfect. Even so, I went back to the 201k to do the French seam. It seems to treat the fabric with more respect – less punchy.
Incidentally I used the smallest of my back-clamping hemmers to do the hem on the pinafore and its lining. The hems were slightly curved and I wasn’t entirely happy that the rolled hem foot would deal nicely with the thickness of fabric. The back-clamping hemmer was wonderful. Like the rolled hemmer the fabric still needs to be guided or fed into the foot as the hem is being formed but because the hemmer feeds in the fabric much further in advance than the rolled hemmer it was much easier to control this and get it right.

The finished outfit.

The trousers and underskirt.

The lined tunic.

The fully lined trousers.

The underskirt with ric-rac embroidered hem.

The ric-rac hems on the underskirt and pinafore linings and the small hem done with the hemmer.

Close up of ric-rac embroidery.

Close-up of topstitch quality on trouser turn-ups.
Copyright of the blog owner 2011
17 Jan 2011 8 Comments
I recently acquired one of these in a box of attachments labelled for a Singer 66k so having located the presumed missing spring from within the folds of the box I put it back together and decided to try it. To begin with, I had a LOT of trouble with it and was profoundly disappointed as I had harboured such high hopes for it but I’m extremely relieved to report that I got there in the end and as is so commonly the case with Singer items it was user error.
I prepared and hooped a sample of cotton fabric and tried the foot on the 201k. No joy. The ring at the bottom of the foot didn’t rest on the fabric but hovered about 4mm above it so there was no obvious purpose for the spring at all and the stitches were mainly skipped. I checked the threading of the upper and lower…all fine.
I came over to my PC and did a little digging on the internet and found out that it was designed for use on a Featherweight. No problem; I took out my 222k and set it up with the foot. Same thing. By now I was really scratching my head so headed back to the internet. Finally, I thought that I had found a clue on the Needlebar website. The foot was shown there with a note stating that it was produced for use on the Featherweight 221, initially to be used with feed dog cover 121309 and latterly with 108002.
This seemed to offer an explanation. Both my 201k and my 222k have droppable feed dogs but the 221 uses a feed dog cover so perhaps it was this feed dog cover which raised the bed by those crucial millimetres.
I was still perplexed though especially as none of the online sales sources stressed the need for a feed plate and furthermore most of them stated that it could be used on any low-shank side clamping machine with equal success.
Taking the foot off the machine I noticed something unusual about the clamp. Most feet slot straight on to the presser bar and don’t have any vertical play but this one was different. It had a slot shaped like a capital ‘T’ which allowed the foot to be mounted higher or lower than the central point, presumably to allow the foot to rest lightly on fabrics of all different thicknesses.
By now it was late, so I decided to leave it and try again in the morning. After breakfast I was careful to mount the foot as low on the presser bar as was possible. The ring now lay lightly on the surface of the fabric as it ought to and the result was perfect! The spring twitched almost imperceptibly and the stitch was gorgeous! Once again I am in awe of a Singer attachment.

A close-up of the tiny darning foot.

See how, with the foot incorrectly fitted, there is a gap below it, even with the presser foot lever lowered. This results in skipped stitches.

With the foot correctly fitted, it lightly skims the fabric and the stitch and control is the best I have experienced with any darning foot.

Note the gap in the foot below the presser foot screw. This is the bottom of the shaped slot allowing for vertical adjustment which I mentioned in the text.

For comparison, this is the foot photographed next to the normal, straight stitch foot. Note how small it is and also the shaped slot allowing for vertical movement when securing the foot in place.
Copyright of the blog owner 2011
17 Jan 2011 1 Comment
One of the best parts about collecting Singer attachments is that with the odd exception (the Hemstitch & Picot Edger) they are all utterly practical. So, in harmony with the resurgence of interest in make-do-and-mend necessitated by the ongoing financial squeeze my most recent acquisition is a Singer Stocking Darner. Yes, I can do it by hand but unless I take tremendous time and effort (which is above the worth of the article being darned) the result is not as smooth and comfortable as a machine-made darn. I have, up until now, used my Singer Featherweight 222k with its own darning hoop and foot (Simanco 171074 and 171071 respectively) or else a normal, wooden hand-embroidery hoop and foot 171071 on my 201k.
The trouble with a normal hoop is that it is almost impossible to keep the rest of the sock from contracting back over the area one is trying to sew so in addition to trying to lightly move the hoop around the darn area ones fingers must also splay apart and keep the offending fabric at bay…so my attention turned to a Stocking Darner.
What a joy! It is effortless in use.
Before you start, make sure that the bobbin thread is up through the needle plate and then take off the presser foot. You might find it easier to get the hoop into position if you also take the needle out. Drop or cover the feed dogs (although to be honest on my 201k I just turn the stitch length to 0 and leave them up).
Now take the spring off the external rim of the darner, turn all the hooks inwards and with your left hand inside your sock, hole over the palm, grasp the darner through the sock, centralize the hole to be darned and then attach the spring to hold the fabric taut. Once this is done, turn the rest of the sock down off your hand and onto the darner and turn the hoops outwards over the rim so that they pull the rest of the sock upwards and outwards, beyond and well out of the way of the stitching area. If it proves awkward getting the hoop under the needle you may find it easier to turn one or two of them back in again to avoid scratching your machine bed.
Once the hoop is in place on the machine, attach the darning foot and if you took the needle out earlier, put it back in again now.
Place both hands lightly on the darner and move it gently, darning just as you would with a normal hoop. That’s really all there is to it. When you’ve finished, cut the threads and you’re done. You might need to remove the foot and the needle again before removing the hoop but the result is well worth the inconvenience. The benefit over a hand worked one (by which I mean one which largely draws the edges together rather than the longer, weaving method) is that it is perfectly flat and this really is terribly important with socks.
Another triumph from Singer.

The sock, the darner and the darner spring.

The sock in place and ready to darn. This is the side which will be face down against the machine bed.

This is the uppermost side, the one which will be facing upwards when the item is being darned.

This is a close-up of the darning foot in place. It will have to be removed before the hoop is put in position as the hoop is too bulky to pass beneath it.

This is the darner in place, ready to sew. Note how the hooks on the darner are folded back on themselves, holding the rest of the sock clear of the sewing area.

A close-up of the area about to be darned, showing the bobbin thread drawn up through the foot ready to start sewing. This prevents the bobbin thread being oversewn underneath which can be unsightly.

The darn being sewn up on the machine.

The completed darn.
Copyright of the blog owner 2011
08 Dec 2010 Leave a comment
My curiosity into the different methods of producing a hemstitch continues with the Singer Imitation Hemstitcher, Simanco Part Number 120687.
This is a large presser foot which attaches in the normal, low-shank manner to the left hand side of the presser bar, with the bulk of the attachment seated to the right; that is within the harp of the sewing machine. It features a small needle hole through which the needle passes and immediately in front of this a raised metal cushion over which the top layer of fabric is fed and it is the fact that the two layers are then held some 5mm apart from one another when the stitch is formed that forms the ladder stitch.
The first thing which caught my attention was that as the fabric must be fed into place within and around the foot before stitching commences it is not easy to start the hemstitching from the very edge of the fabric and although I may be able to figure this out later it is not immediately obvious how this may be easily accomplished. The Hemstitch Fork by Stoppax is much simpler in this respect.
Stitching with the foot in place was very easy. As is usual with hemstitching I loosened the upper tension right off as the ladder stitch looks much neater without the lockstitch happening half way across the ladder ‘rungs’. It was simple and quick to stitch a long length of hemstitching (simpler than with the Stoppax fork which needs to be moved along periodically) but because it is not so simple to keep the fabric evenly taut as one stitches, I felt that the overall stitch quality was nowhere near as consistent and well-tensioned as that obtained by the hemstitch fork. With the fork, it (the fork) is kept held up taut against the fold in the fabric which makes it very easy to guide the fabric whilst maintaining an even tension but because the imitation hemstitcher parts two layers of fabric the edge of which is open on the right hand side, it is difficult to maintain as even a stitch.
Easy, but I still prefer a hemstitching fork.

The Imitation Hemstitcher attached to the Singer 201k

See how the metal ‘cushion’ at the front of the attachment parts the fabric layers ahead of the needle. Note also the small gap (just seen at the back of the photo) before the hemstitch seam commences.

Copyright of the blog owner 2010
04 Dec 2010 Leave a comment
in Projects
I have finally finished the little pinafore ensemble I have been working on as a present for my friend’s daughter who will shortly celebrate her first birthday.

The Finished Outfit
Just to recap, the fabric I chose was a cotton velvet in a cool green shade and some matching glazed cotton to line it.
I did, in fact, make the garment reversible so all of the construction stitches are hidden by bagging out the lining and main fabrics and joining the two at the waist seam which is then concealed by braid or ribbon.
The Pinafore skirts are formed from four identical, rectangular panels pleated and set into the bodice. First of all, I prepare the skirt sections by sewing the fabrics right sides together along the side and bottom seams, leaving the waist seam open. I do the same with the bodice sections, sewing up the side seams, the shoulder seams (fronts and backs are later slip-stitched together invisibly and covered in braid/ribbon) and down the neckline and centre front.
You will, at this point, have four identical bodice sections and four identical skirt ones. Trim the seam allowances close to the sewing line, turn the pieces right side out and press.
Now, set the pleats. I do this mainly be eye, with a tape measure to help me get them exact. When I’m happy with the way they are sitting I pin them in place, trim off any excess which sticks up above the top edge and sew along close to the sewing line to fix their position. I then set this top edge of the skirt section up in to the bodice section, turning the bodice seam allowance up into the inside and pinning it in place. I then sew the two together and repeat these same steps for the other three sections.

The pleats set out ready for stitching

Skirt section pinned into bodice ready to sew
That’s just about it for the pinafore. The rest is just decoration. I chose a dusky pink velvet ribbon which I sewed around the neckline, the shoulder seams and along the waist seam. I hand stitched a whipped running stitch in vintage DMC Perle cotton to add a seaside-rock pink accent and stitched some hand embroidered flowers and foliage along the ribbon at the waist. The sections are caught together where the ribbon meets and the front and back are embellished with a hand made button whipped with the same DMC threads as are used in the embroidery.
The matching bloomers and optional skirt frill are worked in the same glazed cotton as was used for lining the pinafore and are trimmed with the same velvet ribbon.

Bloomers!

Optional skirt frill

Close-up of embroidery

Front detail

Splayed out to show sectional construction

Close-up of bodice

The finished outfit
01 Dec 2010 1 Comment
If you find that your machine is not producing a perfectly tensioned lockstitch on a double layer of medium-weight cotton fabric and a tension of around 4.5, then you need to calibrate the tension assembly so that it does.
This process is both simple and quick and requires no tools apart from a fingernail. It is not necessary to take the whole thing apart, just nudge part of the assembly around a little. The following photos show the procedure conducted on a Singer 222k although I have also recently made exactly the same adjustment on my main machine, the 201k.
Push back against the numbered ring on the tension assembly and you will find that it is springy. Push it back hard, away from the front thumb-screw part of the assembly and you will see – look carefully because this part of the assembly is black – that there are a number of holes drilled into the front of the dial plate. In front of this is a small, bright metal pin which, when slotted into one of these holes, allows the numbered dial to rotate as one with the thumb screw.
Because it is possible to slot this pin into any of the holes in the dial rim the tension can read just about anything so what we need to aim for is to get one full rotation of the dial within the maximum (tightest) and minimum (loosest) setting of the thumb screw. In other words, when the thumb screw is screwed down tight it should read close to 9 and when it is screwed out as loose as it will go it should read close to 0 but don’t worry if it isn’t exact – as long as you can fully tighten and loosen the screw this is fine.
Just keep nudging the numbered dial back with your thumbnail and moving the pin around one hole at a time until you’re happy.

Tension Dial, pushed back to show calibration holes.

Thumb screw showing the pin which slots in to the calibration holes.

Use your thumb to nudge the numbered dial around so that the pin engages with the next hole along from the present one.

Dial fully loosened (see how the end of the tension pin is flush with the end of the thumb screw)

Dial fully tightened (see how the end of the tension pin is below the end of the thumb screw)
25 Nov 2010 Leave a comment
in Projects
This is coming along well, although as is usual with me it is developing rather than progressing towards a pre-conceived conclusion. This is undoubtedly why I’ve never bought a pattern in my life – I can’t rigidly follow a set of instructions as I am too fond of inventing improvements along the way.
In the case of this, the two main “improvements” are reversibility and expandability. The first I am still undetermined over; much depends on my coming up with a design which I am happy with although again as I write this I think I have reached a conclusion about that. The lining will be embroidered in blue forget-me-knots I think. That will give a completely different ‘look’ to the main fabric which is a cool green velvet, trimmed with dusky pink velvet ribbon and whipped running stitch in a glossy, cotton ‘Perle’ DMC thread in seaside-rock pink.
I cannot settle on any of the buttons I have but have have an idea which involves washers so I must head into town today in search of fibre washers. We will have to wrap up very warmly though because it is snowing here in North Yorkshire and I think I will be grateful for the sensible boots I bought on Monday. Ugg boots would be a complete waste of money for me; I spend too much time tramping through mud and dampness so these are like an extended galosh; rubber foot section extending up to mid-calf with a draw-string cordura upper and as they are fleece lined they are every bit as snug as an Ugg but practical for puddles and snow and much easier to walk in than wellies.
Right, I’m off to make a shopping list. I also need a tiny crochet hook.
Copyright of the blog owner 2010
23 Nov 2010 1 Comment
in Equipment
Thanks to a small but timely tax rebate I have been able to buy myself a big roll of pattern paper from Morplan. Yes, I know you can use bank paper, lining paper, greaseproof paper, agricultural fleece, the rolls of paper used for examination tables in GP surgeries and yes, I guess I could also sellotape together all that scratchy, ‘Izal’ toilet paper that my mother has kept stockpiled in her airing cupboard since the early ’70s too but the point is it’s all a bit of a pain, isn’t it? Also, it’s never quite big enough.
If you’re getting creative and want to do your own pattern cutting there are a few things which you really can’t improvise or stint on, however indoctrinated you are by ‘Blue Peter’.
Pattern Cutting Essentials:
That’s it, really. A cutting mat is good, too, and a craft knife for cutting out the paper pattern pieces. Not a rotary thing; just a normal, small craft knife. I discovered this while I was at college: it is much quicker, and a great deal more accurate, to cut with a knife than with scissors. It’s just like tracing a line with your finger along the line you have already drawn and is much easier to handle than using scissors on such a large and unwieldy piece of paper.
Pattern notchers and a pattern drill are nice, additional extras if you can get them at a decent price. If not, just use your craft knife and wait for the people who drop out of or graduate from fashion college to put theirs on e-bay.
I’m really pleased that my paper is here – I finally feel I can be properly creative…and free from the guilt at taking paper from the roll I bought at Ikea for the baby to paint and scribble on!
Copyright of the blog owner 2010
20 Nov 2010 Leave a comment
in Projects
Today’s project is the beginnings of an outfit for a dear little girl who will shortly celebrate her first birthday. It has to come out of my existing stash because I can’t afford any new fabric at present and because 90% of my stash is creams, beiges and white linens and cottons this is a bit of a challenge as I really want to make something which is pretty but also practical and warm.
I’ve decided on a deep jade glazed cotton and a matching cotton velvet and want to make a little mini-dress length pinafore in velvet, to be worn with matching cotton knickers, a little ruffled skirt, or both.
The green is a very pretty, cool shade but as it is quite a strong colour nevertheless I will be tempering it with some cool, mid pinks in my hand embroidery to add a bit of ‘prettiness’ and notch up the good-taste a little but without altering the overall practicality of the garments.
I will post some progress, together with photos, as I get the chance to move forward with this.
Copyright of the blog owner 2010
17 Nov 2010 4 Comments
..and why I hate many modern ones.
It seems that at least twice a week I see a new reason to be grateful for my vintage machines.
While I wait for my infant offspring to grow large enough to attend pre-school and allow me some regular sewing time I am feeding my habit by being a regular contributor on a sewing machine forum. The cries for help are both frequent and worrying – it’s not the questions that alarm me, but the validity of the answers.
Things which ought never to be a problem somehow are and that makes me so annoyed on behalf of their owners because I see a host of sad sewing machine owners, many of them new to their hobby, ending up so subjugated by their tetchy machines that they spend more time trying to appease them than use them.
This in turn can prove to be such a disincentive that the sewer is forced out of their interest by the downright tetchiness of their wretched machine. In their modesty they are much quicker to blame themselves and their own inexperience than their machine – even when we the more experienced sewers see otherwise.
Even if it is their fault, it’s usually a small and honest mistake which any decent machine would forgive and get on with instead of hurling itself into a hissy fit of thread knots before breaking the needle, pinging the broken piece up into your eye before burying its own down into the depths of the bobbin case which jams it up entirely, lassoes the thread around the hook, pieces of which thread penetrate the most unfathomable crevices and just as a finale, throws the timing out.*
* Ok, maybe my imagination is running a little wild here but not by much.
I often finish a piece of advice with the semi-playful observation that I am now going to go and stroke and kiss my lovely machines (inferring that they are delightfully trouble-free, which is true; they are).
Sewing machines have just become too complicated for anyone’s good…apart from the manufacturers who use all of this extra fuss to bamboozle us into believing that they are in some way worth their eye-wateringly high price tags. Now I’m not against paying high prices – the early sewing machines often cost many months and in some cases years’ wages – but unlike their modern equivalents these old ones were made to last and had a beautiful lockstitch – surely the most basic of all sewing requirements – so is it really so unreasonable for me to expect you, the manufacturer to please give me that before you start baffling me with all this faff and gadgetry?
I get really annoyed on new sewers’ behalf that so many of them will never have sewn on a machine with a decent lockstitch and so don’t even know what they’re missing.
I…want…to…sew. I’ve enjoyed a very rewarding career in computers, thanks and I don’t need or indeed want to revisit that with my sewing; especially as I don’t have, as I had then, a talented and enthusiastic team of experts giving me back-up. I don’t want to sit there poking and squinting myopically at a touch-screen, one hand on the manual or, worse still, staring at the machine squatting in sullen unresponsive blankness and wondering whether it’s the screen that’s failed or the electrics… or finding some impenetrable error message displayed which I can’t cancel and which means I have to call the helpline only to waste 30 minutes finding that it needs a trip to the mechanic, waste another 40 minutes arranging this with the mechanic, poking around in the loft trying to find the original packaging, boxing it up and then finding and arranging a courier and then maybe waste another fourteen days waiting for it to come back fixed with a note saying there was a half micron of lint which had settled on a sensor somewhere and now I’m so terrified of getting a repeat that I barely dare use it in case I’m using the wrong thread. So I need a second machine in case this happens again and that will cost me yet more money still and what guarantee do I have that it’ll be any better than this one…and now I’m utterly paranoid. Why can’t I just have a machine that lets me sew?
Repeat this as a mantra and believe it:
I don’t need sensors to tell me when my bobbin thread is running low: I have eyes and I have common sense.
I don’t need automatic thread cutting: I have scissors.
If I must trade seven scruffily stitched alphabets for a decent lockstitch then so be it: I know which one I’ll use more.
I will cope without automatic threading, the decorative crocodiles and the bicycles.
I need a good, fully adjustable stitch, tension which is easy to adjust and calibrate and to use any old thread I like, top or bottom, whether it matches or not.
I can sit down at my Singers, thread them up and go. I can set the stitch length exactly as I need it, tighten the thumb screw to the left of it and happily throw the lever up into reverse and then push it back down again, assured that it will stop in exactly the same place as it was previously set. Now that’s cleverness I can use.
And did I mention I have the attachments to do buttonholes and blind stitch too?
I’m now going to go and hug my machines again.
Copyright of the blog owner 2010
11 Nov 2010 5 Comments
I’ve been asked to cover hemstitching in more detail so I’m going to cover three of the most common finishes: a narrow hemmed, open hemstitch; a wider version of the same and finally a closed hemstitch which offsets the hemstitch against the background fabric.
Hemstitching done with the hemstitching fork gives a similar result to drawn threadwork although in its method it is more similar to faggoting in that it uses a thread to span two fabric pieces rather than punch and stitch a pierced design through the fabric.
There is more than one brand of hemstitching fork available including the Stoppax, the Nu-Way and one marketed as being for the Husqvarna which is a modern equivalent of the Nu-Way. Only the Husqvarna one is still in production so if you see one of the older style ones at a reasonable price it is worth snapping it up.
For a bold hemstitch, use a long stitch length and bring the upper tension right down, even to zero. This will give a widely spaced, deep hemstitch and give a nicely proportioned finish, should be worked with a thickish thread and a thick needle. If a fine, narrow hemstitching is required, use a fine needle, a slender thread, a smaller stitch length and a normal (or even slightly tightened) thread tension. If in doubt, just experiment with some spare fabric scraps until you get a finish you’re happy with.
To do a narrow-hemmed hemstitched row, fold the fabric around the hemstitch fork, place it under the foot, looped end towards you and sew down the gap between the parallel bars of the attachment. When you reach the end, remove the fabric and the hemstitcher from the machine and, taking care not to pull the threads when you do so, slide out the hemstitch fork. This will leave a loosely stitched tunnel and it is this tunnel which is slashed open and the sides smoothed apart to reveal the stitches. For best results, press this open before continuing.

Sewing along the gap in the hemstitch fork.

The loose stitch line securing the fold.

Cutting the fold open. Scissors are better than a seam ripper if you have some with sufficiently narrow blades.
Once pressed open, it is necessary to deal with the raw edges. For the sake of this tutorial I have done a narrow hem, using my narrow zipper foot to get in nice and close to the edge of the hemstitching while still having good access to the fabric. An alternative would be to finish this with braid or a decorative satin stitch which would seal in the raw edge out of view.

The seam cut open and ready to press and stitch down.

Sewing a narrow hem to neaten the edges.

The finished hemstitch. I have used contrasting thread to better show the detailing but would usually choose thread to match the fabric.
A wider hem can be achieved in just the same way as described above but first sew a line of basting stitches to act as the fold against which the hemstitching fork is pressed when in use. The fold is then cut open in the usual way, the basting thread removed and the item pressed. The raw edges can then be turned in and sewn down as before. In this case I find it useful to also sew a line of stitching close to the edge of the hemstitching to keep the finish crisp and neat.

Line of basting stitches against which to place the hemstitch fork for a wider margin.

The line sewn along the central gap, with the outer edge formed by the line of basting stitch. The basting can now be removed.

The basting thread removed, the fold is cut open and folded back ready to be pressed and neatened.

Topstitching a line close to the edge of the hemstitching. This will be repeated on the other side.

Close-up of the hemstitching.

The wider margins shown hemmed and sewn down. This forms a handy margin into which to place some decorative topstitching.
It is not necessary to cut open the fold after the hemstitch fork is removed. If preferred it may be folded and pressed back and a line of stitching placed close to each side of the hemstitching to secure the fold behind the hemstitching. You might like to thread in some braid or ribbon to give a contrast, too.

The folded edge, hemstitched and ready to fold & press back.

Topstitching, worked as closely as possible to the ends of the hemstitching, gives a neat finish and anchors the fold securely behind the exposed hemstitching.
Copyright of the blog owner 2010
11 Nov 2010 Leave a comment
in Equipment
Oh how I longed for my own pair of notchers. Right from when I started my fashion qualifications in 1983. Right the way through my degree course. But, as all things in the student world are ultimately balanced against how much of a night out could be bought for the same money, the notchers repeatedly lost and I gained, in their place, countless nights out and a bunch of friends I count on as such to this very day so I can’t say it was a bad trade-off.
For those of you unfamiliar with notchers, they are typically available in three cutting widths; 1mm, 2mm or 3mm and they do exactly what the name suggests – cut a notch. They are used in pattern making and block making and are used to create a notch in the edge of the pattern or block which corresponds to an important point which will, on the paper pattern piece be marked with a pencil mark made through the notch which mark will, in turn, be notched and, on the fabric, snipped through to mark the sewing line, the balance marks on the sleevehead/armhole, the outside extremeties of darts and anything else that needs to be marked on to the fabric.
Occasionally I would visit the Morplan website just on the off chance that they had dipped within budget and even e-bay seemed to be stalked by the pattern-savvy so no joy there either. Then finally, a few days ago providence smiled on me as a “Buy It Now” arose at £5 for a beautiful pair of notchers. I’m not sure whether they’re the standard or the deluxe ones and nor do I really care – I have my notchers!
They arrived this morning and I am delighted with them. They cut a perfect 2mm notch and I can now proceed with my current project – that of creating a block for the perfect pair of trousers, but that’s a separate blog entry…

Notchers

Notchers close-up and the 2mm notch created with them.
Copyright of the blog owner 2010
09 Nov 2010 2 Comments
A bit of a digression from sewing today. I’m feeling a bit mawkish and missing my Dad so thought I’d share how he spent his war.
My Dad couldn’t swim a stroke. In some professions this wouldn’t really matter but Dad was a Merchant Seaman, a First Radio Officer. He said it was the best job on the ship because of all the crew he was the one person without whom the ship simply could not sail and as he was not needed at all during the loading and unloading of the cargo, which took a good few days back in pre-container days, he had plenty of time to go onshore and prove his conviction.
He signed on and off 51 ships 151 times over a career spanning 43 years. He gained his certificate on the 23rd March 1938 and joined his first ship, the “Nova Scotia” on 5th May 1938, just before his 19th birthday. On his first trip he sailed from Liverpool to Halifax, Nova Scotia; to St Johns Newfoundland; Boston USA and then back to Liverpool. He left his last ship, the MV “Tipperary”, on 19th August 1981.
Dad left Antwerp on 5th January 1939, aboard the “CID” and went to Chatham to load 3000 tons of ammunition. The ship left Chatham and went to Gibraltar, Malta and Alexandria. She then went on manoeuvres with the fleet in the Mediterranean, off Alexandria.

My Dad
From Alexandria, they were sent to Cyprus, (Famagusta) for a rest and then went out again on manoeuvres with the fleet. The “CID” was sailing as an ammunition ship – others were sailing as store ships etc. Ammo ships had an escort, and the “CID”’s escort was HMS “Sea Lion”, a submarine. The submarine travelled in the wake of the ship so as to avoid creating a separate wake that could be detected from the air – all aircraft being treated as enemies.
HMS “Sea Lion” veered off sideways and created a separate wake and this was seen by an aircraft, reported to HMS “Ghurka”, a destroyer on the enemy side who arrived to ‘sink’ both the ship and the submarine. SS “CID” took off the navigator from the submarine and returned him to Alexandria.
Later on in Alexandria, Dad met up with the crew of the seaplane who had sighted them, and from them learned about the extra wake.
The “CID” left Alexandria and entered the Suez Canal. She anchored in the middle of the Great Bitter Lake while the decision was made whether to send her to Aden or to Alexandria. Alexandria won and on the day war broke out the “CID” left Great Bitter Lake and dropped anchor at the harbour entrance at Alexandria.
The ship stayed swinging around the anchor, never lifting her anchor until July 1941, when she went on to Bombay. Dad finally left her on 23rd Aug 1941.

My Dad
During the period in Alexandria Dad was enjoying himself, including a good –and indeed memorable – night out with an Australian RNR Lieutenant who was stationed on a Minesweeper, HMS “Bagshot”. The “CID” was anchored all the way out at the harbour entrance so when, walking back to their respective vessels at 3 or 4am, “Bagshot” turned out to be closer, Dad accepted an invitation to bed down there for the night and return to “CID” at a slightly more conventional hour. As it happened, he woke at 6am to find himself out minesweeping at the harbour entrance, finally arriving back in harbour at 2pm in the afternoon. Dad got a boat back to the “CID” and never had any trouble from it, but when he later met up with his friend he discovered that he, the lieutenant, was transferred from HMS “Bagshot” to HMS “Maidstone”, (a submarine depot ship) and confined to ship for three weeks.
The “CID” was due to be dry-docked so she was emptied of ammunition and filled up with empty shell cases from the evacuation of Crete. She then set out for Bombay, without a convoy, to be laid up in dry dock to have her hull cleaned of barnacles.
After Bombay she sailed on to Suez, where Dad was transferred to the “Foreland”, another ammunition ship. He sailed down to Massawa in Eritrea, on the Red Sea and spent another 14 months swinging around the anchor, doing nothing. Eventually the ship set sail to Mombassa. The ship had insufficient coal for the journey to Mombassa, as the maximum speed was 8 knots so they had to go via Aden for bunkers (coal). The ship then returned to Massawa from Mombassa, again via Aden.
On the way to Mombassa the ship ran aground, so dry-docked in Mombassa to check for leaks. Luckily there were no leaks; only some bent plates. This trip was repeated twice more, sometimes with a convoy, sometimes alone. If a convoy was present, the escort (a whaler) left the ship after 500 miles so the rest of the trip was done without escort.
The “Foreland” next went to Cape Town for dry-docking. She arrived there in mid November 1944 and Dad spent two months living ashore in Cape Town, including Christmas and New Year.
When she left Cape Town, “Foreland” sailed for Mombassa, via Durban for bunkers. From Mombassa she proceeded to Aden with no convoys at all, took on more bunkers, headed through the Suez Canal and then up through the Mediterranean to Gibraltar. She was still without convoy and was still carrying ammunition.
In short, Dad left home with a full cargo of ammunition and also arrived back with a full cargo of ammunition. The ship left Gibraltar 3 days before the end of the war in Europe, still with no convoy. Dad arrived in Preston on 15th May 1945, came home on leave and whilst there, the war in the Far East finished too.
Dad joined his next ship, the “Samindoro”, on 15th November 1945, bound for the West Indies. He left the ship on 14 Jan 1946.
During this period Dad saw neither a ship sunk, nor a shot fired in anger at sea, nor a depth charge dropped. An air raid conducted every Friday night on the harbour in Alexandria represented the only enemy action encountered. There were a couple of dramas which Dad recalled: firstly, a small coaster (to carry 500 tons) which was at anchor near the ship was emptied of ammunition and once emptied, had half her stern blown off by a small bomb. Then, some time after Dad had left; a ship was sunk in Alexandria Harbour. Dad said they felt safe in the harbour as the fleet had erected a box barrage above it. The navy did not engage; it was left to the army on shore to shoot down the planes.
Copyright of the blog owner 2010
07 Nov 2010 Leave a comment
It’s not exactly that I don’t like the striated, deco-style face plates but I’d be lying if I said I preferred them so as she is in every other respect perfect, I recently weakened and purchased a scroll-faced one for my little 222k Featherweight so she could match her big sisters, the 201ks.
Like all things to do with vintage Singers, it was extremely simple to change it: simply undo a thumbscrew and lift off.

Singer 222k old faceplate

Singer 222k new faceplate
Copyright of the blog owner 2010
07 Nov 2010 Leave a comment
in Projects
This is the little cotton shirt I made for a friend’s baby boy for his first birthday present. The fabric was cream poplin, the buttons were vintage linen laundry buttons from my stash.

The pintucking on the front bodice section.

Shaping the front neck by eye.

Shaping the back neck.

Piecing the shirt.

Pinning and basting the collar.

The finished shirt.
Copyright of the blog owner 2010
07 Nov 2010 Leave a comment
in Projects
Here are the shoes I embellished for my wedding. With the help of hand stitching and a glue gun I secured pieces of guipure lace across the tops and the tongues of the shoes, added a few tiny little clear and pearl beads and added some colour accents in pale salmon pink Pearsalls silk floss from my step great grandmother’s stash.

My Wedding Shoes

The shoes with a small drawstring bag I made to match them using tulle over wide satin ribbon, organza ribbon and more of the lace, embroidery and beading.

Detail of the lace, embroidery and beading.
Copyright of the blog owner 2010
07 Nov 2010 Leave a comment
in Projects
This is my son’s christening outfit. It was totally handmade from approximately a metre of pure, white linen, ten matching mother-of-pearl baby buttons from my grandmothers stash (Dad’s side) and embroidered with ivory and grey Pearsall silk floss from my step-great grandmother’s stash (Mother’s side).
The shirt is made entirely from squares and rectangles, the sole exception being a slight slant put on the shoulders. The shoulders themselves have a yoke, from which hangs a placketed front and back bodice worked with pintucking, fastened with small rouleaux loops and tiny, mother-of-pearl buttons. The collar is, like the bodice, exactly the same front and back and is set across the shoulders to fold back down upon itself across them. The sleeves are square set, with diamond gussets to allow the arm some movement and there are small, triangular gussets strengthening the bottom of the side seams also. All visible seams are made by the French Seam method. Top stitching was done as a whipped running stitch in embroidery floss.
A little pair of shorts with turned-up cuffs decorated with whipped running stitch completed the outfit.

Being dunked in the same font as Grandad gives a boy an appetite to match.

View of the back of the bodice.

Side view showing the yoke.

Wider side shot showing also the triangle gussets at the bottom of the side seams.

Basting the placket openings and the collar pieces. The underarm gusset is clearly visible as is the whipped running stitch on the bodice and tucks.

close up of pinning and basting the collar.

Sewing the rouleaux into the placket front.

The completed outfit.

The cuff buttons.

The finished neckline and collar.
Copyright of the blog owner 2010
07 Nov 2010 5 Comments
The Singer Hemstitcher and Picot Edger is often mooted as one of the rarer, ‘must have’ attachments but in truth my experiences with it were disappointing. It’s not that it doesn’t work; it does. The difficulty lies in obtaining easily a result which is both neat and evenly tensioned on both sides. Because only a single needle is in play, it is necessary to make two passes at the hemstitched row; the first one pierces the holes and zig zags a row of stitching which enters each hole and pulls back and secures it open on the right hand side. When the end of the row is reached, it is essential to stop with the piercer depressed through the fabric so that it acts as a pivot around which the fabric is swivelled through 180 degrees. The second pass is then sewn, again forming the same zig zag, with the needle now drawing back and securing the second side of the hemstitching. The piercer should reenter the same holes as it made on the previous pass.
That’s the theory. In practice it is difficult to get the zig zag to form an exact mirror image of the one made in the previous pass so the holes often appear a little skewed and there are often stray threads snaking diagonally across the corners of the holes formed (insomuch as a circle can have corners). The result is not as neat as the rows sewn on a proper, dedicated hemstitching machine, the majority of which use twin needles.
The attachment is not very adjustable; because of the necessity for the piercer to drop at a predetermined point in the zig zag’s passage it is not possible to adjust the stitch length. It is possible, however, to fine tune the zig zag width by adjusting the position of the piercer in relation to where the needle falls although the primary purpose of this adjustment is to allow the needle to fall exactly in the right place – to the right hand side of the pierced hole. The piercer can also be adjusted forwards/backwards to properly allow it to pass through the hole in the throat plate, which is a raised plate screwed in place over the feed dogs, replacing the usual feed dog plate.
When finding these attachments it is essential to make sure that you have the right throat plate for your machine. If, however you have a 99/66, a 201/15, a 127/8 and a 221/222 then you don’t need to worry because unless your 66 is a 66-1 whatever you get it’ll fit one of the above.
The attachment itself is part number 121387 and is the same for all the models listed below.
The extra long thumb screw is 51347A and is the same for all models listed below.
The throat plates vary and are numbered as follows:
Class 15 & 201: 121388
Class 66* & 99: 121389
Class 101: 121390
Class 127 & 128: 121391 (including screw 202J)
Class 221: 121392
* with the exception of the 66-1.
I tried this attachment on a double layer of stiff calico and a double layer of a cotton twill. Both gave less than perfect results, even after as many adjustments as I was able to make. I don’t doubt for a minute that the fabric might better behave if it were starched stiffly first but I cannot guarantee that the result would, after washing, be any better than had the fabric not been starched as the untidy result seemed firmly lodged in the ability to get the stitch rows catching the hole in the same position rather than the ability for the needle to catch and draw back the hole.
One more hint if you are still determined to buy and try one for yourself: the rubber sleeves which feed the fabric are often perished or at best shiny and not able to feed the fabric. These can be easily replaced by the same heat-shrink insulation tube used to improve the safety of old wiring.
Me? I’m going to stick with my Stoppax Hemstitching Fork.

New rubber soles for the feet. My husband shrunk on a double layer of heat-shrink insulation tube and this works very well.

Hemstitcher on the machine, showing the piercer correctly positioned in line with the hole in the throat plate.

Photo showing the correct position for the piercer in relation to the turned and pressed hem.

Photo (blurry, I’m afraid) showing the resultant hemstitched rows.
Copyright of the blog owner 2010
07 Nov 2010 2 Comments
This is a review for the non-template Buttonholer; the old type with the bight, zig zag and buttonhole length adjustable by wing nuts. The stitch length is adjusted by using a screwdriver to turn a pointer from short to long.
The attachment (in its completed state rather than constituent parts) has the part number 86662.
I bought this attachment as I was curious to compare it against the Griest template type attachment I already owned and I further justified its purchase by the additional versatility it offers by allowing you to change the cutting width.
Ideally this should be just wide enough to allow the buttonhole to be cut open without cutting the stitches but not so wide that there is sufficient fabric to fray once this is done. The template style buttonholers do not allow this to be adjusted so on thin fabrics especially it is certainly an advantage to be able to adjust this.
Having said that, because the attachment is indeed so adjustable it is essential to do some test buttonholes on some scraps until you are happy that the cutting width, the bight (zig zag width) and the stitch length are all correct. Having the stitch length correct is worth taking your time over as this is the one which controls how densely the zig zag stitch is created – for thick fabrics which will fray easily you will probably want to have this set to a fairly close stitch but a long zig zag width but for fine fabrics you will need to have the density reduced so that the button hole is soft and not like a solid mass of thread. Unlike the other adjustments which are made by sliding a wing nut, it is adjusted using a screwdriver to move a pointer between L, N and S (long, normal, short).
Once you have made a buttonhole with which you are happy, these adjustments will stay put until you change them so there is no need to recalibrate the settings ahead of each in a long row of buttonholes but it is definitely worth taking the time to do some test pieces first and get this right. It is not idiot proof and if you whack the bight size right up to maximum and the cutting width down to minimum then the two sides of the buttonhole will overlap and you won’t have anywhere to cut the buttonhole open at all!
Use the right needle and thread for the fabric and this will give you as nice a buttonhole as any I’ve seen. The maximum is about 1 1/16″ (the same as the Griest template ones) but it is possible to make them longer by moving the plate forwards before the attachment sews the end bar – there are increments marked on the plate to make it easy to measure by how much you need to move the plate forwards. Full directions for this are given in the instruction leaflet.

Overview of the attachment showing the adjustment screws for bight, cutting width and (the screw in the triangular aperture on the side of the attachment) the stitch length.Photo showing the plate in which the buttonhole is sewn and the small ‘pusher’ which helps push the fabric back flat after each stitch is formed.

Photo showing the buttonhole length adjustment and the wing nut by which the attachment is turned through its stitch cycle.

Photo showing the plate in which the buttonhole is sewn and the small ‘pusher’ which helps push the fabric back flat after each stitch is formed.

Photo showing the resultant buttonhole sewn with an average cutting width on a double thickness of cotton twill curtain lining. This buttonhole has been worked around twice and judging by this photo the machine would have benefited from having the top tension loosened a bit.
Copyright of the blog owner 2010
07 Nov 2010 12 Comments
Griest buttonhole attachments were made in the following model numbers, each for a different style of machine:
#1 Side Screw Clamping – Singer, White, Brother, Morse, Atlas, Kenmore, Domestic, Free Westinghouse and most all imported straight stitch sewing machines.
#2 Top Clamping – White, Kenmore, Domestic, Majestic, Franklin, Worlds, Dressmaker and all Rotary machines made by White & Domestic Sewing Machine Corp.
#3 Top Clamping – Kenmore (49, 71, 76), Free Rotary, Free-Westinghouse, New Home (Rotary), Stratford, Most all machines made by Free & New Home Sewing Machine Company.
#4 Top Clamping – Eldredge, National, Montgomery Ward, All machines made by National Sewing Machine Company.
#5 Slant Needle – Singer only.
#6 Low Bar (1/2”) – Left Needle Position Zig Zag and Automatic Machines.
#7 High Bar (1”) – Left Needle Position Zig Zag and Automatic Machines.
#8 All Pfaff Sewing Machines except models 139, 239, 1221 and 1222.
#9 All Necchi Straight Stitch and all Low (1/2”) Centre Needle Position Zig Zag and Automatic Machines.
#10 All Necchi, Pfaff (Models 139 and 239) and High Bar (1”) Centre Needle Position Zig Zag and Automatic Machines.
Low and High Bar are different terms for low and high shank.
Left Needle Position and Centre Needle Position refer to the resting position of the needle before it commences a straight stitch. In other words, is the needle at the centre of the slot in the needle plate or is it to the left of it. The model numbers are printed on the end of the box.
In use, these are definitely the easiest button hole attachments with which to achieve a well tensioned and nicely balanced buttonhole. The attachment comes with five templates, one of which is already in place in the machine. These standard templates are 5/16”, 5/8”, 13/16”, 11/16” for straight buttonholes and 11/16” for the keyhole type. Additional templates are available as 3/8”, 1/2”, 15/16” for the straight type, 5/8” for the keyhole and an eyelet style. Each template has a guide on the back of it so that the button may be placed against it to reckon the right one to use.
The stitch width may be adjusted by moving the slider on the side of the attachment to “N” for narrow, “W” for wide and any point in between. It is usual to use a narrow setting for small buttonholes and a wider one for longer buttonholes as this is generally more in keeping, visually, with the overall proportions of the finished buttonhole but you may, of course, adjust this accordingly if your fabric is, for example, thin and your button large.
A feed dog plate is provided with the machine but as this affects the amount of clearance under the attachment, do just dispense with it and drop the feed dogs if this is possible on your machine.
It is possible to make a larger buttonhole than the size of the template will allow. This is done by twisting the adjustment knob which moves the template through its cycle and stopping when the needle position is in line with the second line from the front of the cloth clamp on the left hand side as you face it. This is now your new starting position and when you have run the attachment through its cycle until it reaches the same point on the opposite side to where you started, stop with the needle down in the fabric, carefully raise the presser foot lever. 1″ of your buttonhole is accounted for in what you have already done so you need now to decide how much bigger it needs to be. Each line on the cloth clamp represents and extra 1/8 “ on the buttonhole. If two lines will suffice, move the adjustment knob clockwise to cycle around the open end, down the left hand side (as you look at it), around the bottom and then take care to stop when the needle is level with the chosen guide line on the clamp. Drop the presser foot lever and continue to sew. This will allow the correct extra length to be added to the resultant buttonhole. That may sound fiddly, but is an excellent way of achieving an extra-long buttonhole where some modern machines would certainly fail to allow it, guided (and limited) as they are by the diameter of the button which will fit in the buttonhole foot.

The Griest Buttonholer and templates.

The standard templates supplied with the attachment.

The buttonholer in use.

The finished buttonhole.
Copyright of the blog owner 2010
07 Nov 2010 Leave a comment
This is a set of hemmer feet which, along with a quilting guide, may be attached to a side-clamping, low shank machine using the cording foot which accompanies the attachments but which features a thumbscrew at the back of the foot which secures the hemmers in place. The cording foot itself attaches to the side-clamp in the usual way.
The hemmers themselves work much as you would expect, and whilst they are a bit fiddly to get started, a bit of spare thread knotted to the fabric at the start of the proposed hem edge gives something to hold on to when initially coaxing the fabric around the curve of the attachment. Once started, they are wonderful and give an excellent, neat finish.

The Hemmers and Quilting Guide lined up on the 201k machine bed.

One of the hemmers in place on the 201k, ready to sew.

The hemmer in use.

The finished hem.
Copyright of the blog owner 2010
07 Nov 2010 Leave a comment
This is by far my favourite way to create hemstitching. I also have a Singer Hemstitcher & Picot Edger attachment but this is far simpler to use and gives, to my mind a much more predictably neat result.

The Stoppax Hemstitching Fork

The hemstitch fork positioned and ready to sew.
To use it, the hemstitch fork is inserted into a fold of or between two layers of fabric with the closed end facing the user and the needle positioned to stitch between the parallel bars of the attachment.
The fabric is then folded and pressed back (slitting the fold open if necessary) and then narrow-hemmed down on either side of the topstitched row or else finished with some ornamental topstitching as shown here.

Pressed open and finished with some decorative satin stitching from the Bernina 830.
Copyright of the blog owner 2010
07 Nov 2010 9 Comments

These are all feet used by straight stitch Singer sewing machines.
1: Four-position Ruffler (Simanco 86642)
2: Two-position Ruffler (Simanco 120290)
3: Tuck Marker (Simanco 36583)
4: Stoppax Hemstitching Fork
5: Rolled Hemmer (Simanco 35857)
6: Hopping Foot (Pfaff 80251)
7: Gathering/Shirring Foot (Simanco 121441)
8: Low shank, multi-slot binder with guide pins (Simanco 160359)
9: Standard issue binder (Simanco 121464)
10: Multi-slot binder (Simanco 55414)
11: Quilting Guide & Foot (Simanco 35932)
12: Adjustable Hemmer (Simanco 35931)
13: Zipper Foot (Simanco 121877)
14: Hinged, narrow zipper foot (Simanco 161127)
15: Cording foot and for use with 16-21 (Simanco 25510)
16: Quilt Guide (use with 15) (Simanco 25515)
17-21: Hemmers (use with 15) (Simanco 25509, -11, -12, -13 & -14)
22 & 23: Seam Guide & bed screw (Simanco 25527)
24: Underbraider (Simanco 121547)
25: Hinged straight stitch foot (Simanco 45321)
26: Darning foot (Simanco 171071, cannot be used with Featherweights unless thread cutter is removed)
27: Edge Stitcher (Simanco 36865)
Copyright of the blog owner 2010
07 Nov 2010 Leave a comment
This machine is perfect where space is at a premium. 9 ½ inches long (15” with the extension flap down) it can be picked up and moved with one hand, weighing only 11lb. It is made, I believe, from cast aluminium (or similar, light alloy). It packs away snugly into a very compact 14 x 10 x 8 inch case, making it very easy to transport and the hard case, leather-bound, is smart and offers excellent protection against knocks and bumps.
Because it is a low-shank, side-clamping machine it uses standard Singer feet. The 222k has a shorter distance between the face plate and the needle bed than say, a 201k (2” compared to 2 ½ “). It also features the twin thumb screw holes in the bed which allow it to use industrial attachments.
Unlike its elder sister the 221, the 222k can drop its feed dogs, allowing for free-form embroidery. The other main difference is that the 222k has a free-arm facility. The free arm circumference is an extremely dainty 7” (that of my Bernina 830 Record measures 9”) making it perfect for setting the relatively small cuffs in childrenswear.
Stitches are restricted to straight stitch only, plus reverse, but are of a quality and evenness which is scarcely seen in modern machines. Stitch length may be anything between 6 and 30 stitches per inch, with increments marked at 6, 7, 8, 10, 12, 15, 20 and 30.
The bobbin is mounted vertically across the end of the machine. It is very slim, so holds less thread than a standard one.
There are two levers on the front of a 222k; one to switch between “sew” and “darn” (to drop the feed dogs) and the other to alter the stitch length with increments as previously noted. The free arm is obtained by loosening the thumb screw at the base of the pillar and gently easing the flat bed section to the left.
The standard foot pedal is the Singer button type, which is not particularly easy to control so we have, on mine, rewired the plug to a new, clam-shell foot pedal. We also replaced the main flex and checked the wiring in the motor (well ok, I say “we” – my husband did it).
The 222k uses standard, domestic needles. The harp is 5” long by 4” high. For comparison, my 201k is 8” x 5 ½ “and my Bernina 7 ¼ “x 4 ½ “). In use, the machine is both smooth and quiet. It has an extremely good lamp, mounted at the front of the machine that takes an easily sourced, low-wattage bulb.
I wouldn’t recommend the 222k for heavy, frequent use but as a machine for domestic dressmaking, general repairs and light upholstery such as piecing together patchwork then I can’t think of another machine which is so small and gives such pleasure in use. Mine dates from 1957 and I have owned it for a couple of months now.
Dimensions: 15L x 7D x 10H inches (9 ½ “L when using as free arm). Weight: 11lb (5kg).

The 222k in freearm mode, shown next to a 201k for size comparison.

Like its stable mate the 201k, the 222k gives a wonderful straight stitch, evenly tensioned and consistently formed.
Copyright of the blog owner 2010
07 Nov 2010 7 Comments
Reputed to be the best machine Singer ever made, I find it hard to argue. I own three; all electric, although I suspect that one of these has been adapted to electric from being (I suspect) hand-crank. This third one also features a knee-lifter bar which the others do not. They date from 1949, 1952 and 1954 and were acquired between four months ago and last weekend.
A real workhorse, the 201k is all cast metal, a standard low-shank, side clamping machine which uses standard machine needles, bobbins and Singer feet. It has an unusually long harp, measuring 8” long by 5 ½ “high which makes it particularly sought after by quilt makers. It is a straight-stitch only machine, plus reverse. The stitch length is changed by a sliding lever on the front of the machine, with increments marked at 6, 7, 8, 10, 12, 15, 20 and 30 stitches per inch. If the lever is pulled above the centre line (which is marked) the machine sews in reverse.
The 201k also features a varnished wood extension flap which neatly clips onto, and folds down from the wooden base in which the machines are housed. The machine tilts out of this base to reveal the thumbscrew which, by two possible positions, controls dropping or raising the feed dogs.
The stitch quality is exceptional; perfectly formed, even and straight. If you do a lot of top stitching, then you should be settling for nothing less than this.
Usually a fair few accessories, feet and attachments are included in the sale of these machines but spares and replacements are extremely easy to source and also very cheap. Twin screw holes in the bed also allow it to use industrial attachments such as hemmers, bias binders etc. The quality of the original, Singer attachments is exceptional and they are well worth seeking out in preference to their modern counterparts. Indeed some do not, to my knowledge, have a modern counterpart; the tuck marker being one example. The ruffler, in particular, is very smooth and not at all clattery (as I believe the modern ones sometimes are) and there are three different types of bias binder foot. There are also buttonholers and zig zag attachments available although I have read mixed reviews on their efficiency and would suggest that they (like the monogrammer attachments, for which the pattern cams are difficult to obtain) are for purists only as most of us would have a second, more modern machine with zig zag and buttonholes included.
The addition of a new, clam-shell foot pedal is an improvement as it is easier to regulate the speed than with the original, button activated one.
The Singer 201k was also manufactured as a hand-crank and a treadle. A conversion in either direction is easy, a conversion to hand crank being especially easy if the machine already possesses the larger, spoked fly wheel although hand conversion kits are hard to source in the UK they may be obtained from a US seller on e-bay. It is my intention to eventually convert one of my three into a hand-crank. There are also two distinct styles of casting. The older one is the typical, antique Singer style, black with gold decals and a large, spoked fly wheel. The newer models were much more streamlined in shape, with a smaller fly wheel and no decals. They were available in black or a pinkish tan. The end plates may differ too, being embossed either in scrollwork (which is my favourite) or else with art deco-style vertical stripes. The newer models vary only in the casting; both offer the same functionality and smooth, even stitches. It has an extremely good lamp, mounted at the rear of the machine that takes an easily sourced, low-wattage bulb and provides very good illumination at exactly the right position.
When not in use, the 201k packs away into a 21 ½ x 14 ½ x 9 ½ “ suitcase, formed of bent ply and covered in mock-crocodile ‘leather‘ with metal reinforced corners. It is certainly designed to withstand knocks although with the machine inside it you may need to engage the help of a strong man to carry it out to the car!
The 201k remains my favourite, all round sewing machine although it is very heavy indeed and therefore not easily portable. It astonishes me that they can be obtained for so little money. When I next make curtains or loose covers, of all the machines I own, this will be the one I choose for the task. It is smooth and quiet to use and like my 222k, a joy to run.
Dimensions: 20L x 8 ½D x 12H inches. Weight: about 26lb (12kg).

A 1954 cast alloy 201k and a scroll-fronted 1949 cast iron 201k, both electric.

The 201k gives a beautiful, well tensioned and accurate straight stitch.
Copyright of the blog owner 2010
07 Nov 2010 14 Comments
I chose my vintage Bernina 830 Record because it offered exceptionally good value for money. It dates from around the late 1970s/early 1980s and I have had it about four months. Bought to replace my faithful, metal-bodied, 25-year-old Brother Compal Ace whose circuit board had become corrupted I had a clear view of my needs and wants but despite trying quite a few modern machines I was not satisfied with the quality of either the machine or the stitch. Even the Bernina 220 did not offer, in my opinion, the stitch quality I expected from that name so I decided to follow the vintage route and buy a Bernina whose stitch I could trust to be exceptional.
I was not disappointed. For £200 less than a new 220 and half the price of a new 1008, I got exactly what I expected: an enormously satisfying attention to detail with the build quality – smooth lever action in attaching the flatbed, a ball bearing snap-fastening for the bobbin cover and absolutely no sign of a plastic presser foot lever. There is a metal knee-lift lever too, which slots into a hole below the bottom of the pillar. The machine is mainly metal bodied; the cover for the motor (which is mounted at the back of the pillar) is plastic, as is the end plate, the fly wheel, the knobs and the section at the back holding the spool pins but in all the parts which are functional rather than decorative, this machine is cast metal which gives both longevity and stability when sewing. This machine won’t judder off the table when you’re sewing a fast seam.
Extremely intuitive to thread and to use, the controls are simple and self-explanatory. Stitch length (0-4mm) is controlled by sliding a lever on the pillar and then twisting the lever knob to secure it in position. Above this are twin dials; one for selecting the zigzag width (0-4mm) and the other for choosing the appropriate stage on the five-step button hole. There are five different needle positions (chosen via an inner knob on the zigzag dial). Tension is self-adjusting but may be manually overridden using a wheel on the top of the machine. The feed dogs are dropped by simply switching a dial at the base of the pillar. The harp measures 4 ½ “ high by 7 ¼ “ long.
As well as the usual straight zigzag and buttonhole, the 830 offers 5 utility stitches, named “overlock”, “stretch”, “universal”, “running” and “blind”. Universal and running are both a variation on a zigzag. In addition to these, there are 15 decorative satin stitches which may be worked in a continuous row or else as single motifs. There is a small window in the machine body which displays the point in the stitch cycle so one can get ready to stop when the cycle (and thus the motif) is complete. The switch between straight and decorative stitch is made by pushing a lever on the top of the machine next to which is a second lever which switches between the different pattern cams by pushing the lever to the right to release it, sliding it up or down before releasing it to spring into position alongside the appropriate pattern icon.
The stitch quality is exceptional; neat, well-formed and perfectly straight. The machine takes standard, domestic needles and as it is a zigzag machine is also capable of heirloom-style stitching using twin and also wing needles.
There is a small hole in the needle bed through which may be drawn up a cord (or gimp) for corded pintucks, and also the twin screw holes to the right of the needle which allow industrial hemmers, folders and binder attachments to be used. These give a much better finish than the foot versions and are easier to control.
On the subject of feet, the authentic ones are indeed expensive but are very good quality and it is usual for these machines to be sold with a good few feet along with it: 7 is usual; 9 a real bonus. In any case, it is possible to re-use existing feet you may possess simply by purchasing a shank adapter for about £7. This will allow you to use both screw-on and snap-on feet. I believe that both high and low shank versions are available. Care should be taken when buying new Bernina feet to be certain that those purchased are compatible with the vintage Berninas. The newer models take a different foot but a good stockist such as Bambers will always be happy to advise and offer support.
This is the machine I use for fine finishing on my baby and toddler wear garments as the stitch quality is fantastic.
Dimensions: 388L x 182W x 315H mm. Weight 20lb (9.15kg). 1200 spm. 85W motor.

The straight stitches on the Bernina 830 are consistently even-tensioned, well-formed and (most important of all) straight.

The range of stitches for the Bernina 830 is just right for the serious sewist.

The satin stitches are extremely nicely formed.
Copyright of the blog owner 2010
07 Nov 2010 3 Comments
The faceplate, fly wheel and knobs are plastic; the main body is all cast metal, which gives excellent stability in use.
The 334D takes normal sewing needles, which is useful.
It has differential feed, adjustable foot pressure and cutting width is adjusted by a knob to the right and beneath the edge of the cloth plate.
Stitch length and differential feed are adjusted by knobs on the right hand side of the machine and subject to the usual tweaks and trial runs I have achieved extremely good results on both heavyweight and light, dress-weight cottons. All in all it is an extremely amiable machine; a pleasure to use.
Stitch length is between 0.8 and 4mm. Seam width is between 3 and 7mm on 3-thread and 5 and 7mm on 4 thread overlock. It sews at up to 1500 spm. Dimensions are 300W x 325D x 300H mm. It weighs 16lb (7.5kg).

Bernina Bernette 334D

Colour photo showing the colour coded thread paths and diagrams which make this such an easy machine to thread up.
Copyright of the blog owner 2010

You must be logged in to post a comment.